Happy Halloween – last card

halloween backdrop wm

Hello Everyone,

The day has come, it is Halloween and I am showing you my last card this year in the Last Minute Halloween Card-series. It was a fun week full of cards and bright colours 😀 I cannot deny myself 🙂

20171031_161828 wm

For the last card I used Lawn Fawn and Clearly Besotted images, coloured with Copics and fussy cut.

20171031_161930 wm

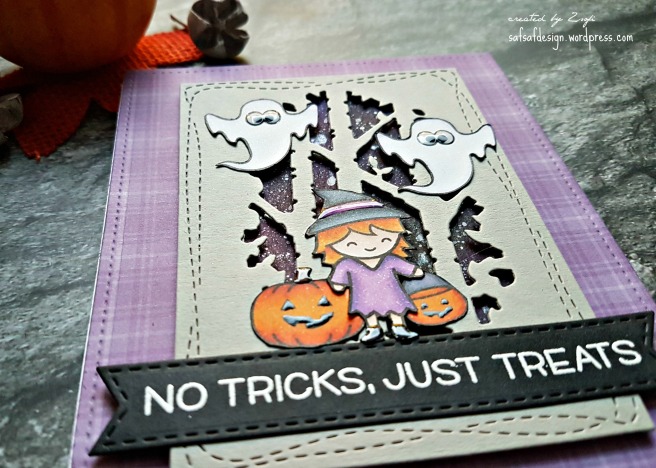
To build my scene I made a galaxy background first with watercolours and white acrylic paint. It is not showing much, only when you take a closer look. I also die cut a birch tree die (SSS) within a wonky stitched rectangle, which I popped up on the background using 3D foam tape. I die cut a large stitched rectangle from a purple plaid paper (Lawn Fawn) and adhered my scene on this.

20171031_161900 wm

The sentiment is from the Happy Howl-o-ween Lawn Fawn set, I white heat embossed it on a stitched black banner.

20171031_161908 wm

I used Wink of Stella clear shimmer pen (a bit less sparkly than the Spectrum Noir one) on the ghosts and the dress of my cute witch. I also emphasized some details with a black glaze pen and glossy accents.

20171031_161853 wm

I will upload this project to the Simon Says Stamp Wednesday Challenge Anything goes.

I hope you enjoyed my card series, I am thinking of doing the same soon for Christmas. Let me know in the comments below if you were interested! I appreciate your feedback so much!

Have a lovely fright night and Happy Halloween!

Zsofi

Clean and simple Christmas

Hello Everyone,

I am popping in with a clean and simple Christmas card inspired by the almost closing MFT Sketch Challenge #356.

20171031_083534 wm

I stamped and coloured images from several MFT sets (Beast Friends and Ewe are the best) and die cut them with the coordinating dies. I took a piece of patterned paper (Echo Park) and ran it through with a stitched rectangle die from a Blueprints set. I also die cut a stitched banner from dark chocolate cardstock to hold my sentiment.

20171031_083547 wm

I white heat embossed Happy Christmas from a small Simon Says Stamp set, where the fonts were bold enough to fill the space.

20171031_083605 wm

After adhering everything, I used a Spectrum Noir shimmer pen on the present and the Santa hat, and added some glossy accents. A few Doodlebug enamel dots finished this simple but cute card.

20171031_083555 wm

I will upload this to the current MFT Sketch Challenge #356 and Simon Says Stamp Monday Challenge: All creatures great and small.

Hope you got inspired and will be back soon again,

See you,

Zsofi

Last minute Halloween card series – Day 7 – costume party

halloween backdrop wm

Hello Everyone,

This is my second post today, as I promised you Halloween cards until Halloween. So this is the last but one.

20171030_160109 wm

I had the Newton’s Nook Designs Newton’s Costume Party set and didn’t have the chance to use it before. I wanted something rather simple, but could not decide which costume to feature. So I came up with a design which fits 3 in one card.

20171030_160335 wm

I started with stamping and colouring the kitties and costumes, I used Copics and the coordinating dies to cut them out. Then I took a black stitched strip of cardstock and added a stitched scalloped green mat to it. After that I die cut 3 windows and placed my kitties in them. I backed it with a piece of vellum to mute down the background as the paper I chose was very vibrant.

20171030_160329 wm

I white heat embossed a sentiment on a piece of bold coloured patterned paper (Doodlebug Booville collection still) and gave it a light blue stitched at before I adhered it to an A2 sized card base.

20171030_160146 wm

A little bit of Spectrum Noir shimmer pen and glossy accents were needed to make this cute card even more special. I also used a black glaze pen on the eyes of the ghost costume.

I will upload this project to the Simon Says Stamp Monday Challenge All creatures great and small.

Newton

I hope you like it and will return for the last card in my series tomorrow.

See you,

Zsofi

Christmas card and tag set

Good morning,

As it is Monday, I will have a little break from Halloween cards now and show you something special I made for Jana’s pulmonologist. It was totally inspired by the current Inky Paws Challenge #58 , that sketch gave me the idea of putting a circle tag on a card.

Image may contain: text

I made a gift set, including 2 cards and 4 tags:

20171025_141959 wm

I started with stamping the pretty ornament from the Newton’s Nook Designs Beautiful Baubles stamp set along with a circle sentiment from Simon Says Stamp on Copic friendly cardstock. I die cut it with a circle die and put it aside. I made several of these (more than I show here as I want to try more colour combos later), my stamp positioner was a great help with this.

20171025_142322 wm

Then I looked for patterned paper. I am addicted to Doodlebug Designs paper pads and still have plenty sheets from last year too. I chose one in colder colours and one more pinky-red. I cut them down to fit the front of an A2 sized card. I also chose coordinating cardstock scraps and die cut a stitched strip.

20171025_142201 wm

Then I coloured the ornaments in coordinating colours. It is much easier for me to select the patterned paper first and the colour accordingly, I almost all the time do this. I added some Spectrum Noir shimmer and glossy accent on the top.

20171025_142222 wm

While it was drying I made some scalloped circle mats in coordinating colours, and backed them with a white one. I like to have my tags sturdy, the look more high quality this way. I poked a tiny hole on the top of the stand-alone tags and threaded through some silver string.

20171025_142327 wm

I adhered the cards together using 3D foam tape under the tags. I also die cut tiny bows (Pretty Pink Posh) from silver cardstock and glued them on the ornament with a drop of Ranger Multi Matte Medium.

20171025_142359 wm

A tiny little gemstone in the middle finished this cute set off.

20171025_142250 wm

I will link this project to the Simon Says Stamp Wednesday Challenge Anything goes.

Newton

I hope you like my project, and got inspired. Come and play along with us at the Inky Paws Challenge till Friday 3rd Nov for a chance to win a 20 USD gift certificate to the Newton’s Nook Designs online store.

Hope to see you there,

Have a lovely week,

Zsofi


Last minute Halloween card series – Day 6 – more Love Cynthia

halloween backdrop wm

Hello Everyone,

If you ever tried one Love Cynthia stamp or digi stamp, most probably you share the addiction I have. The images are super cute, and I could not resist, had to buy the other Halloween digi too.

20171024_085214 wm

I printed them on Copic friendly paper and coloured them with Copics. Then fussy cut them out. I stencilled some cobwebs to Bristol Smooth cardstock with Hickory smoke distress ink and cut the panel in half. In this way I had enough materials to make 2 very similar cards.

20171024_085221 wm

I die cut a postage stamp frame (Avery Elle) from white cardstock and adhered to the stencilled panel. I stamped the sentiment (SSS set) in black and adhered the images. I covered an A2 sized card base with pretty patterned paper from the Doodlebug Booville collection and popped up the framed piece with 3D foam tape.

20171024_085239 wm

I had to do the usual magic: a bit of Spectrum Noir shimmer pen, gold and white gel pens, and glossy accents. I added this to the Boo sentiment too, I love the raised look it gave.

20171024_085311 wm

20171024_085321 wm

I hope you like my cards, there are still 2 days till Halloween 😉 Come back tomorrow for more fun!

Hope to see you,

Zsofi

Last minute Halloween card series – Day 5 – stickers again

halloween backdrop wm

Hello Everyone,

I am back with a quick share as it is really running late here. I still have plenty of stickers from the Doodlebug Booville sticker collection and they are simply too cute not to be used. So I decided to make mini scenes on tags with them.

20171024_085728 wm

I started with die cutting several tags (MFT Blueprints) from white cardstock and the tag fronts from black cardstock. I sponged some distress ink on the white ones, sprayed them with water and dabbed it off with a paper towel. I die cut little banners from white cardstock and stamped a sentiment in black on them.

20171024_085904 wm

I assembled the tags, popped up the sentiment banner with 3D foam tape and added the cute stickers to make the scenes. I added some black and white ribbon and tied a silver bow on them.

20171024_085935 wm

I prepared the card bases from heavy weight white cardstock and added strips of patterned paper on their left side. I also added a thin strip of glitter paper next to it and covered up the joining lines with a colourful stitched strip (Lawn Fawn Picket Fence die).

20171024_090001 wm

I adhered the tags using 3D foam tape and I had 3 cards done in short time.

I hope you got inspired and will pop in again tomorrow for more fun.

See you,

Zsofi

Last minute Halloween card series – Day #4 with Newton’s Nook Designs

halloween backdrop wm

Hello Everyone,

Today I brought a card which needs a bit more time to prepare but a lot of parts can be easily replaced with less technique oriented solutions which can save some time.

I definitely wanted to use the adorable Halloween set from Newton’s Nook Designs Newton’s Boo-tiful night. I could not decide though which pumpkin image to use so I created a design which fits them both 🙂

20171001_155010 wm

I started with stamping the images on Bristol Smooth cardstock and used my Zig Clean Colour Real Brush marker to colour them in. Then I fussy cut them (no coordinating dies unfortunately) and ran a Memento black marker around the edges for a more finished look.

20171001_155107 wm

I had another piece of Bristol Smooth cardstock, I created a circle mask for the moon and sponged Wilted Violet and Black soot distress inks on it. When it was all done, without removing the mask I applied silver glitter  embossing paste through the Starfield stencil. I set it aside to dry, meanwhile I inked up a scrap piece of cardstock with Black soot distress ink and die cut 2 grass borders. I sprinkled them with water for a more textured look. I also die cut a white picket fence (Lawn Fawn die) to add more dimension to my scene.

20171001_155021 wm

When the background was dry, I removed the mask and used Black soot distress ink (really watered it down) to add texture to the moon. I was impatient and dried it with my heat tool, so I could stamp the sentiment and the bats on it with black ink.

After I assembled the card, I added some glossy accent to the eyes and mouth of the pumpkins.

20171001_155034 wm

I will upload this project to the Cat Lovers Blog Hop and to the Simon Says Stamp Wednesday Challenge Anything goes.

Newton2017 Cat Lovers Hop Badge

I hope you like my card and will come back tomorrow for more Halloween fun.

See you,

Zsofi


Last minute Halloween card-series – Day #3 Create with stickers

halloween backdrop wm

Hello Everyone,

I am back with another simple but cute card design for the upcoming Halloween. If you are like me, then you also have a huge collection of stickers and patterned paper which you never really use. Ok, from time to time, but there is still plenty left. Today I brought some inspiration to use some of those cute stickers (not all of course, I would never do that) 🙂

20171024_085437 wm

I have recently bought the Doodlebug Booville stickers along with the paper pad, which is great as the designs work perfectly together. All I had to do is to choose a patterned paper with cute spiders on it, cut it to fit the front of an A2 sized card. I die cut a stitched rectangle from dark grey cardstock and also a spider web in the middle of it (Memory box die). I backed it with a white piece of cardstock.

20171024_085612 wm

I adhered 2 little spider stickers to the web and the colourful Halloween sentiment sticker under it. All I had to do is to heat emboss Happy above it in white.

20171024_085623 wm

 I popped up the panel with foam tape to have some dimension and my cute Halloween card was all done. Perfect for people who are not afraid of spiders (I am totally scared of them but this card would still make me smile).

20171024_085604 wm

I hope you will check now all your stickers and make some quick and easy cards with them.

I will upload this card to the Simon Says Stamp Wednesday Challenge Anything goes.

If you like this post, please subscribe and come back tomorrow for more Halloween fun.

Hope to see you,

Zsofi

Last minute Halloween card-series – Day#2 with more Love Cynthia

halloween backdrop wm

Hello Everyone,

I am back today with the second card I created with the adorable digi stamps from Love Cynthia. I used the same set just another image from it.

20171024_085031 wm

I started with printing and colouring the cute pumpkin girl with Copics. I fussy cut her out along with the other pumpkin as I wanted her to sit on top of it. I glued them both on a stitched white tag (MFT Tag Builder die) just left a little space in-between for a sentiment. I added orange organza ribbon tied with black-white twine.

20171024_085143 wm

I chose a pretty pumpkin paper from the Doodlebug Booville collection and adhered it to a white card base. I die cut 3 stitched stripes from black shimmer paper and laid them across the card. I added a lime green rectangle mat to my tag and popped up a small sentiment (cut out from one of the papers from the Booville paper pad).

20171024_085051 wm

A bit of Spectrum Noir shimmer on the pumpkins, black glaze pen on the mouth and eyes and glossy accent on the leaves finished this simple but very cute card design.

20171024_085122 wm

I love the way it turned out, I think I will re-make this card with a Christmas scene soon.

I will upload this project to the Simon Says Stamp Wednesday Challenge Anything goes.

Hope you got inspired and will check back tomorrow for Day 3 of my Halloween series.

See you,

Zsofi


Last minute Halloween card series – #1 watercolour with Love Cynthia digis

halloween backdrop wm

Hello Everyone,

I have been busy in the last few days catching up on Halloween cards. Personally I don’t celebrate Halloween, but I love all the cute stamps and dies available. And I also have some crafty friends who celebrate at the end of the month. So I put together a mini series of Halloween cards made in the last minute. Every day from today till Halloween I will post one spooky-cutie card. Hope you will like this and get inspired, it is never too late to make a card 😀

20171024_133549 wm

For Day1 I made a card with the newly released digi stamps from Love Cynthia. If you are not familiar with the Happy Girls, you have to check out her website. I printed and coloured the cute witch with Copics, fussy cut it and added some extra details: black glaze pen on the eyes, Spectrum Noir shimmer pen on the hat and dress and some glossy accent on the pompom and broomstick.

20171024_133652 wm

I created a simple watercoloured background with a twist I learnt from Jennifer McGuire: after applying the watercolour (Gansai Tambi in my case) I sprinkled it with different types of salt crystals and let it dry. After drying I rubbed off the salt and I was left with a gorgeous textured background.

20171024_133612 wm

I die cut a spooky fence from black shimmer cardstock (MFT farm fence die) and a white circle as the moon. I also ran the background through the Big Shot with a stitched rectangle die. Before adhering the moon, I sponged some white pigment ink in the area where I wanted to glue it to get a halo effect.

20171024_133600 wm

The sentiment is from a Lawn Fawn set, white heat embossed on a stitched black banner. I mounted this on a white card base.

20171024_133702 wm

Relatively simple and fast card, with not many layers.

I hope you like it and will pop in tomorrow again for the next card.

See you,

Zsofi