I have a cute birthday card for you today featuring stamps and dies from Heffy Doodle. I love how the different sets coordinate! I mixed up some older and newer stamps on this adorable design.
I created a Distress Oxide inked background using Salty Ocean and Blueprint Sketch Oxide inks and an ink blending tool. I added some Tsukinko Shimmer Spritz droplets and also splattered some white acrylic paint all over for a textured look.
Then I used the Silver Lining Cloud border dies and cut it from white and also from silver glitter cardstock. I layered them on top of each other tiny offset. I love the little silver lining we get in this way!
I assembled the card and popped up the cake with the two fairies with 3D foam squares. I added Diamond Stickles to the wings of the fairies and the flame of the candles and covered the frosting on the cake with glossy accents. It looks so yummy in real life!
I also scattered a few silver jewels from Studio Katia on the cloud border.
I started with blending Distress Oxide inks on a white top folding card base: Candied Apple, Worn Lipstick and Spiced Marmalade. I spritzed it with water for a textured look and dabbed it off after 30 seconds with a paper towel.
I made sure the panel is dry and arranged some of the sentiments from the Just because stamp set in my stamp positioner. I stamped them with the same Distress Oxide inks several times so they are darker than the background. I love the tone on tone effect so much!
I heat set it with a heat tool as I wanted to white heat emboss the main sentiment and I did not want the powder to stick to unnecessary places. To make the sentiment pop even more I repeated the stamping-embossing part. It is more dimensional this way.
I did not want to distract the attention too much, so I decided to use mini white flowers as embellishments from the Spring Wreath decor die set. I cut out a bunch and scattered them all around the card. As a finishing touch I adhered a mini silver Glossy Dot in each flower center. One layer card but so special thank to the pretty background and the little flowers.
I hope you got inspired and will give this a try. Until next time, happy crafting!
A sweet friend of mine was invited for a wedding party today and asked me to make a card for the happy couple. I love to make wedding cards, it always cheers me up when I can create cute wedding scenes.
I have recently got my hands on the Heffy Doodle Happily Ever Crafter stamp and die set and I also received the free Hay there stamp and die set. I could not wait to use them together! I stamped and coloured them with Copic markers and used their coordinating dies to cut the images out.
For the background I die cut the Lawn Fawn Vertical Stitched cloud backdrop from Neenah Solar white cardstock and added a bit of Tumbled glass Distress Ink with a small blending brush. I love the texture I got with the stitching details and a bit of soft colour.
I assembled the scene, adhering the hill and grass first and then the trees and the cart. I adhered the bride on the horse and popped her and the groom up with 3D foam squares.
The sentiment I stamped on a thin strip of vellum using black Staz-on ink and wrapped it around the background panel. Using double sided adhesive tape on the back ensures that no glue shows through the vellum on the front.
I also die cut the word Magical from gold glitter cardstock. I embellished the card with some gold jewels on the trees.
I added clear shimmer to the dress and glossy accents to the gold parts of the cart, the crown, the bow tie and shoes of the groom. I used a black glaze pen on the eyes to make them shiny.
I hope you enjoyed today’s inspiration and you will pop in again tomorrow for some more fun!
I started with stamping the balloons from the Paper Sweeties Happy cake stamp set on Neenah Solar White cardstock and die cut it with an Arch Tag die from Pink and Main. As the original tag would be too short, i made it longer with the partial die cutting technique.
Then I stamped the same balloons on the newly released Sparkle Sheets and fussy cut each balloon from different colours. I paper pieced the bunch of balloons and adhered the pieces with liquid glue.
I added some orange ribbon from Paper Sweeties to the tag and popped it up with 3D foam squares on a white card base covered with pretty patterned paper from the Summer Splash paper pad.
CARD #2
For my second card I stamped and coloured the images from the Paper Sweeties Happy Cake Day stamp set and used their coordinating dies to cut them out.
I cut the biggest Stitched rectangle die from white cardstock and also from patterned paper from the Summer Splash paper pad. I cut a small piece of the white one and silver heat embossed my main sentiment on it from the Special Day stamp set. I also stamped a smaller sentiment above it using aqua ink.
I assembled the card, added a thin strip of Silver Sparkle Sheet below the cake stand and used 3D foam squares to pop up the cake.
I decorated it with 7 candles (as Paper Sweeties are turning 7) and added finishing touches: covered the balloons with a clear shimmer pen for a subtle sparkle, used glossy accents on the frosting and decorations of the cake and also on the flames of the candles. And last but not least I added some pretty flower sequins from Paper Sweeties to the bottom and embellished their middles with tiny white pearls.
GIVEAWAY
To celebrate the occasion Pink and Main is generously giving away a $25 Pink and Main surprise package for one lucky commenter. All you need to do is to hop along with us and leave a comment at each designer’s blog to enter the draw. Winner will be announced on the 28th August on the Pink and Main blog. Start hopping at the Paper Sweeties Blog.
We have reached the final day of the sneak peeks at the fa-boo-lous August release at Newton’s Nook Designs. Are you excited? I hope you liked the last three days and are ready for getting in spooky mood. Today we are showcasing 2 Halloween stamps with their coordinating dies and fun new stencil. All of these will be available tomorrow, 23/08!
CARD #1
For my first card I stamped and coloured the adorable dogs from Happy Howl-oween with Copic markers and cut them out with the coordinating dies. I stamped a bunch of extra candies for building a cute garden scene.
The next step was to create the night sky background. I used the Clouds stencil on Bristol Smooth cardstock and Wilted Violet Distress ink. When it was done, I die cut the panel with my favourite postage frame die from Frameworks.
I also die cut a Fence from woodgrain cardstock and grass with a Land border die from black cardstock. I applied a bit of white pigment ink on the grassy border for a spooky look.
After adhering the background a black cardbase and attaching the fence and grass, I placed the dogs temporarily where they would be. I felt I wanted the sky to be more Halloween-y so I pulled out the Flying Bats stencil and used mini blending brush to add a couple of bats around the dogs with Black Soot Distress ink.
I partial die cut some speech bubbles from white cardstock to match the sentiments and popped them and the dogs up with 3D foam squares. I scattered the candies in the grass all around.
As a finishing touch I added a bit of clear shimmer to the wizard costume and the candies and emphasized some details with glossy accents and a black glaze pen.
CARD #2
For my second card I coloured the Witchy Newton set with Copic markers and cut it out with its coordinating die. I cut a lime green and a slightly wider purple piece of cardstock, adhered them together and tore a piece of vellum which was tiny taller so I could wrap it around the coloured cardstock piece. I added strong tape on the back of the panel to secure the vellum.
I stamped the sentiment with black STAZ-ON ink and adhered the cut out image under it.
I embellished the vellum with tiny silver stars and added some clear shimmer to the boot and glossy accents on some of the details.
The background for the focal panel I created on a black scalloped rectangle (Frames and flags die set). I masked off the stitching parts with purple tape and applied Thermoweb Pearl metallix deco foil gel though the new Ghost stencil. I love the pearlescent shine after drying!
I mounted the assembled panel on a dark grey card base to match the spooky feel.
GIVEAWAY
Would you like to win the “Witchy Newton” or the “Happy Howl-oween” Stamp Set? We will choose ONE lucky winner for each stamp set! Here’s how to win: comment on the NND blog and Design Team blogs (see list below)! The winner will be chosen at random from the collective reveal posts. Make sure to check out each of their blogs and comment for your chance to win. You will not know which blog has been chosen so the more you comment on the better your chances are of winning! You have until Thursday August 22nd at 9pm EST to comment — winners will be announced on the blog post on Friday, August 23rd.
Check out all the awesome Design Team Blogs below to enter:
I hope you liked my projects for the week and you got inspired. I would be so curious to know which is your favourite of this release! Let me know in the comments! And happy shopping for tomorrow!
I cannot believe that we are half way through the August release reveals at Newton’s Nook Designs! After some coffee and some Fall images we are introducing cute mice playing outside enjoying autumn weather. Autumn mice is a playful and adorable set which comes with coordinating dies.
I started with colouring all the images in the set, I even coloured some extra leaves as I knew I would build some Fall scenes which needed plenty of leaves. When I had everything cut out I was already sure I will end up with more than just one card.
CARD #1
For my first scene I die cut the Lawn Fawn Leafy Tree Backdrop Landscape die 3 times from dark brown cardstock. I also cut some grass and hills with the land border dies from yellow and kraft cardstocks. To make the images pop I used the Lawn Fawn stitched clouds backdrop on aqua cardstock.
I assembled the scene on an A2 sized white card base and layered the tree frame.
The sentiment I stamped on a grey banner (Frames and flags die set) and tucked it under the last frame.
I added the images and adhered a couple of leaves on the tree and on the grass too. I added white gel pen highlights, emphasized the eyes and noses with a black glaze pen and added glossy accents on the scarf and stems of the pumpkins.
CARD #2
My next project is a 4 bar card, where I used a couple of patterned paper from Lawn Fawn as a background for my mini scene. I used the same scene building elements as on the A2 sized card just this time I made a 3 layered dimensional frame using the Framework die set.
I stamped another sentiment from the set with brown ink directly on the background and popped up the mini scene with 3D foam squares.
I covered the cap of the acorn with glossy accents and used a black glaze pen on the eyes and nose of the mouse.
TAG
And last but not least I created a little tag using the Fancy edges tag die set. I like to make my tags thicker by adding an extra piece on the back. In this way I ensure the pretty finished look also.
I used some sturdy twine and yet another gorgeous sentiment from the Autumn mice set.
GIVEAWAY
Would you like to win the “Fall Fringe” Stamp Set? This stamp set will be given away to ONE lucky winner! Here’s how to win: comment on the NND blog and Design Team blogs (see list below)! The winner will be chosen at random from the collective reveal posts. Make sure to check out each of their blogs and comment for your chance to win. You will not know which blog has been chosen so the more you comment on the better your chances are of winning! You have until Thursday August 22nd at 9pm EST to comment — winners will be announced on the blog post on Friday, August 23rd.
Check out all the awesome Design Team Blogs below to enter:
I hope you are excited about the August release at Newton’s Nook Designs already! It is Day 2 and we are showcasing the awesome Fall Fringe stamp set. It does not have coordinating dies but matches the previously released Frames squared die set perfectly! Look at all the great sentiments! This new set will also be available on Friday, 23/08!
For my card I stamped the image with Chocolate Truffle Amalgam ink from Gina K Designs and used Copic markers to colour it. I love the bright colours also for Fall so I went with sharp orange, deep brown and striking green shades. I also coloured the middle of the stamp with a light blue marker to make the images pop even more! The sentiment I stamped with the same brown ink.
When I was done with the colouring, I cut along the edges of the stamp and matted it with a dark brown square. I die cut the scalloped square die from the Frames squared die set from kraft cardstock and layered it under.
I wanted to make this a standard A2 sized card, so I cut a strip of green patterned paper (Sunny Studio) and matted it with the same brown cardstock before adhering it to a textured cream card base.
I popped up the focal panel with 3D foam tape and added a bit of natural twine on the top – simply wrapped it around the card and tied a bow.
As a finishing touch I added glossy accents to the pinecones, the caps of the acorns and the stems of the pumpkins.
I love the shine!
GIVEAWAY
Would you like to win the “Fall Fringe” Stamp Set? This stamp set will be given away to ONE lucky winner! Here’s how to win: comment on the NND blog and Design Team blogs (see list below)! The winner will be chosen at random from the collective reveal posts. Make sure to check out each of their blogs and comment for your chance to win. You will not know which blog has been chosen so the more you comment on the better your chances are of winning! You have until Thursday August 22nd at 9pm EST to comment — winners will be announced on the blog post on Friday, August 23rd.
Check out all the awesome Design Team Blogs below to enter:
It is my second post today, if you are looking for my Newton’s Nook Designs August release Day 1 post, click here.
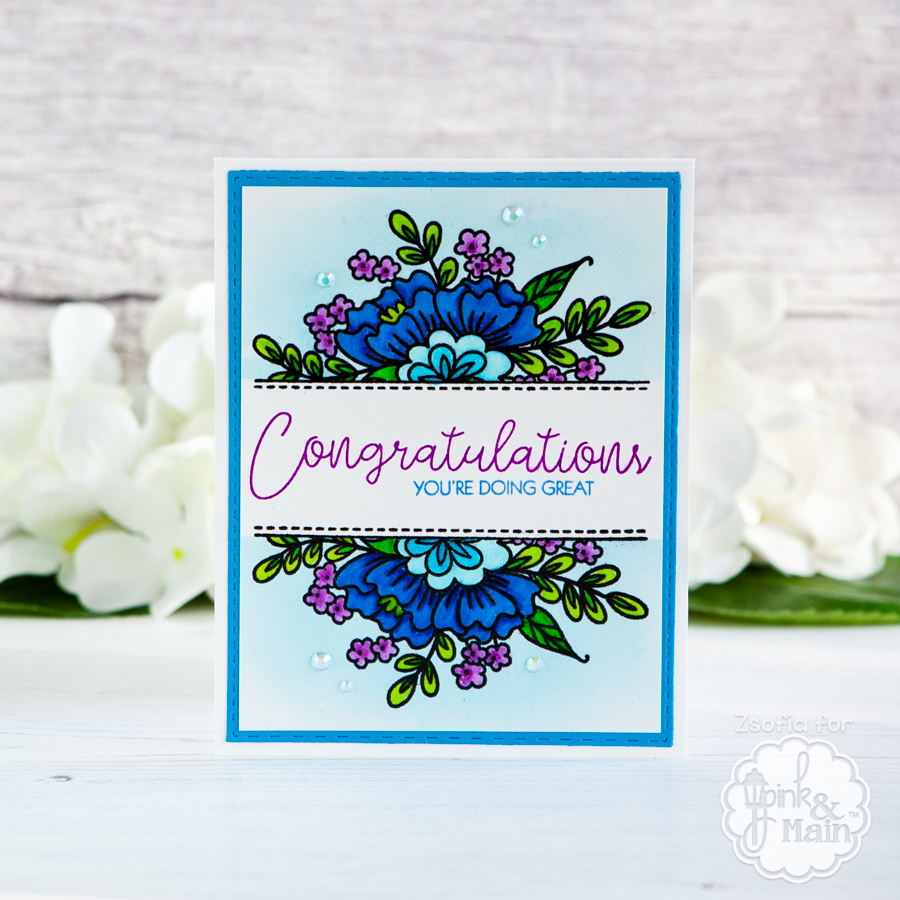
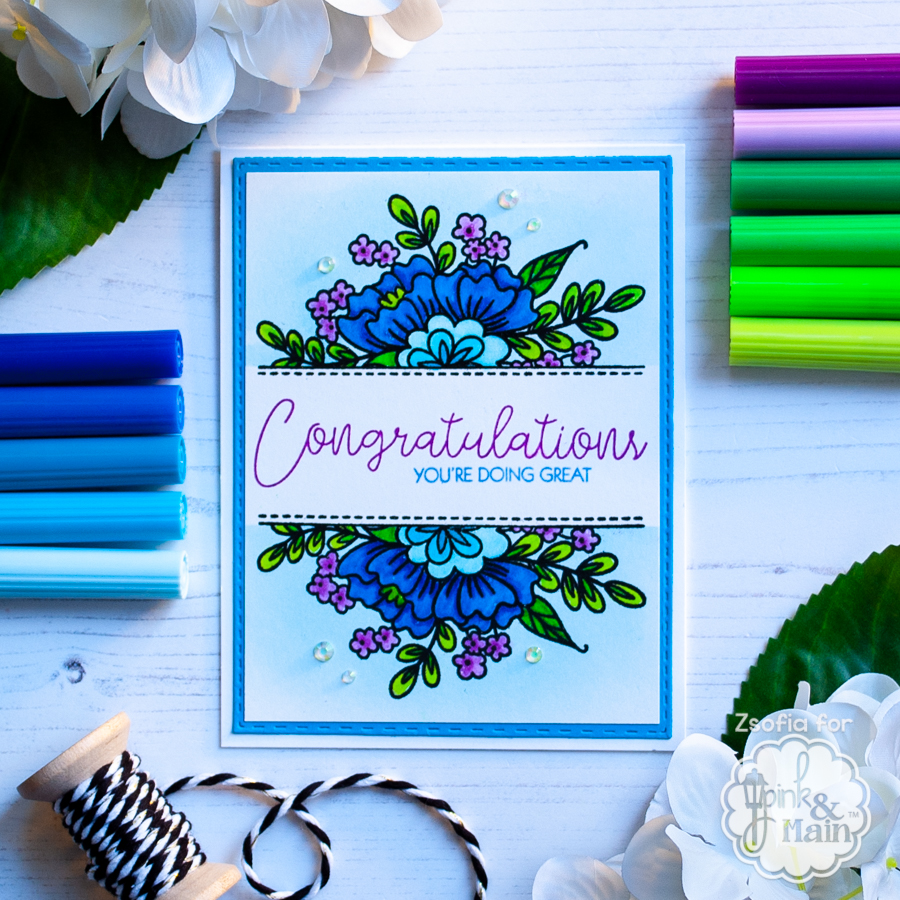
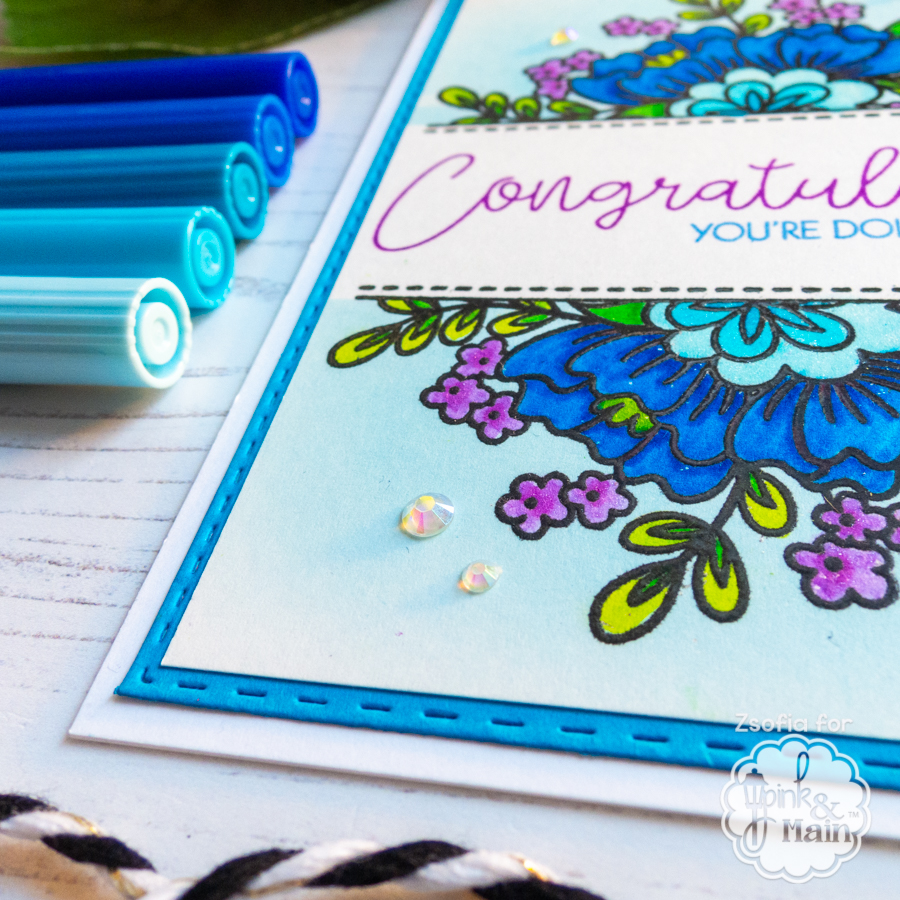
Now I am back with another sneak peek, this time at a wonderful sentiment set from the August release of Pink and Main. I created a pretty floral encouragement card. Who would not like to get one like this in the mail?
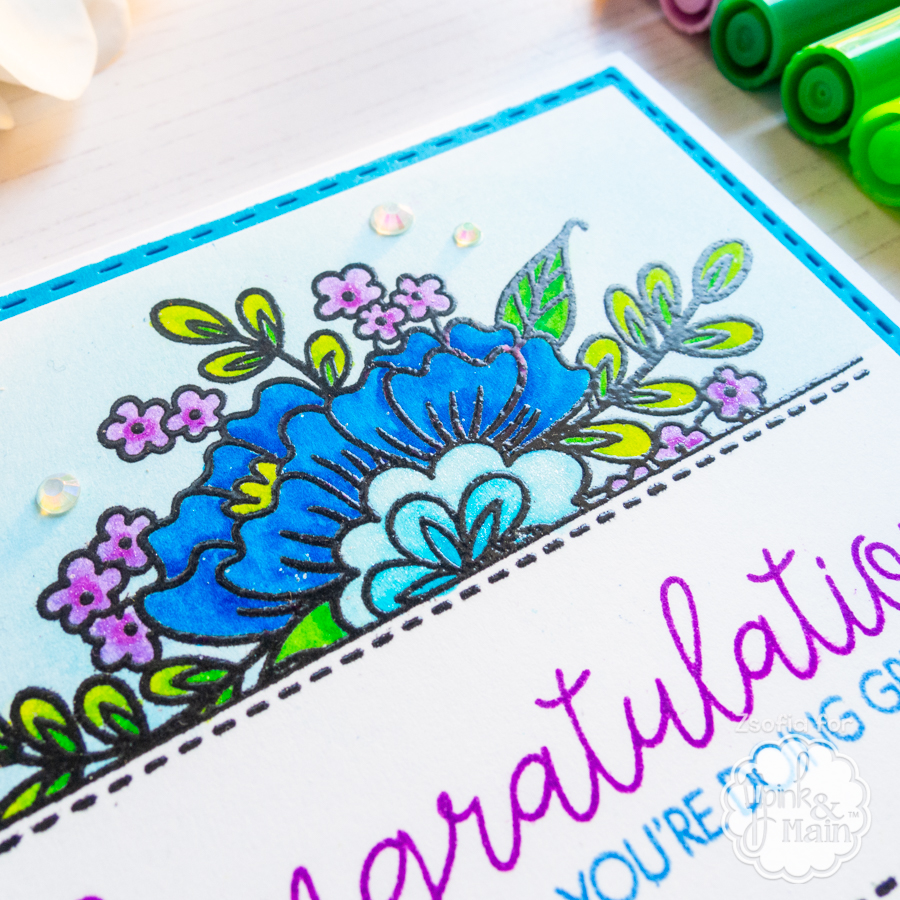
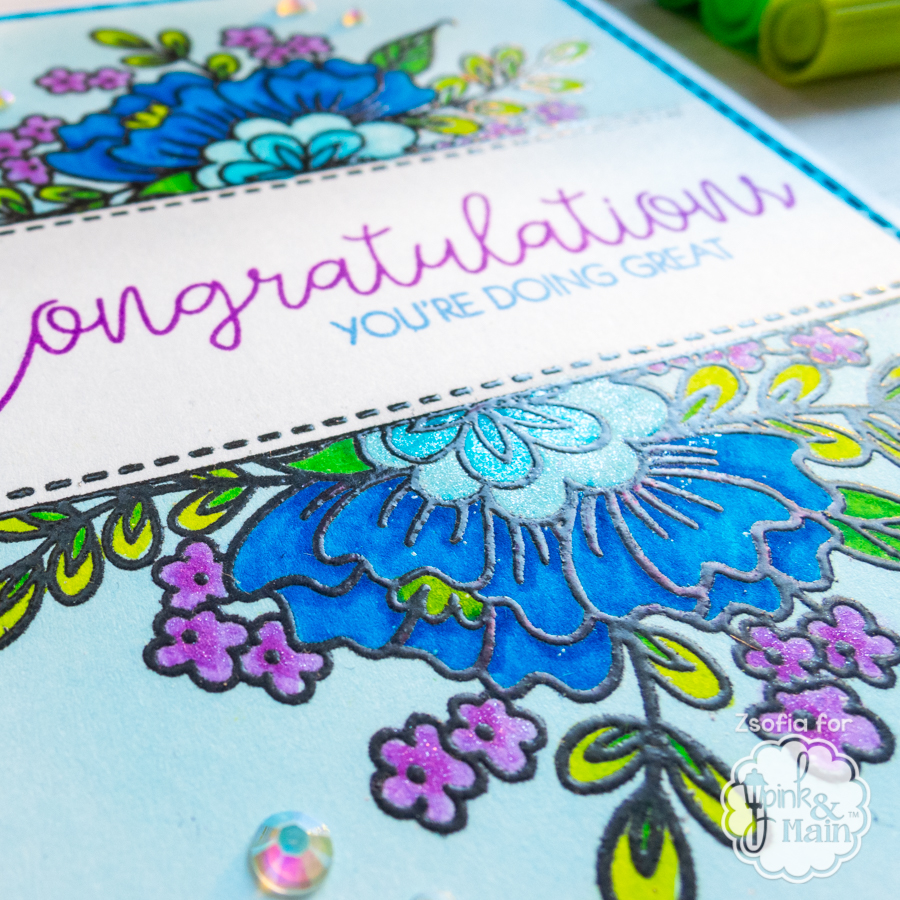
I started with stamping the florals on Bristol Sooth cardstock with Versafine Onyx black pigment ink and clear heat embossed it. You can skip the heat embossing part, I am just impatient to wait for the ink to dry and I love the raised shiny edges. It helps me with my colouring.
Before colouring I masked off the sentiment line with purple tape and applied Tumbled Glass Distress Ink with a small blending brush for a subtle background colour.
Then I used Tombow markers and a water brush to colour the flowers. I kept the colour family in the blue-green range. I also went back in certain areas with a clear shimmer pen to add some sparkle.
When it was dry, I stamped the sentiment with purple and blue inks and cut the panel down. I matted it with a Stitched Rectangle cut from blue cardstock and adhered it to a white top folding card base. I finished it off with a couple of iridescent jewels.
I hope you enjoyed today’s sneak peek at another gorgeous sentiment set. All new goodies will be available tomorrow, 20/08! Until next time, happy crafting!
I am super excited today as we are starting the absolutely “fall-tastic” and gorgeous August Release reveals at Newton’s Nook Designs. The first set we are showcasing is called Pumpkin Latte – yes, a coffee themed fall set! YAY! I just love the girl images and all the little extras to create little scenes. It also has coordinating dies.
For my card I stamped and coloured the images with Copic markers and cut them out with the coordinating dies. I am in love with those huge pumpkins!
It gives a pretty tone-on-tone textured look and matches the theme perfectly.
When it was dry, I added some rainbow plaid patterned paper (Sunny Studio) to the bottom of the card and accented it with a thin strip of dark brown cardstock.
After adhering the images in place with liquid glue, I used one of the banners from the Frames and flags die set to cut a dark brown flag. I white heat embossed a sentiment on it and added it on the top left corner of the card.
As a finishing touch I added some glossy accents to the stems, coffee caps and the pockets of her jacket. I love how cheerful this card turned out with the bright fall colours and the textured background.
GIVEAWAY
Would you like to win the “Pumpkin Latte” Stamp Set? This stamp set will be given away to ONE lucky winner! Here’s how to win: comment on the NND blog and Design Team blogs (see list below)! The winner will be chosen at random from the collective reveal posts. Make sure to check out each of their blogs and comment for your chance to win. You will not know which blog has been chosen so the more you comment on the better your chances are of winning! You have until Thursday August 22nd at 9pm EST to comment — winners will be announced on the blog post on Friday, August 23rd.
Check out all the awesome Design Team Blogs below to enter:
It is Zsofi here with a fun card which does not involve colouring but instead it is very dimensional thanks to the die cut layering.
I was absolutely inspired by the pretty yellow-blue patterned papers from the Puddle Jumper paper pad and I started with cutting out the strip with the anchors and roses. I die cut 2 mini scalloped borders from yellow cardstock and layered it under this elegant strip.
While I was die cutting, I also cut some tags for my layering using the Scalloped Rectangle frame set. I cut the base and the small one from white cardstock and the middle layer from an anchor patterned paper.
I also die cut 4 of the big stitched clouds (In a cloudy sky die set) from white cardstock and layered them under the scallop strip.
I decided that I needed a bit more yellow on the card, so I used the Plaid stencil and Lantern Yellow Hybrid ink on the card base to add some light, fade-out colour. When assembling the card, I used 3D foam squares to pop up the tag in the middle.
I hope you liked today’s inspiration and will give it a try. Die cut layering is a cool technique and easy way to add interest and dimension to an otherwise simple card design. Until next time, happy crafting!