Coffee first – CLBH #3

Hello Again,

I am back with yet another coffee themed card. I still have billions of ideas just not enough time. I still hope I can finish up at least one more before the Summer/Spring Coffee Lovers Blog Hop closes. We will see.

29541159_10216244462694822_8004581139974979584_n

CLBH2018_summer_09

So for my card today I used a stencil from Create a smile and added a rainbow of distress inks over it. I made sure to mask off a little edge on each side, so it is totally a one layer card.

CLBH2018_summer_10

I went over the stripes of the mugs with a clear shimmer pen to make it sparkly. When it was all dry, I stamped the sentiment from the Create a smile Coffee first stamp set with black ink and went over the word coffee with Glossy accent.

CLBH2018_summer_12

A few clear sequins from Pretty Pink Posh finished off my card for today.

CLBH2018_summer_11

I will also link this up to the Simon Says Stamp Wednesday Challenge Anything goes.

Thanks for stopping by and hope to see you soon again,

Zsofi


Our love is strong… – CLBH #2

Hello Everyone,

Another quick post on my second card for the Spring/Summer Coffee Lovers Blog Hop.

29541159_10216244462694822_8004581139974979584_n

CLBH2018_summer_05

I had this cute retro stamp from Create a Smile, which I really wanted to use for a long time. I stamped it on a strip of white, Copic friendly cardstock and stamped the sentiments next to it with black and dark red inks.

CLBH2018_summer_07

I coloured the image with Copics an added some glossy accents to the heart, handle and little know on the top of the coffee maker. My parents still have and use sg like this, just in silver.

CLBH2018_summer_06

I gave it an aqua mat and foam mounted it on a pretty patterned paper piece. A few red heart sequins finished off this simple design.

CLBH2018_summer_08

I hope you like my card and will pop in again for some more coffee themed ones this week.

See you,

Zsofi


Bearing gifts ft. Studio Katia New Release

Hello Everyone,

Last Friday & Saturday Studio Katia had a mega Blog Hop as their 2nd anniversary celebration. It was a blast and I could not stop making more cards with the new release.. Today I brought you a birthday card made with the new Kobi set. 

SKbloghop_11

I made a very vibrant birthday card. I used a dotted stencil to apply Abandoned Coral, Wild Honey and Mustard Seed distress inks on Bristol Smooth cardstock. After removing the stencil I went back gently with the same inks to cover the whole panel.

SKbloghop_12

I stamped and coloured the bear from Kobi Bearing Gifts using Copics. I used the coordinating die to cut him out and popped him on a Dotted Shaker tag using 3D foam tape. I white heat embossed the little sentiments on very thin black cardstock strips and adhered them to the tag. I used a piece of black gingham ribbon and white twine to complete the tag and mounted it on the background using 3D foam tape.

SKbloghop_13

The usual shimmer pen-glossy accent combo I used on the presents an added a few Gold Crystals to make it festive.

STUDIO KATIA NEW RELEASE

Studio Katia is celebrating their birthday with a new release, which includes 6 new Clear Stamp Sets and 4 sets of Coordinating Dies, 4 new stand alone Creative Dies, 2 new Stencils and new Embellishments! Check them out here!

BLOG HOP GIVEAWAY

Don’t forget that Studio Katia is giving away TWO $100 CAD gift certificates on each day of the Hop, winners will be chosen from the comments left on all blogs of the Hop! Make sure to leave all the comments by Saturday, June 2nd, 2018 11:59 PM EST. Please leave your comment on this blogpost if you want to enter the giveaway.

All winners will be announced on Sunday, June 3rd, 2018 on the Studio Katia Blog.

Hope you like my card for today and will return soon for more inspiration.

See you,

Zsofi


Sending Latte Thanks – CLBH #1

Hello Everyone,

A quick second post today as I am participating in the Coffee Lovers Blog Hop Spring/Summer and the Create a Smile Thank you Challenge.

29541159_10216244462694822_8004581139974979584_nCLBH2018_summer_01

I had a very simple and clean card design in mind, therefore I clear heat embossed the cup from the CAS Coffee First stamp set on a strip of aqua cardstock. I also heat embossed with the same clear embossing powder a sentiment from Honey Bee Stamps, in the middle I die cut the Latte word with its shadow from coloured cardstock. I layered 3 die cuts on top of each other for more dimension.

CLBH2018_summer_02

I coloured the image with Prismacolor pencils and added glossy accent to the heart on the mug. I gave this strip a brown thin mat, adhered it to a patterned paper, which also have a brown mat. Then I mounted it all on a kraft card base.

CLBH2018_summer_04

To finish off the design I stamped 3 hearts above the mug from the CAs stamp set using brown ink.

CLBH2018_summer_03

I hope you like this simple card design, perfect for guys too. I have some more coffee cards for the hop ready, so make sure to check back soon.

See you,

Zsofi


Purr-ty time – IPC #73

Inky Paws ChallengeHello Everyone,

Today is the start of the new Inky Paws Challenge. It is a fun sketch for the next two weeks.

For my card I started with stamping and colouring the kitty with the balloons from the Newton’s Birthday Balloons stamp set using Copic markers. I used the coordinating die to cut it out and popped it up on a scalloped stitched circle tag (Pretty Pink Posh).

IPC73_zsm01_IGblog


For the background I sponge lightly some Distress inks on Bristol Smooth cardstock and placed the Cloudy sky stencil over it and applied the same inks again. Before removing the stencil I sprayed it with some Shimmer Spritz for a subtle sparkle.

IPC73_zsm01_04

I wrapped a vellum strip around it, adhered it to the back of the panel so the adhesive does not show. I tied white twine around and made a little bow in the front. I die cut 2 banners from coordinating coloured cardstock scraps and stamped the sentiment on one of them. The die I used is from the Frames and flags die set. I adhered these to the back of the scalloped circle and used 3D foam tape to mount it on the card.

IPC73_zsm01_02

As a finishing touch I scattered some clear sequins (Pretty Pink Posh) and used a white gel pen to add some details to the coloured image. Glossy accent on the balloons, paws and nose finished off the card.

IPC73_zsm01_03

I hope you find my project inspiring and you will play along the Inky Paws Challenge #73. You have 2 weeks to link up your project to be eligible to win the 20USD gift certificate to the Newton’s Nook Designs online store.

Newton

See you soon, have a great day!

Zsofi

Summer fun with Heffy Doodle

Hello Everyone,

I am popping in today with a very summery card, I made for the Heffy Doodle Summer Loving Challenge.

HeffyDoodleChallenge_01

I had a little beach scene in mind for a week now, where the little mice from the Hello Squeakheart set can have a bit of water-fun. So I stamped and coloured the little critters with Copics, used the coordinating dies to cut them out. I altered the house a bit to look like a beach house and drew a rug and a ball free-hand.

HeffyDoodleChallenge_03IG

Then I was working on the scene using Distress inks. I cut waves (Mama Elephant die), a palm tree, a sun and clouds (MFT) and masked off the sand and then the sky. I added some water splatters to the sea and went over them with a Tonic Shimmer pen to give it some sparkle. I also added some light and darker brown splatters to the sand to give it a more realistic look.

HeffyDoodleChallenge_02

After assembling my scene, I added some extra leaves to the palm tree with 3D foam squares, some matte enamel dots to look like coconuts and some glossy accent to the roofs and hearts on the houses.

HeffyDoodleChallenge_05IG

The sentiment is a simple black “hello” from the same stamp set. I also added a house and a little mouse inside the card.

HeffyDoodleChallenge_04

I will also upload this project to the Simon Says Stamp Wednesday Challenge Use more than one stamp.

I hope you like my card and will pop in tomorrow. I have some pretty projects scheduled for you already.

See you,

Zsofi

Studio Katia 2nd Anniversary Blog Hop

BLOG_HOP_2ND_ANIVERSARY

Hello Everyone,

I am so excited to be part of the Studio Katia 2nd Anniversary Blog Hop as a guest designer. I feel honoured to be part of such a gorgeous celebration.

You should have arrived from my talented friend, Laura Volpes’s blog and I am the last stop for today. If you get lost you can find the full hop list below or visit Studio Katia Blog!

CARD 1.

SKbloghop_01

For my first card I applied Distress Inks gently on Bristol Smooth cardstock, then through the Brush Stroke Waves stencil I reapplied the same inks once more. Before removing the stencil I sprayed Iridescent Shimmer Mist on it for a subtle sparkle. Until my background was drying I stamped and coloured the images from the Under the sea stamp set using Copic markers. I die cut them with the coordinating dies.

SKbloghop_03

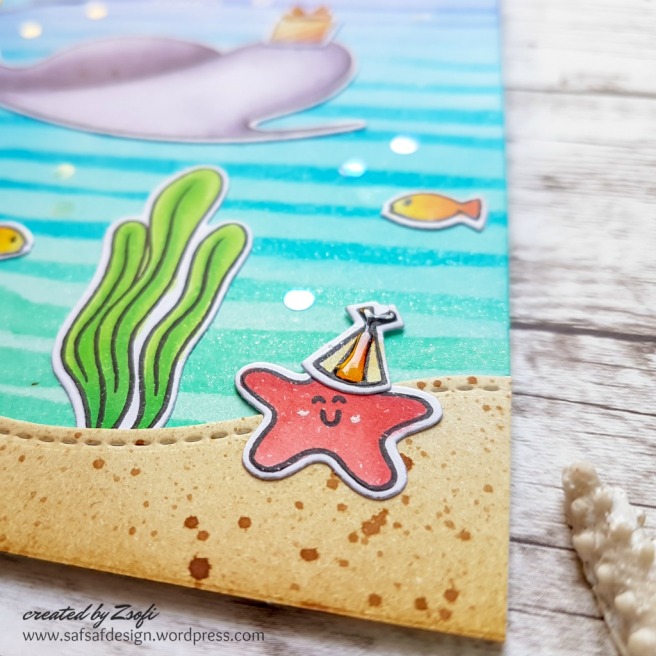
I also inked up a stitched hillside border with distress inks, splattered some Gathered Twigs and Antique Linen inks on it to look like sand. Before assembling the card I white heat embossed the sentiment on the top. I decided to make this card really festive by adding the present and the little birthday hat from the Shell-ebration stamp and die set.
SKbloghop_04

As a finishing touch I emphasized the eyes of the fish with a black glaze pen and added a bit of glossy accents to some details. I also scattered a bunch of Clear confetti to look like bubbles.

SKbloghop_02

CARD 2.

SKbloghop_08

For my second card I die cut a Stitched Creative window in the middle of a white cardstock, and once more from light grey cardstock. I adhered a piece of an alcohol ink background to a white card base and popped up the window with the inlaid frame using 3D foam tape.
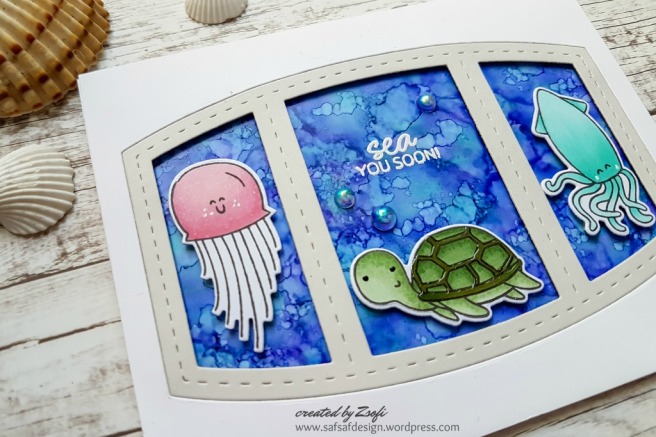
SKbloghop_10

I carefully white heat embossed the sentiment in the middle window and adhered the sea critters using 3D foam squares for ore dimension. A few Iridescent bubbles, glossy accent and white gel pen details finished this card off.

SKbloghop_09

CARD 3.

SKbloghop_05

After seeing the Seashell Shaker die I just had to make an underwater shaker card too. I die cut a white cardstock piece with the rectangle from the Dotted Patterns Set 1 with the Shell die in it. I added a piece of transparency to the back of it and made the tunnel for the shaker part with 3D foam tape. I used a small piece of the alcohol inked background adhered to a blue violet mat and added Crystal Clear, Silver Foil Confetti and a bit of the Shimmering Ice Fusion sequin mix.

SKbloghop_07

When my shaker piece was all sealed I decorated the front with the little turtle from the Shell-ebration set. The sentiment I white heat embossed on a black banner. A bit of glossy accent, some clear shimmer on the present and black glaze pen on the eyes made it finished.

SKbloghop_06

STUDIO KATIA NEW RELEASE

Studio Katia is celebrating their birthday with a new release, which includes 6 new Clear Stamp Sets and 4 sets of Coordinating Dies, 4 new stand alone Creative Dies, 2 new Stencils and new Embellishments! Check them out here!

GIVEAWAY

Studio Katia is giving away TWO $100 CAD gift certificates on each day of the Hop, winners will be chosen from the comments left on all blogs of the Hop! Make sure to leave all the comments by Saturday, June 2nd, 2018 11:59 PM EST.

All winners will be announced on Sunday, June 3rd, 2018 on the Studio Katia Blog.

Here is the full list of blogs participating on Friday, 25th May:

I hope you enjoyed my cards and will return soon for more fun projects.

See you,

Zsofi


Spring card with button flowers – IPC 72

Inky Paws ChallengeHello Everyone,

It is Monday again which means I am back with fresh inspiration for the Inky Paws Challenge #72.

10dea-29694779_10155904945671311_3445395545304459185_n

I love buttons and I am hoarding them. Whenever I see something nice I cannot resist. So when I was thinking about what to make for today, I just simply checked my stash of buttons and found these cute flower shaped ones.

IPC72_zsm02_IGblog

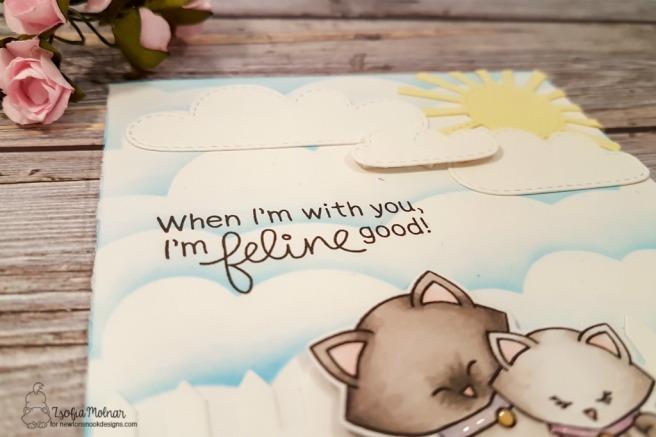
So I made a coat – I wanna say card – to go with them. I sponged first some Tumbled glass distress ink on a card base using an MFT cloud stencil. Then I die cut from white cardstock the fence and clouds, from yellow cardstock the sun and from green the grass. I used Lawn Fawn dies.

IPC72_zsm02_03

When my scene was ready I stamped the cute kitty couple from Newton’s Sweetheart set. I used Copics to colour and the coordinating dies to cut it out. I stamped a sentiment on the background and popped up the kitties with 3D foam squares.

IPC72_zsm02_01

IPC72_zsm02_02

As a finishing touch I embellished the grass with the flower buttons and added a bit of glossy accent to the collars.

IPC72_zsm02_04

I hope you got inspired and you will look through your stash for funny buttons and enter the Inky Paws Challenge #72 with your creation. You have time until Friday 25th May to play along to be eligible to win the 20USD gift certificate to the Newton’s Nook Designs online store.

Newton

I will upload this project to the Simon Says Stamp Monday and Wednesday Challenges as the theme is Stencil it.

Have a wonderful day,

Zsofi

Monster birthday ft. Lawn Fawn

Hello Everyone,

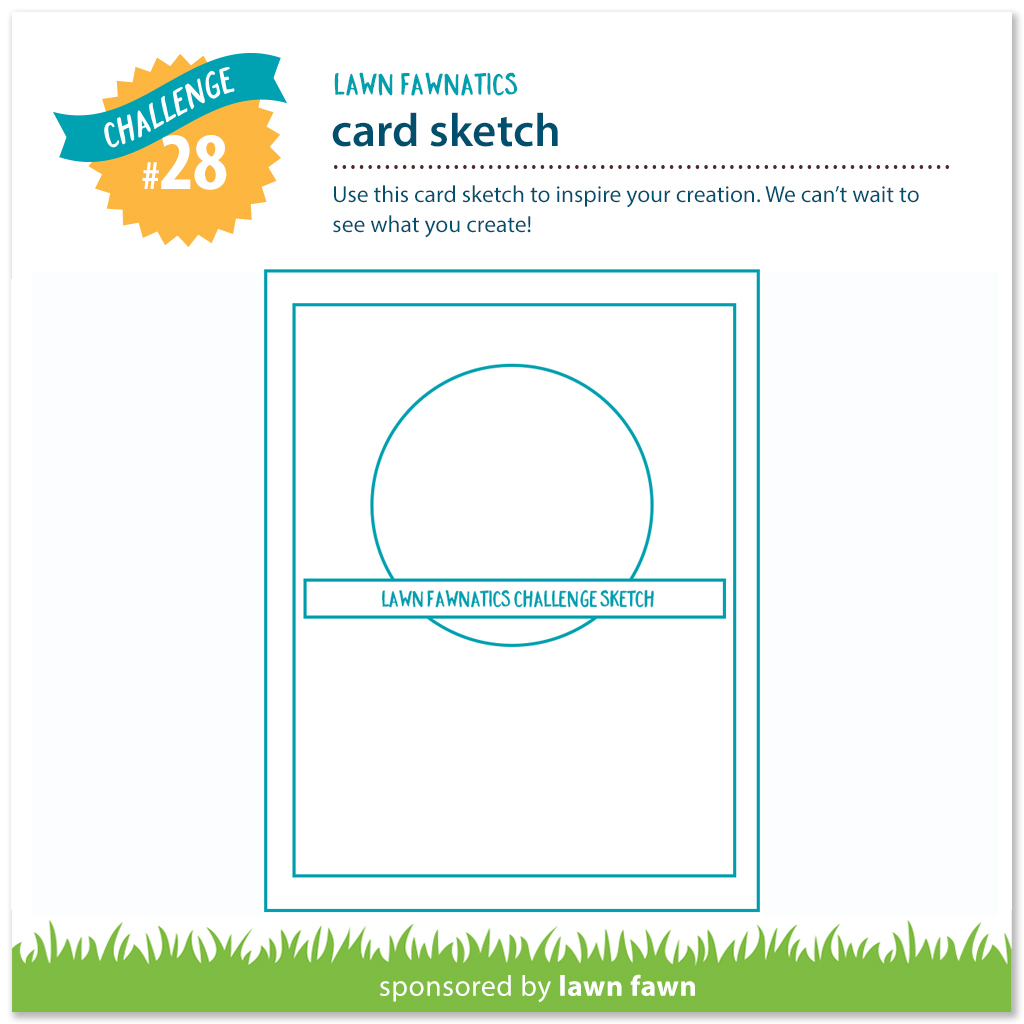
I am back with a card I made for the current Lawnfawnatics sketch challenge #28.

LFMonsters_01_IG

I stamped, coloured and die cut a bunch of the little monsters from an older Lawn Fawn set called Monster mash. I used a rainbow of colours.

LFMonsters_04

I have made a galaxy background using Distress Oxide inks, shimmer mist and some white paint.

LFMonsters_03

I die cut several stitched circle frames and stacked them together. I placed my tiny aliens around and adhered a last frame in navy colour. I added the galaxy background which I cut down to a circle and adhered it all to a white stitched rectangle.

LFMonsters_02

The sentiment is from the Out of this world set, stamped in black and aqua inks.

LFMonsters_07_IG

For the inside I cut a strip of the galaxy background and added another 3 little monsters. I embellished all of them with a white gel pen, a black glaze pen and glossy accents.

LFMonsters_05_IG

LFMonsters_06_IG

I will upload this project to the Lawnfawnatics Sketch Challenge #28.

I hope you like my card and will come back soon for more inspiration.

See you,

Zsofi

Mermazing birthday

Hello Everyone,

It is my second post today, as I wanted to share with you a mermazing birthday card I created for the current MFT sketch #384 and Colour challenge #93. 

I created an alcohol inked background with blue, purple and mint alcohol inks. I spritzed it with a bit of rubbing alcohol for more texture. I adhered it to white card base and added a stitched rectangle frame.

MFTmermazing_01

Then I stamped and coloured the mermaid from the Mermazing stamp set. I used Copics, and the coordinating dies to cut it out. Added some glossy accent and some Stickles for the extra shine on the tail.

MFTmermazing_03

The seaweeds were stamped with matching colourful inks. I used Press and Seal to help with the arrangement and glued them in place on my card. The mermaid was popped up with 3D foam squares.

MFTmermazing_02

I also white heat embossed a sentiment on a strip of blue violet cardstock from the More essentials sentiments set. To finish it off I added some iridescent bubbles from Studio Katia.

MFTmermazing_04

MFTmermazing_05

I will upload this card to the MFT Sketch Challenge and Colour Challenge.

Hope you like my card and will check back tomorrow for some out of this world fun!

See you,

Zsofi