Today I am sharing a simple last minute card idea for Mother’s Day mixing the new release with older favourites from Pretty Pink Posh.
First I die cut the stitched flower from the Stacked Squares die set from a bunch of cardstock scraps. I used 3 shades in each colour family: pink, yellow and green.
Then I die cut a white A2 sized white card front with a gorgeous die from Scallop Border 2 die set. I adhered 5 flowers on each securing them with liquid glue.
Next I chose matching patterned papers for each colour from the Floral graph rainbow petite prints paper pad from Doodlebug. I cut a 2 inch strip and adhered on the bottom of each notecard. I also added a thin strip of coloured cardstock on the top of the notecards before mounting the decorative focal panels on with 3D foam squares.
I am thrilled to be part of an epic 3 days blog hop celebrating the new release of Pretty Pink Posh. It is full of crafty supplies for special occasions: baby, wedding, graduation. But of course the versatility is endless as you may see if you hop with us! It is the last day of the hop so if you have missed the previous days, make sure to check all the fabulous inspiration our team and special guests created!
For my card I decided to go with the wedding theme. I don’t make many wedding cards but I can easily imagine recreating this as a wedding invitation too, just by changing the sentiment to You are invited.
I started with a piece of Bristol Smooth cardstock and the Fancy Lattice stencil. I used Tsukineko Delicata Golden Glitz ink and a blending brush to create a beautiful pattern. I heat set it with a heat gun and die cut it with an Eyelet Rectangle die.
Then I die cut the Happily Ever After Shadow dies from gold glitter cardstock and the shadow part from vellum and adhered them together. I used liquid adhesive to pop it up on the background panel, that is the best for intricate die cuts.
Next I die cut the two connected hearts from the Valentine Mug Addition die set twice and stuck them together. Then I dipped them in clear ink and covered them with gold embossing powder. I heat embossed them with the help of a tweezer and repeated the ink-powder-heat embossing process once more. I got a really smooth, gold embellishment this way. I secured it in place with liquid glue and my card was ready. I love the 3 different types of gold on one card, it it really festive and precious.
GIVEAWAY
Hop along with us and leave comments on each stop. We are giving away 3 $30 gift certificates to three random comments (1 winner each day) left before May 15, 2024 at 11:59 PM PST. Winners will be announced next week on the Pretty Pink Posh Blog, so be sure to visit and see if you are one of the winners.
I hope you like my card and got inspired. If you like my cards, make sure to follow me on Instagram, where I share even more card projects. Thanks for stopping by and see you soon,
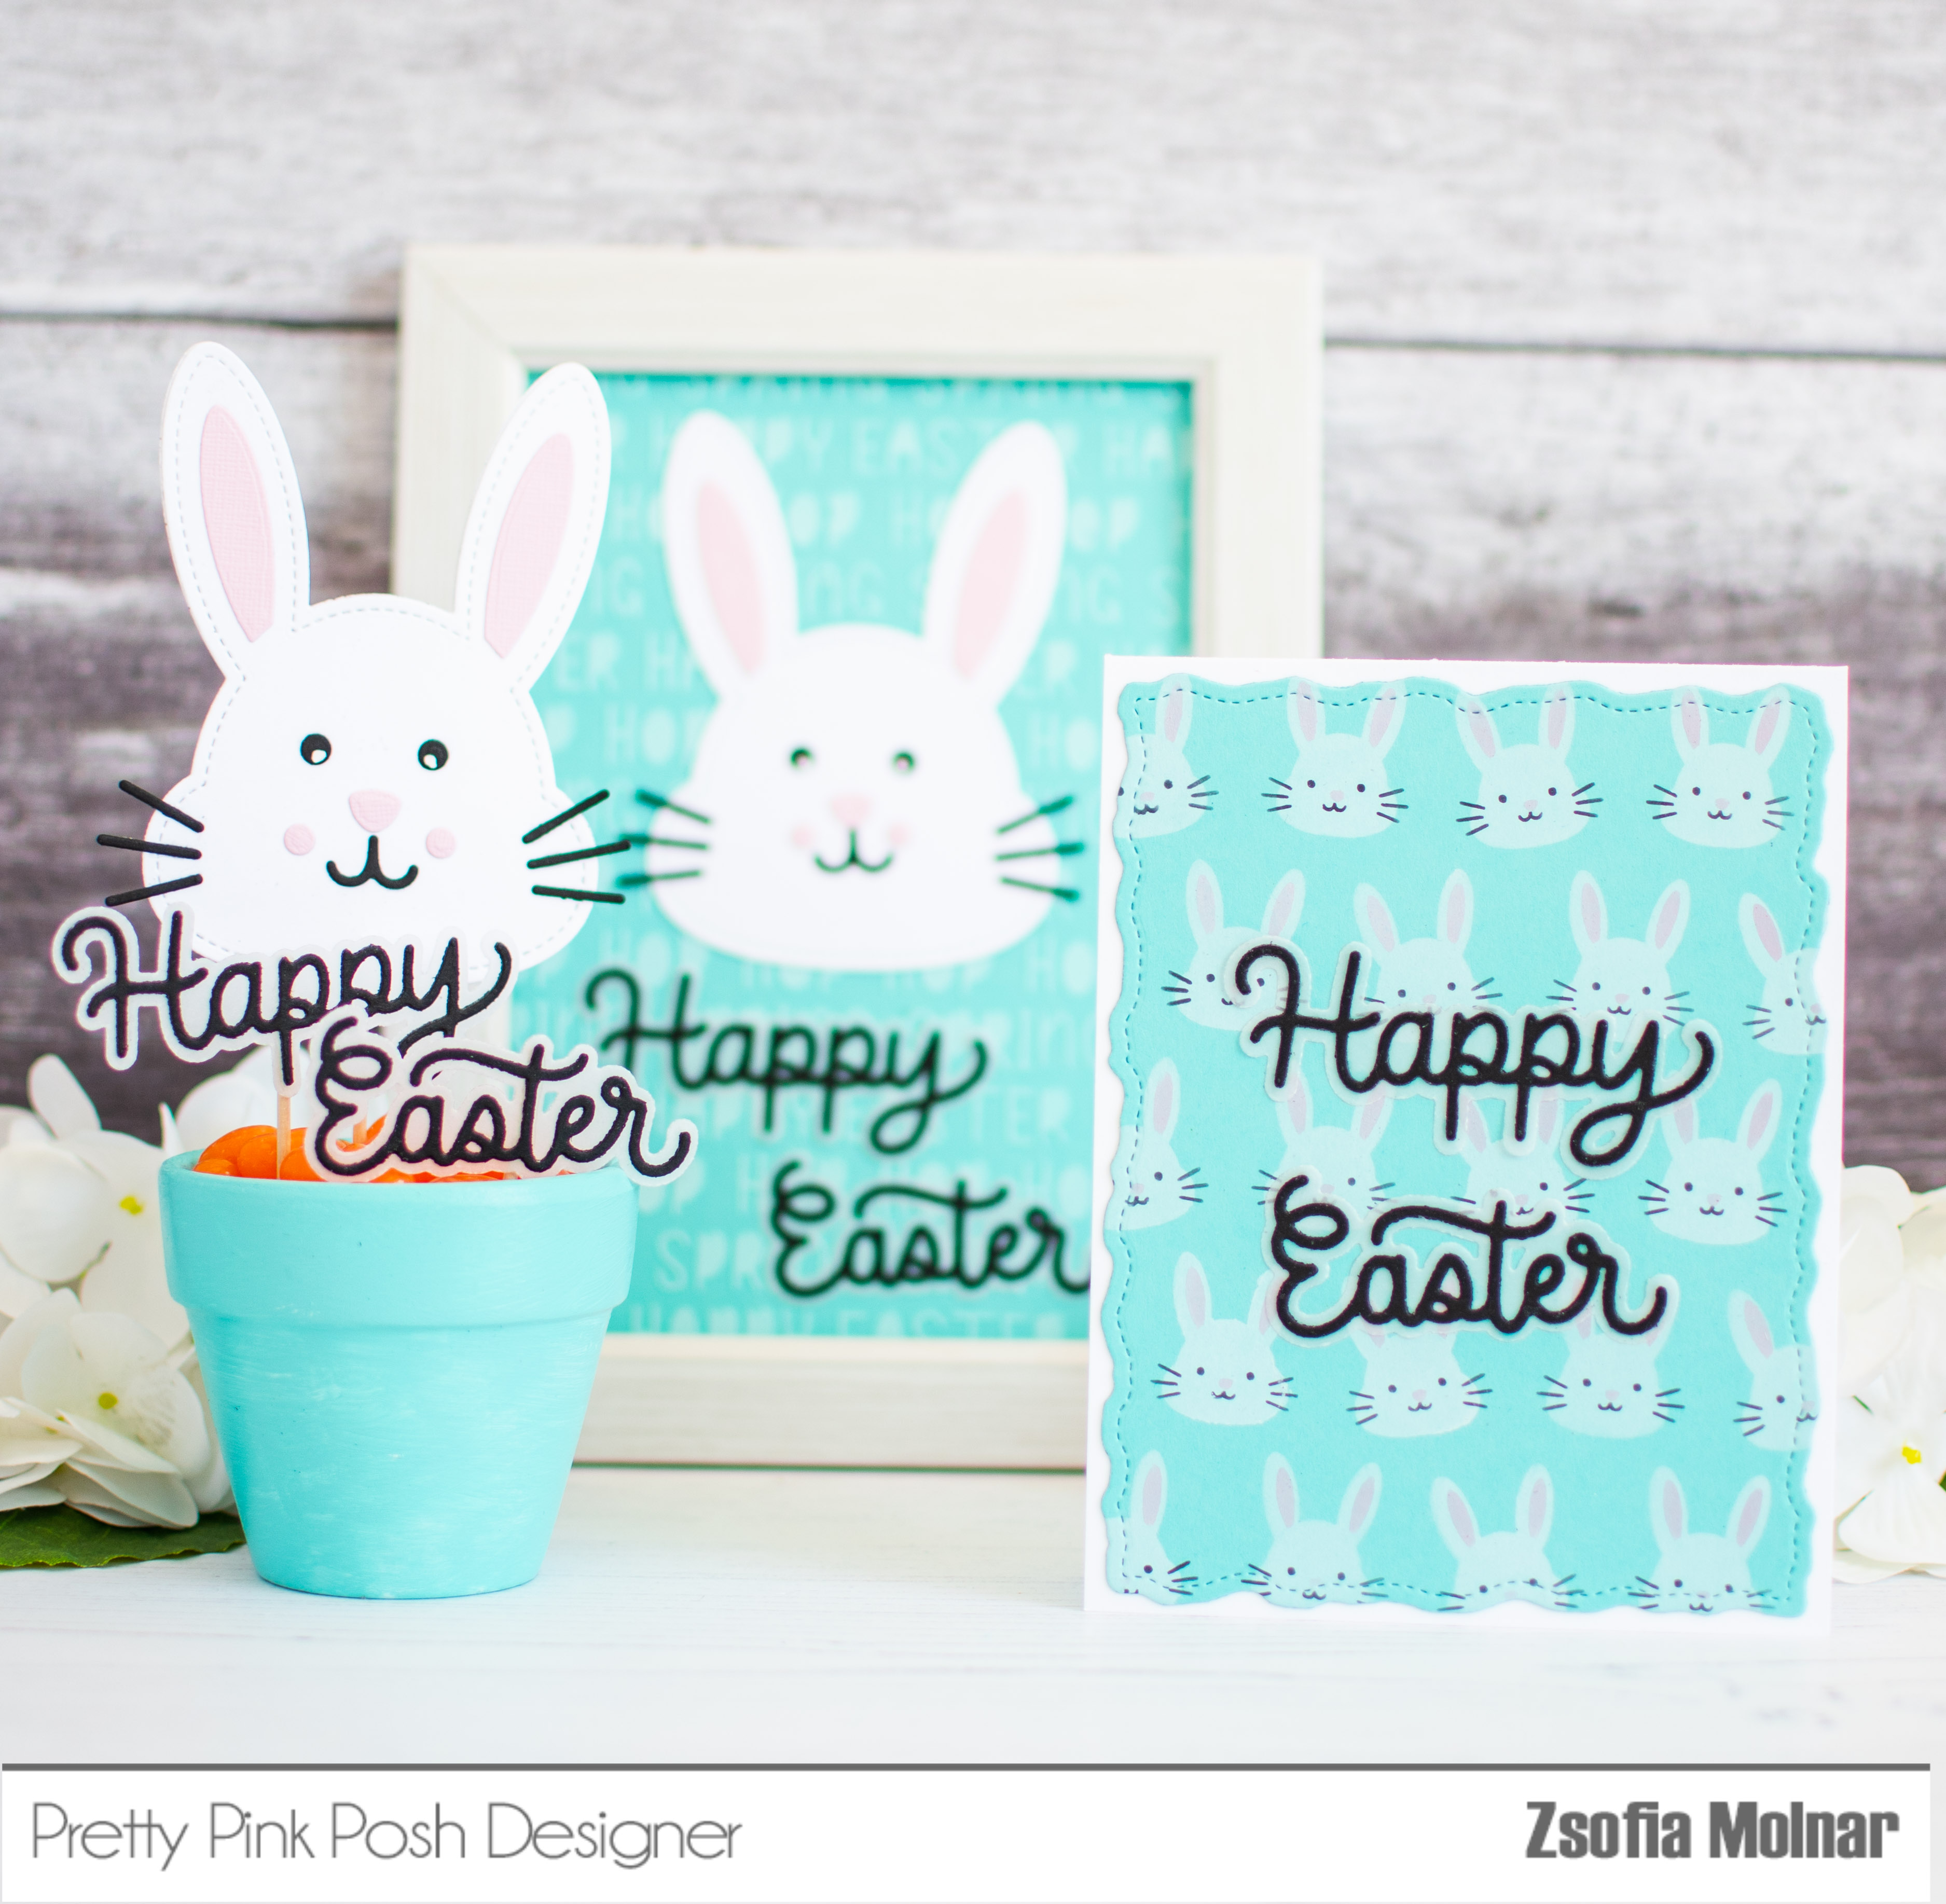
My project today is a home decor for Easter. I made a framed picture, a small treat in a pot and a matching card. I love to create complex project like his one, it can be a perfect gift too! Lets see them one by one.
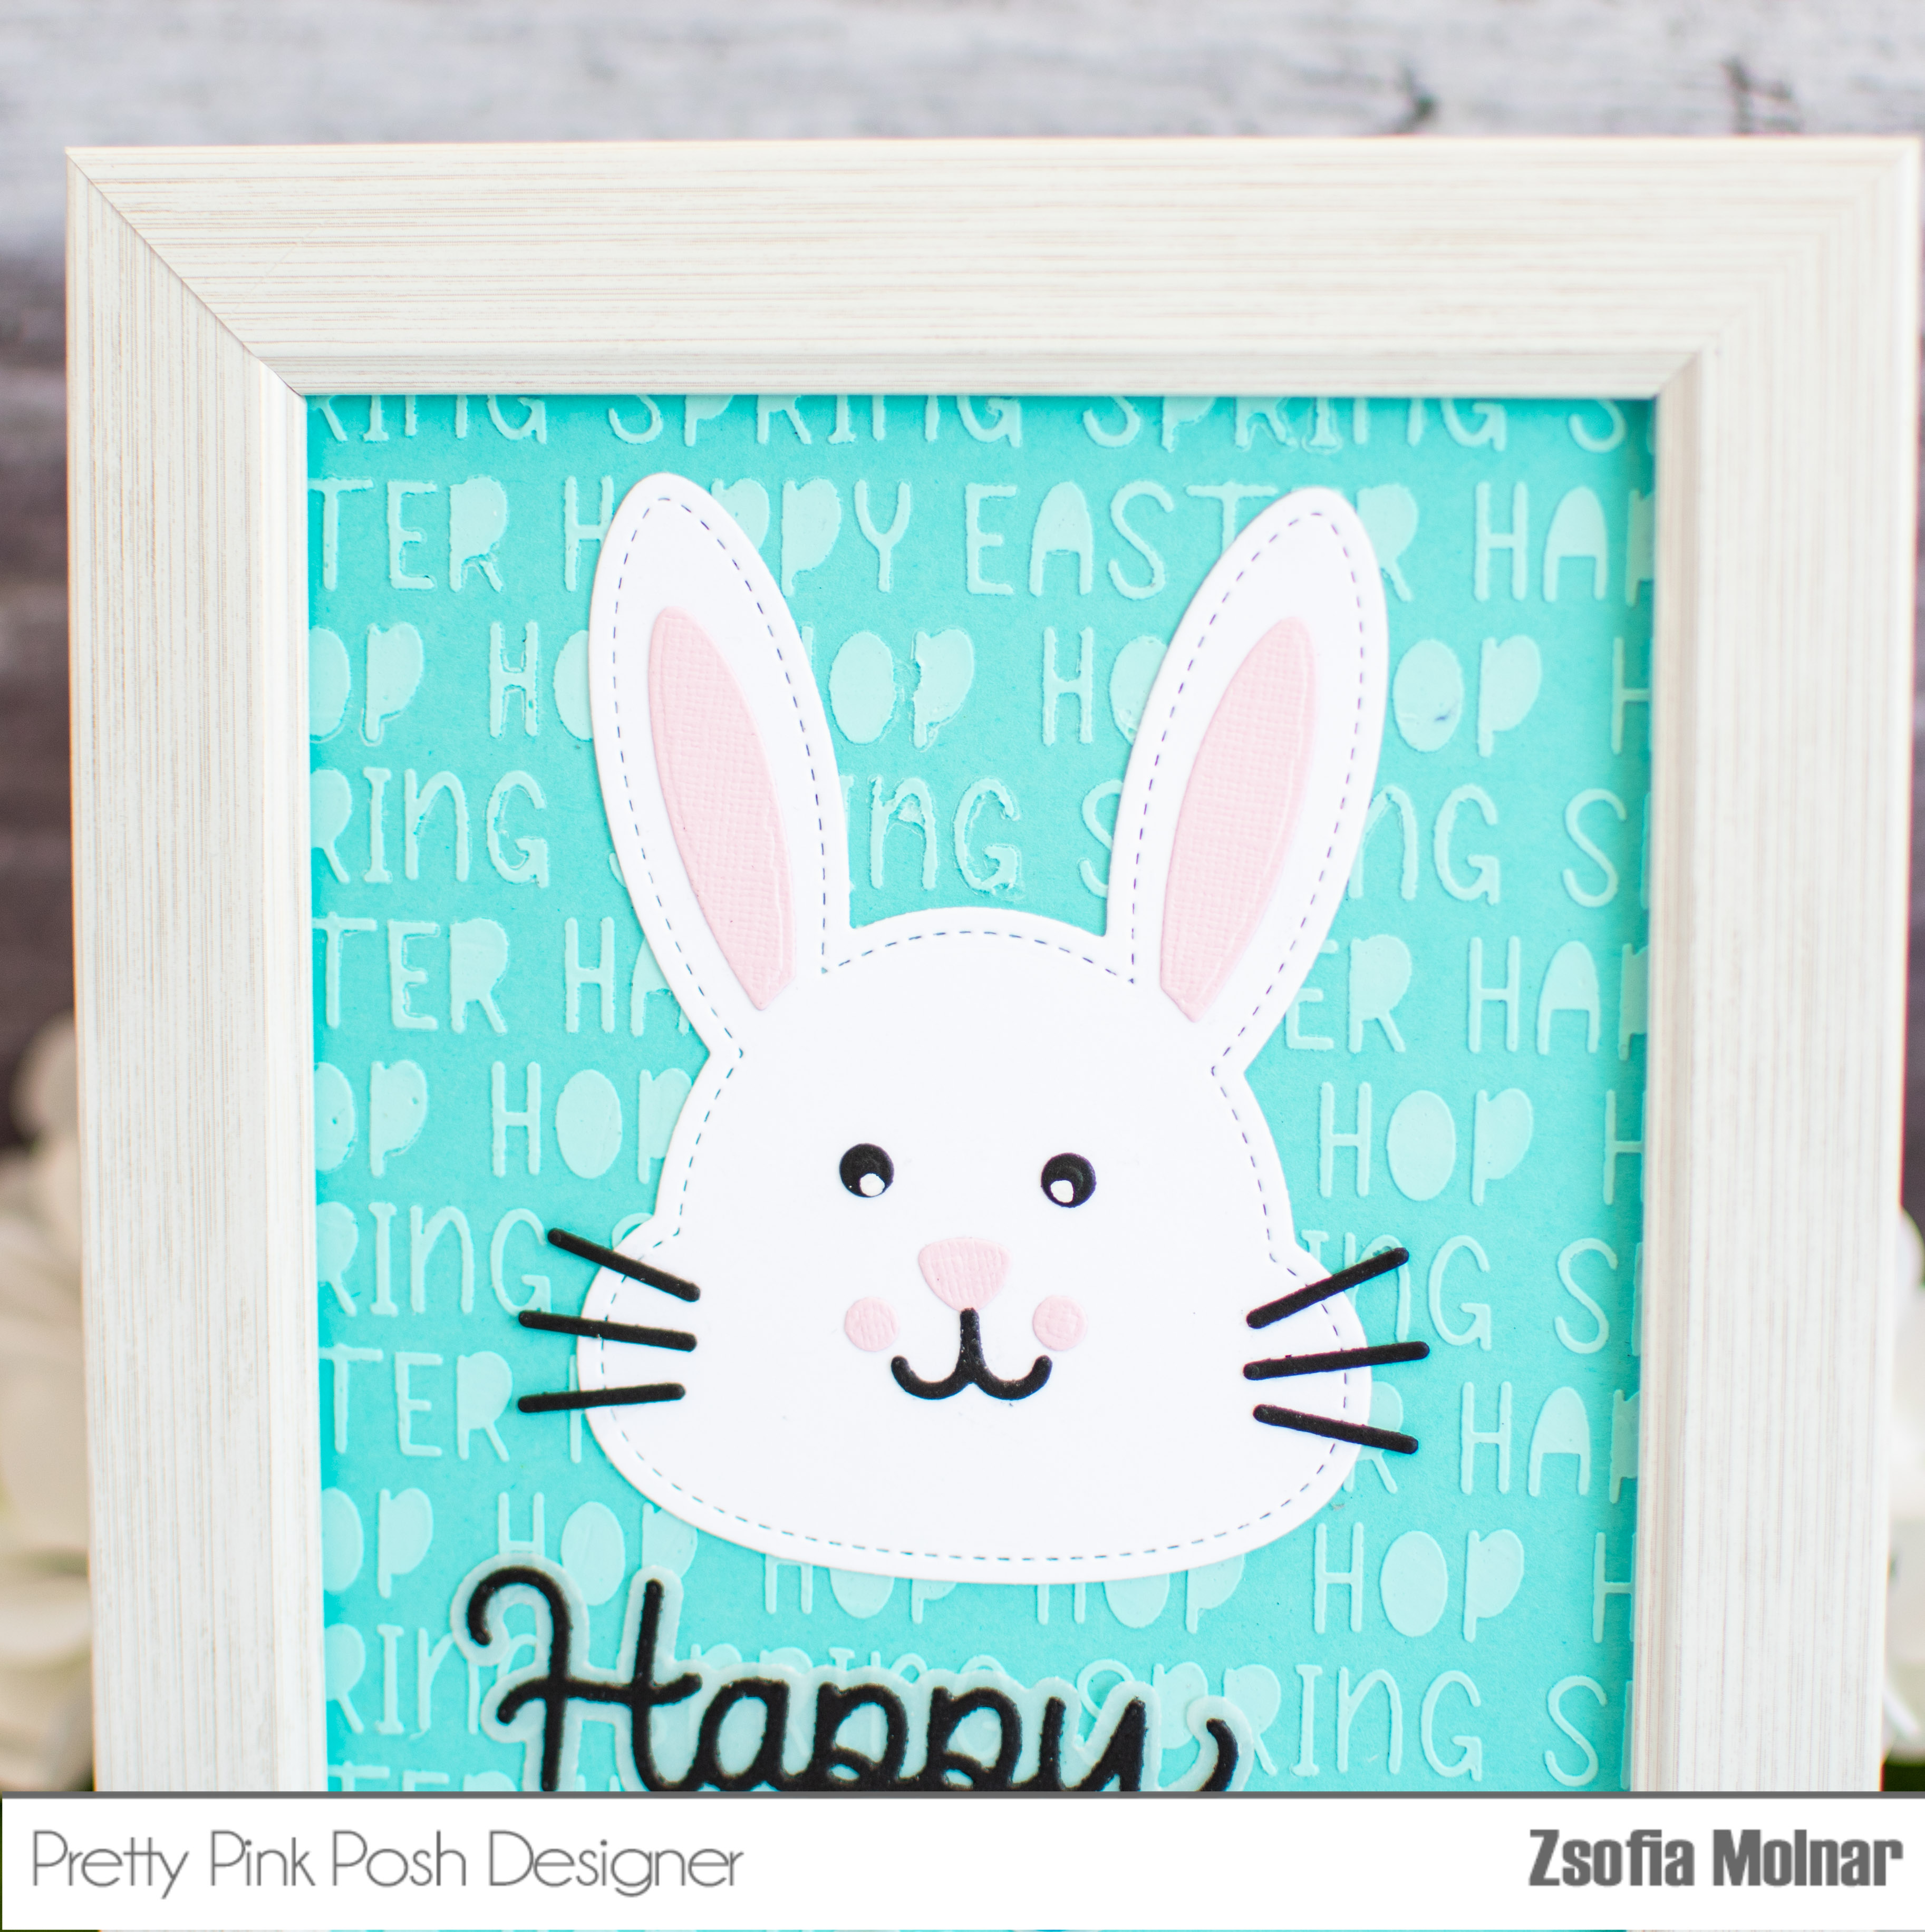
PICTURE FRAMED
I cut a piece of teal cardstock which matched the frame I had at home and used the new Easter Words stencil with some pearly texture paste. I did add some colour to the paste with Peacock Feathers and Blueprint Sketch Distress Oxide, to get a tone-on-tone look. As my cardstock was larger than the stencil I needed to continue the pattern by simply shifting the stencil. With this design, it was super easy to line it up again for a seamless result.
While the paste was drying I die cut and assembled a few bunny heads using the Bunny Face Shaker die set. I used liquid glue with a precision tip to add all the tiny details.
I also die cut the Happy Easter sentiment with 2 older die sets: Happy Spring Shadow die set and Easter Wishes die set. I used vellum for the shadow and simple black cardstock for the sentiment itself.
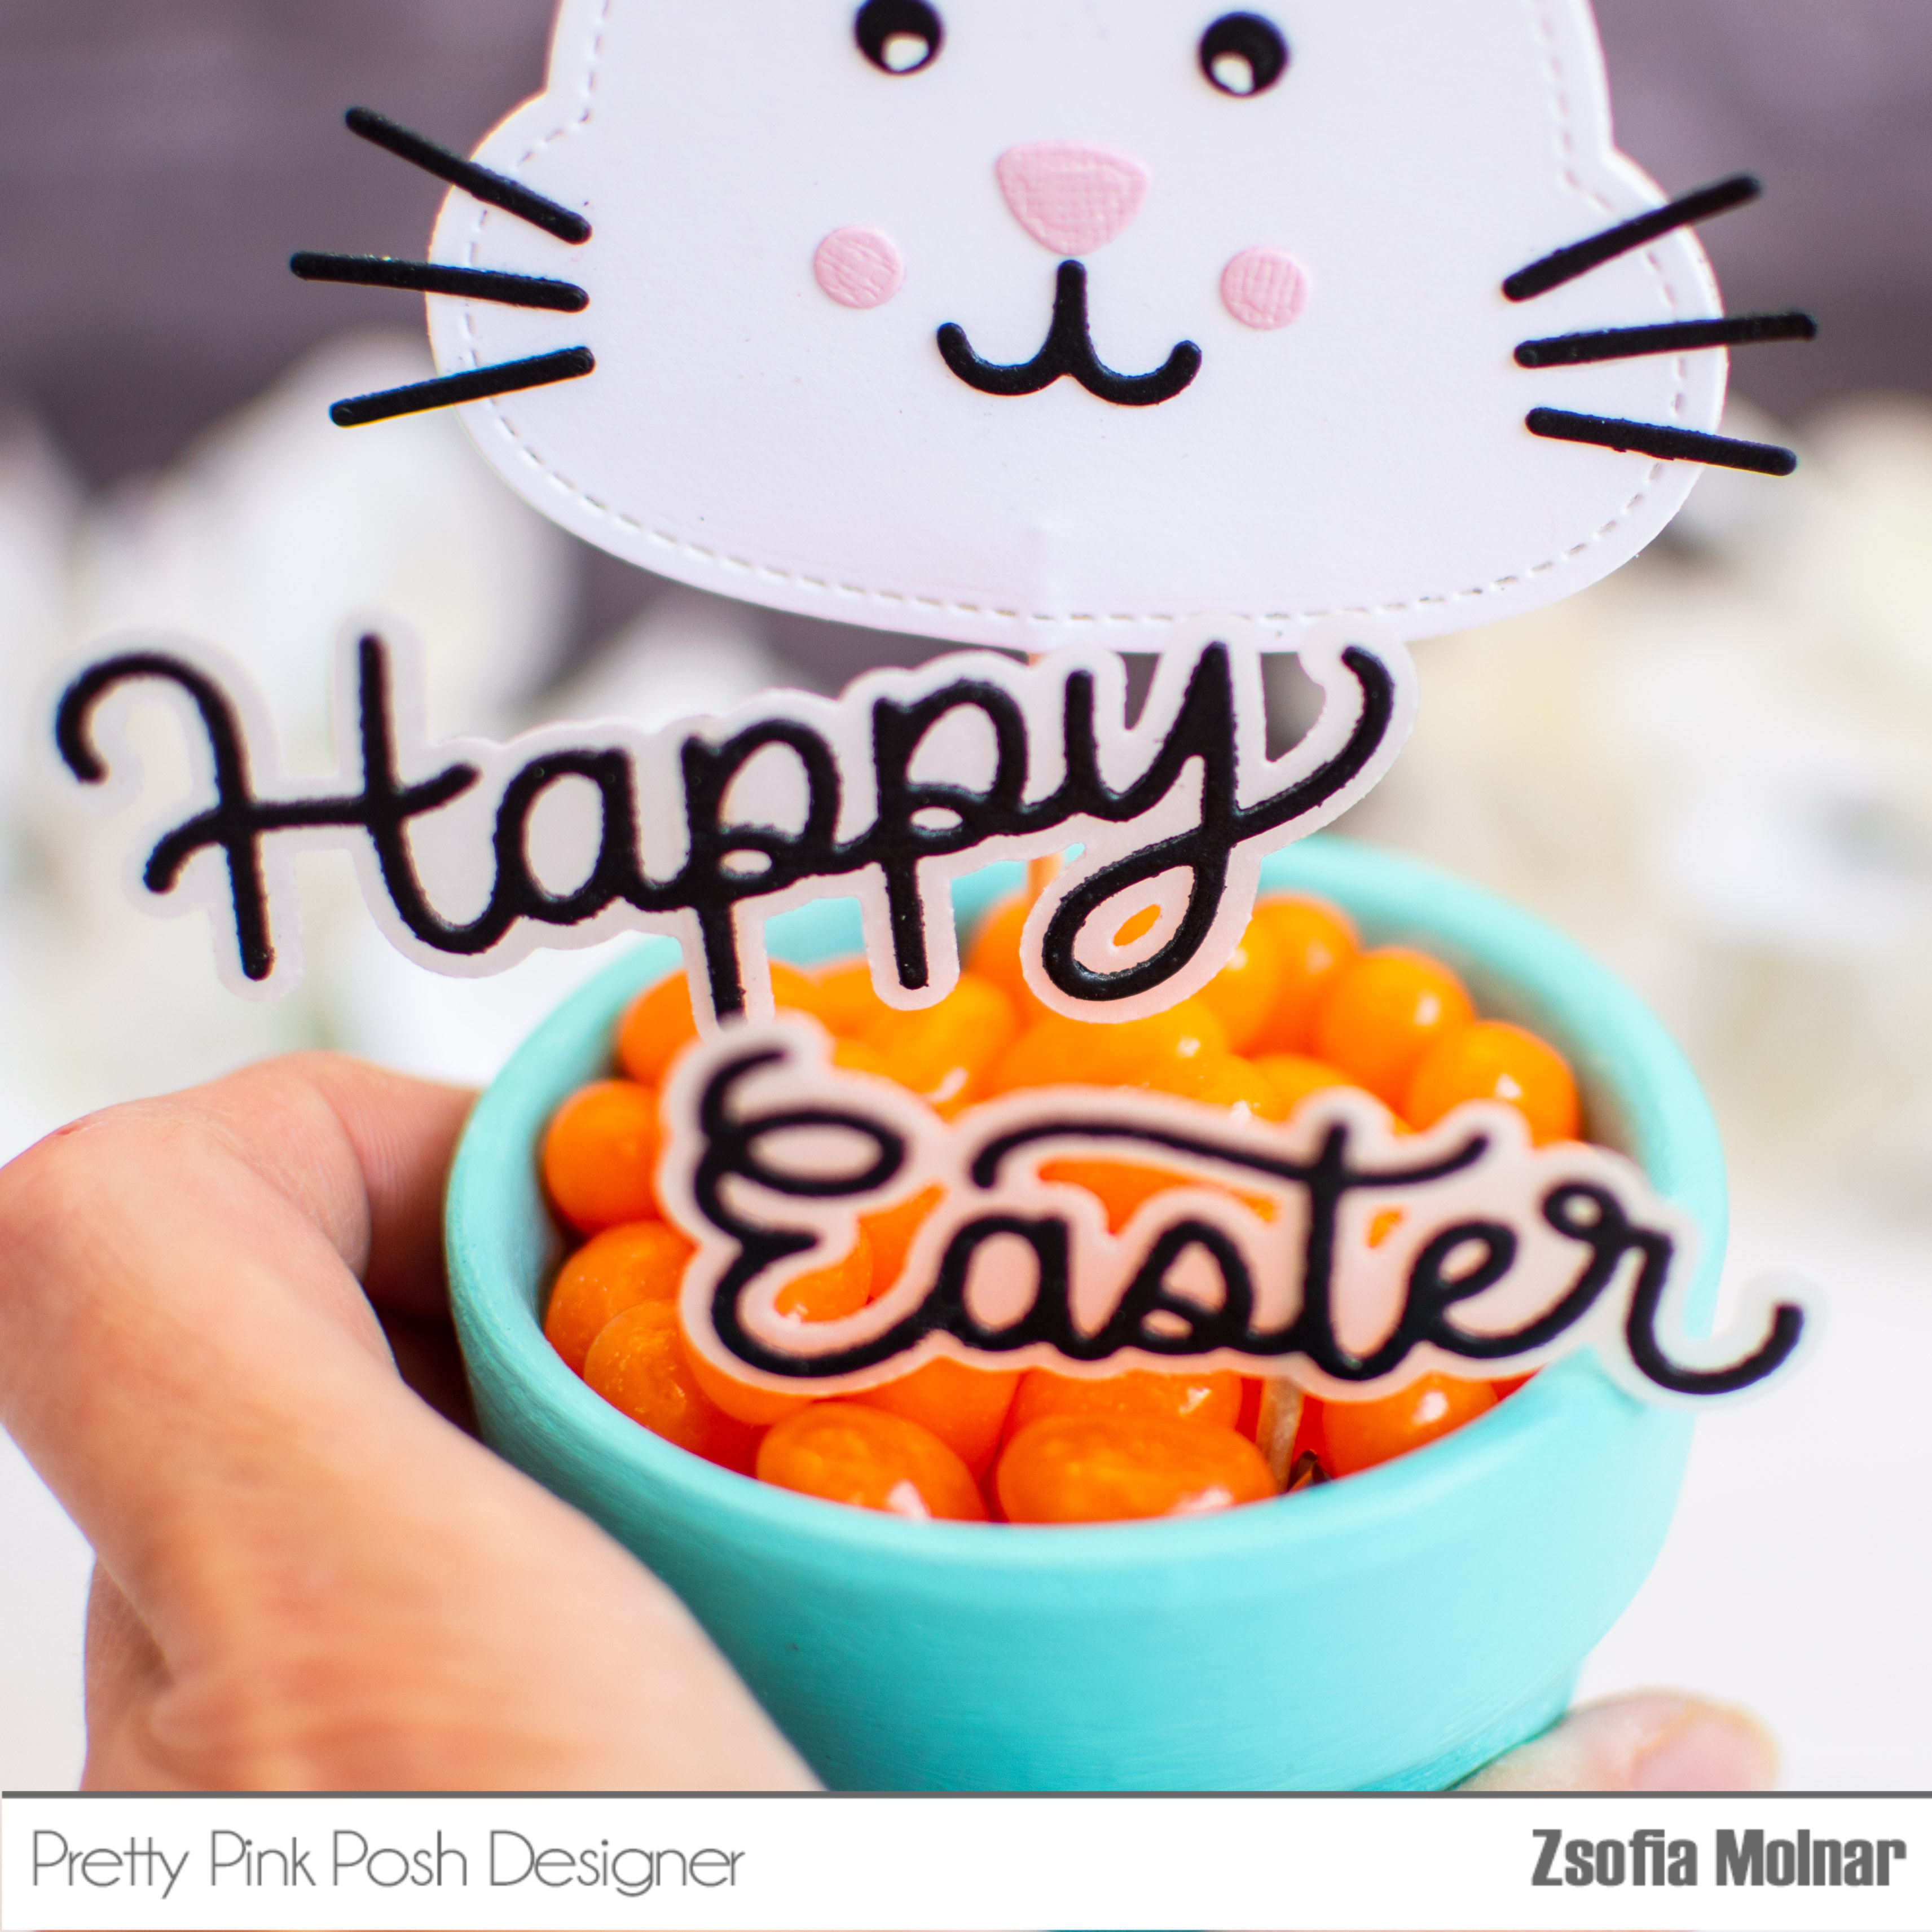
SWEET BUNNY TREAT
For the small treat I painted a tiny pot with pastel aqua acrylic paint, filled it with orange jelly beans and added the bunny face and sentiments on toothpicks to it. So easy to make, yet so pretty! Perfect for the kids!
BUNNY CARD
I really wanted to make a matching card and I was giddy to figure out how well the Layered Bunny Faces stencil matches the Bunny Face Shaker die set! So I applied white pigment ink on teal cardstock with Layer A of the stencil set and dried it with my heat tool before adding the eyes and mouth with black and nose and ears with pink inks. It is so subtle and cute!
When it was dry, I cut it down with a Stitched Torn Rectangle die, adhered it to a white card base and adorned it with the same sentiment.
GIVEAWAY
Leave a comment on each stop of the blog hop and you may be one of the lucky winners! They are giving away 3 $30 gift certificates to random comments (1 winner each day) left before March 13, 2024 at 11:59 PM PST. The winners will be announced on the PPP blog, so be sure to return and see if you are one of them! The last day blog hop list:
Pretty Pink Posh is turning 10 this month and we celebrate with a gorgeous new release, a fun Blog Hop, freebies with purchase and more! I am so grateful to be part of this awesome party, I am a fan of all Pretty Pink Posh products ever since Paulina brought out her first sequins. But enough of being sentimental, let’s dive in the fun!
For today I created cute little treat boxes with the new Birthday Treat Box die set. I cut the base 2 times from aqua cardstock for each treat box, folded them at the scorelines and adhered them together with score-tape. It is ready super fast! I knew I wanted to put some candles in one and flowers in the other, so I adhered a piece of cardstock in the middle of each to have something to add my die cuts to. I also added green rice paper which I always save when I get a package. It makes the treat boxes so festive!
I used the candle die from the same set and cut it 3 times from white cardstock. I used Copic markers to colour the flames. I die cut some flowers from white cardstock and leaves from green cardstock using the Spring Foliage die set. I coloured the flower centers with Copics and assembled the bouquet.
I adhered both the candles and the flowers to that middle piece of cardstock with liquid glue. I could easily hide a gift card or small chocolate pieces behind them, isn’t it cool?
For the sentiments I chose the new Happy Birthday Shadow die and the Smile Shadow die from an older release. I cut the text from gold sparkle cardstock and the shadow from white, used liquid glue to adhere them together and secured them on the treat boxes.
As a finishing touch I used a clear shimmer pen on the flames and flower centers.
GIVEAWAY
Pretty Pink Posh has a freebie with purchase and a sale as part of the festivities.
Also if you leave a comment on each stop of the blog hop, you may be one of the lucky winners! They are giving away 5 $30 gift certificates to random comments (1 winner each day) left before February 16, 2024 at 11:59 PM PST. The winners will be announced on the PPP blog, so be sure to return and see if you are one of them! The last day blog hop list:
Happy New Year to all of you! I am so excited to be part of the new release blog hop for Pretty Pink Posh this month, what a better start of a crafty 2024 than showcasing a gorgeous new release. The January release is all about love and luck, beautiful new stencils, stamps and dies all related to Valentine’s Day and St. Patrick’s Day. Join us for an incredible amount of inspiration!
While I was die cutting I also cut the new Heart Cover Plate die twice: once from pink and once from aqua cardstock and paper pieced a beautifully stitched background on a white A2 sized notecard. I popped up the coloured cupcakes with 3D foam squares on every second heart.
For the sentiment I white heat embossed two short ones from the Sentiment Strips: Valentine stamp set on black cardstock and cu them to small strips. I adhered them under the middle cupcake using liquid glue.
As embellishment I adhered a few clay hearts from the Colourful Hearts Clay Confetti mix to the background. I also adorned the cupcakes with clear glitter pen and glossy accents for a shiny, dimensional look.
GIVEAWAY
Make sure that you leave comments on each stop of the hop. Pretty Pink Posh is giving away 3 $30 gift certificates to three random comments (1 winner each day) left before January 11, 2024 at 11:59 PM PST. Winners will be announced next week on the PPP Blog. Here is the Blog Hop list for Day 2:
I have a quick card to share with you today, which is perfect for mass producing if you need more cards for the holidays. I used the latest release from Pretty Pink Posh to create this in traditional colours but it would look lovely in teal and pink too!
I started with stenciling the wreath using the Layered Winter Wreath stencils. It is a set of 3 stencils, easy to line up. I chose Distress Oxide inks because I wanted a kraft base for my cards and these inks look gorgeous on kraft. I used Ground Espresso for the twigs, Lucky Clover for the pine needles, Candied Apples for the berries. First I went with Twisted Citron for the holly leaves but it looked a bit too yellow so I went over it with Bundled Sage. If you make multiple cards, you can easily do these steps in assembly line style. It will make it quicker.
I made sure that the ink was dry before I gold foiled the Hot Foil Merry Christmas sentiment in the middle. I used the biggest die in the Eyelet Rectangles die set and matted it with dark red cardstock which matches the berries.
As a finishing touch I added glossy accents to the berries and voilà, the card is finished! I cannot wait to try this design in other, non-traditional colours too!
Thanks for stopping by, I hope you enjoyed today’s inspiration and you will pop in again tomorrow for more fun!
Long time no post, but I am thrilled to be part of the new release blog hop for Pretty Pink Posh. The August release is all about Halloween, cute and adorable designs, fabulous die sets, great stencils and fun new embellishments. Join us for an incredible amount of Halloween inspiration!
My card features the new Halloween Signs stamp and die set. I stamped and coloured the images with Spectrum Noir Illustrator markers and cut everything out with their coordinating dies.
As I could not decide which image to us as focal point, I came up with a simple design idea which uses all of them on one card. For the background I simply took a piece of black cardstock and added a bit of shading to the edges with white pigment ink and a sponge dauber. It gives it a mysterious feeling, I love it. Then I used copper ad white metallic paints to add splatters to the whole panel. I also added white acrylic paint splatters and dried it with my heat tool. Then I spritzed the whole panel with shimmer mist for a subtle sparkle. So easy yet special background!
I used thick 3D foam tape to mount the images. Then I used a white gel pen to add highlights and a black glaze pen to make the eyes of the critters shiny.
I also emphasized some details with glossy accents.
Look at that spider, isn’t it adorable?
GIVEAWAY
Be sure to leave comments on each stop of the hop. Pretty Pink Posh is giving away 3 $30 gift certificates to three random comments (1 winner each day) left before August 15, 2023 at 11:59 PM PST. Winners will be announced next week on the PPP Blog, so be sure to return and see if you are one of the winners.
I hope you enjoyed all 3 days of the blog hop and ready to start Halloween crafting full of new ideas. If you like my card, please follow me on Instagram where I share more of my happy cards.
I have some great news to share, I will be staying on the Social Media Design Team of Pretty Pink Posh for another term. Check the announcement post on the PPP Blog to see the whole team! These ladies are all fantastic designers and I feel so honored to be part of this wonderful team!
To celebrate, I made a thank you card mixing new and older stamps and dies. This card is for all of you, who follow me on my crafty journey. Your sweet comments and encouraging words mean the world to me. I hope I can inspire you even more in the coming months.
I started with stamping and colouring the images from the following stamp sets: mice from Mouse Friends, berries, leaves and basket from Fresh Berries stamp set. I used Copic markers and cut everything out with their coordinating dies.
Then I used the Starburst stencil with Seedless Preserves Distress Oxide ink on a white note card. I rotated the stencil 90degrees and went back with the same blending brush without reinking it. It resulted in a lovely background with halo effect. So cool! I also cut some grass from green cardstock to set the scene. I used a Land border die from Newton’s Nook Designs, but you can find a pretty grass die in the Nature Essentials die set from Pretty Pink Posh too!
I assembled the card using liquid glue, but popping up the 2 mice in front of the basket with 3D foam squares for a dimensional look.
As the card was already too busy, I decided to incorporate the sentiment in the design: I stamped part of it on the basket directly and white heat embossed the other part on purple cardstock. The sentiments are from the Fresh Berries stamp set. I love that the “berry much” stamp has a coordinating die so I could cut it out easily and add to the basket.
I used a white gel pen to add highlights to everything, it makes it even more playful I think. I also used a black glaze pen on the eyes of the mice to make them shiny, and a drop of glossy accents on their tiny noses. Isn’t it cute?
GIVEAWAY
To celebrate the new team, Pretty Pink Posh is giving away a 100 USD gift card. For the details on how to win, please visit the PPP Blog.
I wish you enjoyed my card and will come back for more inspiration soon.
Welcome to the Pretty Pink Posh June Release Blog Hop Day 3! I am so happy to be part of such a lovely event with a fresh. summer card. I mixed and matched a few sets from the new release, let me guide you through the process.
First I stamped and coloured the images from the Citrus stamp set using Copic markers, and cut them all out with their coordinating dies.
While I was die cutting, I created the background panel from patterned paper (Doodlebug Design Bar-b-cute paper pad) and a Wonky Stitched rectangle die. I used a smaller die to cut a piece of vellum to mute the pattern a little.
For the sentiment I chose the Large Smile Shadow die set and cut it from orange cardstock 2 times and once from metallic orange foil cardstock. The shadow I cut from white and layered all the pieces on top of each other. It looks so shiny and dimensional! I assembled the card as on the picture, using the fruits and sentiment to hide the adhesive and keep the vellum piece in place. I also added a heat embossed sentiment on a black strip of cardstock using 3D foam squares.
As a finishing touch I added clear shimmer to the fruit slices and glossy accent to their skin. I used a few of the tiny flowers from the Citrus stamp set as embellishment also on the sentiment. A tiny Marshmallow Pearl in the middle of the flowers made them even cuter, don’t you think?
GIVEAWAY
Make sure to leave comments on each stop of the hop for a chance to win one of the three $30 gift certificates. Winners will be selected randomly from each day’s comments left before June 14, 2023 at 11:59 PM PST. Winners will be announced next week on the Pretty Pink Posh Blog.
I hope you enjoyed the hop today and got inspired by all the talented designers. If you like my cards, please follow me on Instagram, where I share even more of my creations.
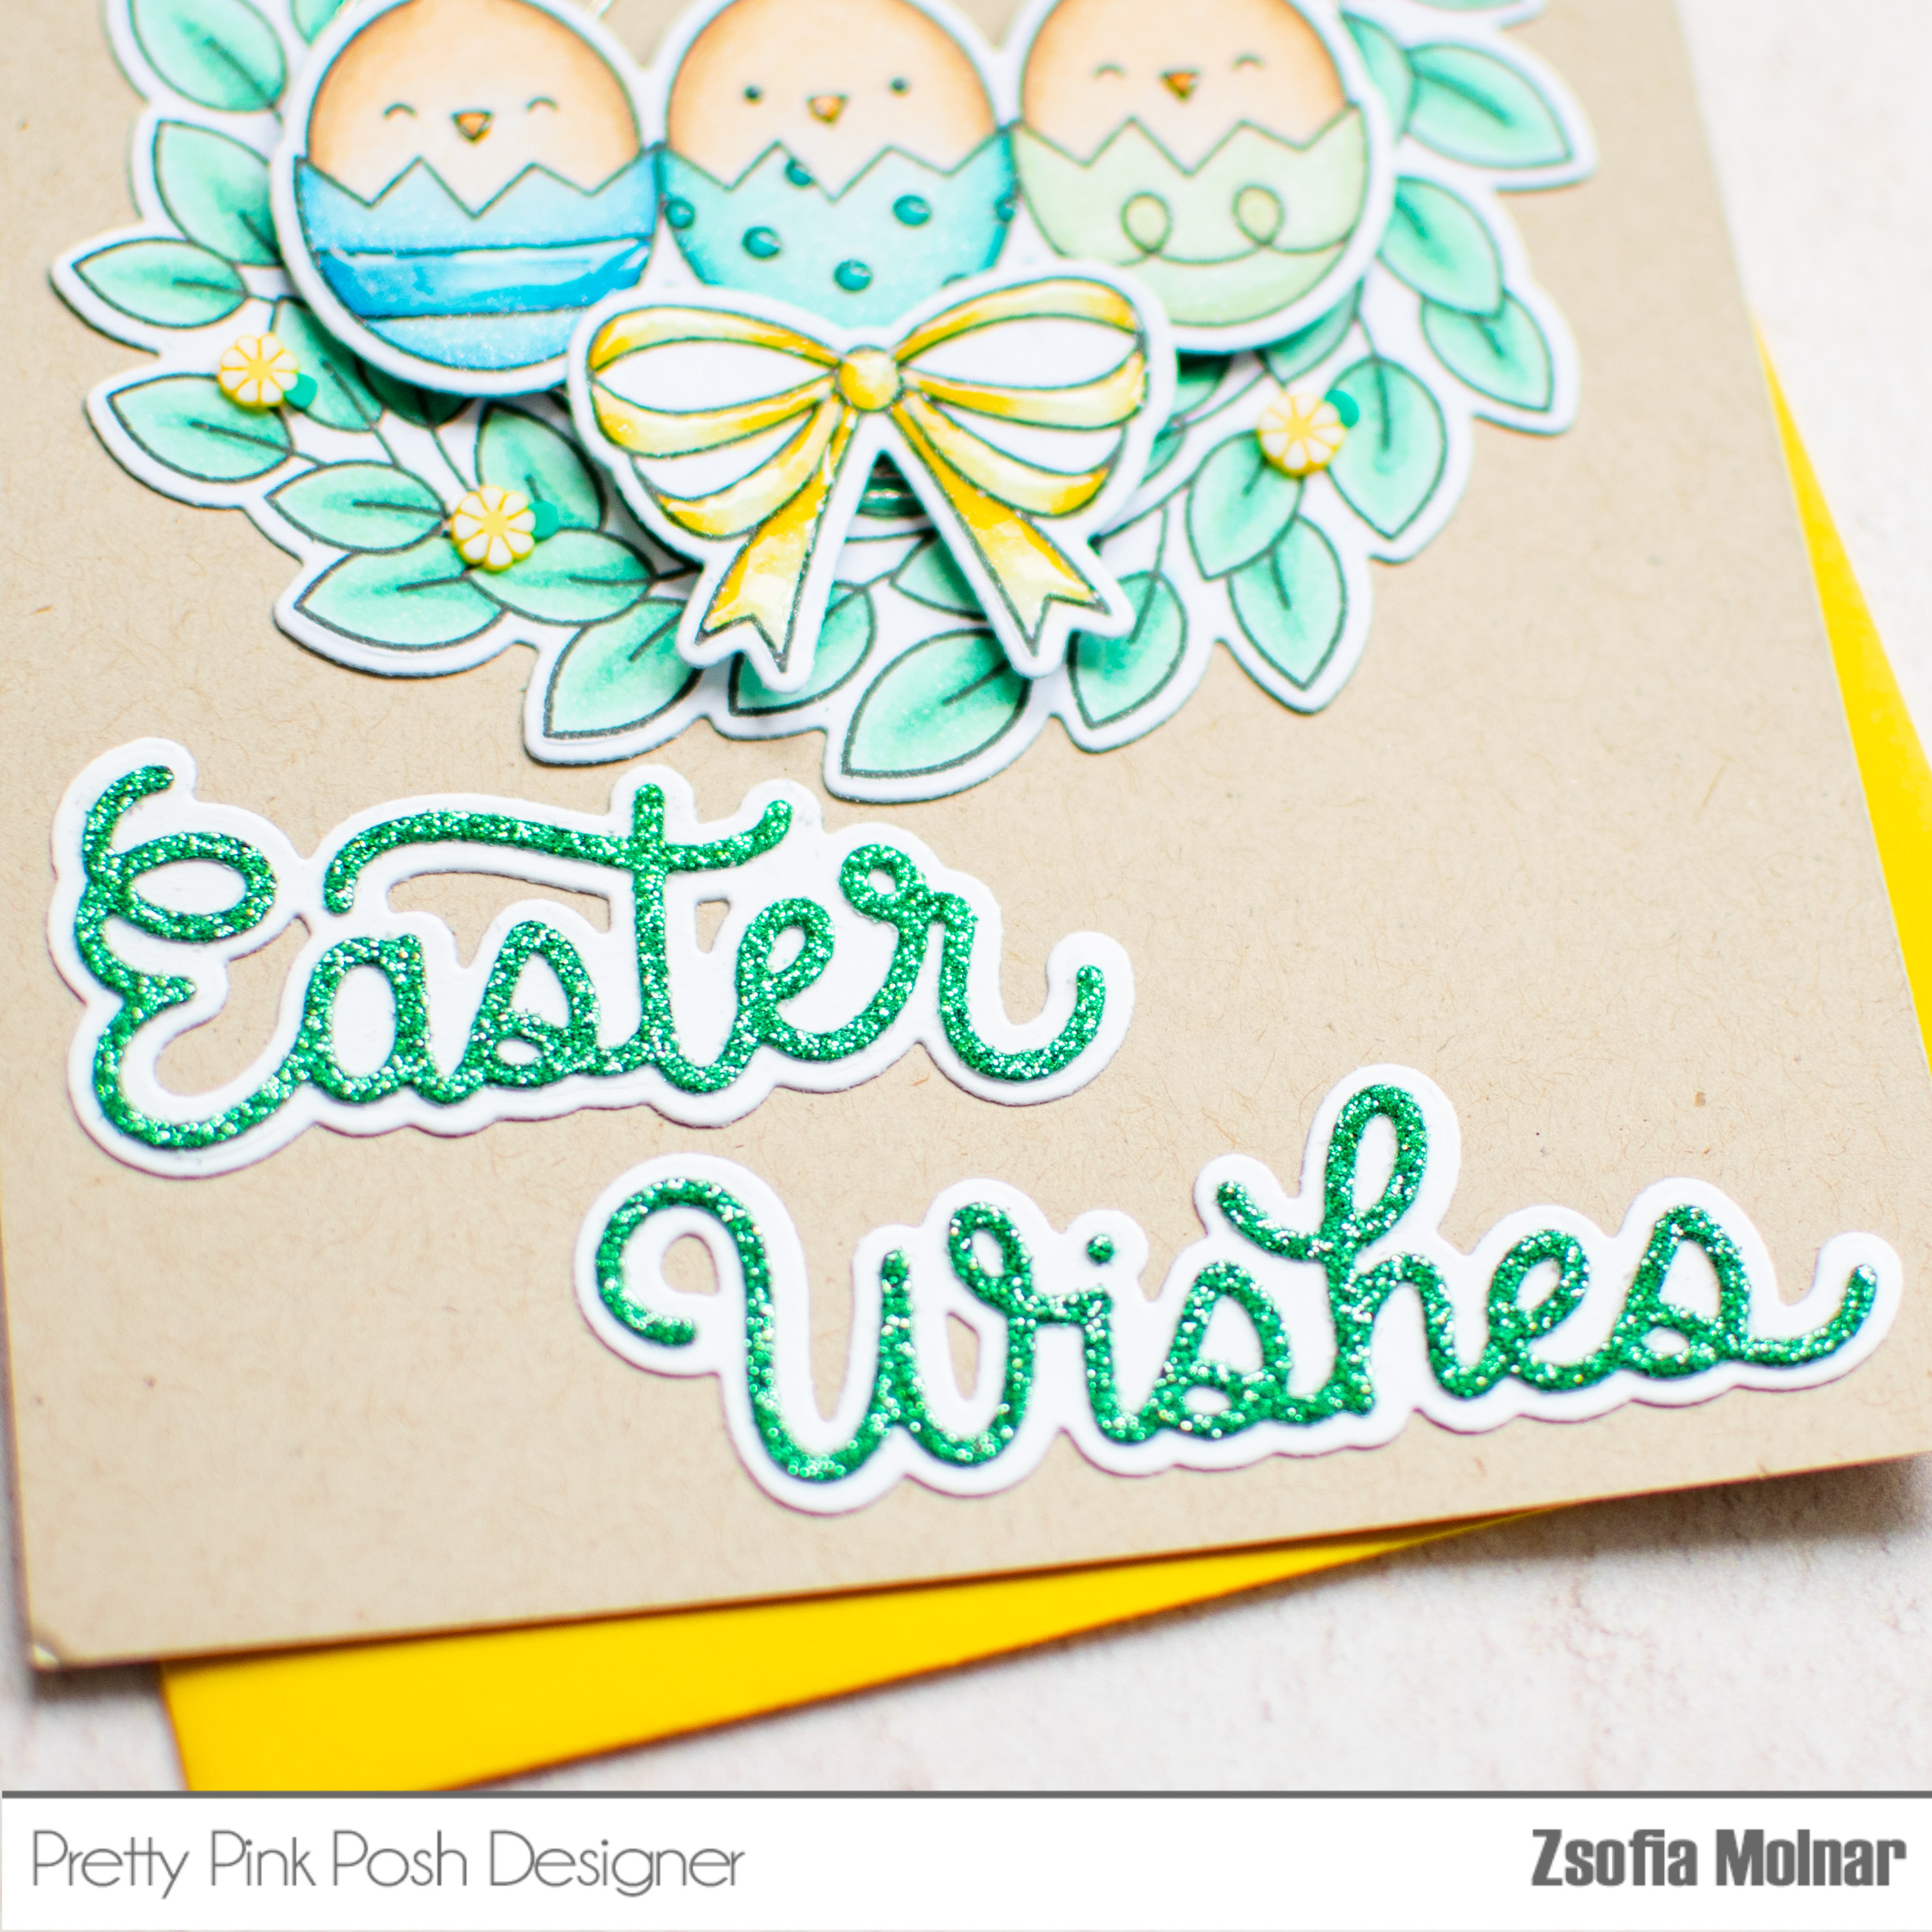
I am back today with a super cute Easter card, which I have created with the new release of Pretty Pink Posh. This card is part of a fun, 3 day long Instagram Hop – for all the details and prizes, visit my Instagram account.
First I stamped and coloured the images from the Leafy Spring Wreath and Spring Chick stamp sets. I used Copic markers, but stepped out of my comfort zone and picked colours which are not my go-to colours:
I cut everything out with their coordinating dies and while I was die cutting I also created the sentiment: I used the new Easter Wishes Shadow die. I cut the shadow from white cardstock and the sentiment itself from a pretty glitter green.
For the card base I chose kraft to match the chicks and to make the wreath stand out. Before popping up the chicks and ribbon with 3D foam squares I added a bundle of thin silver thread behind them as an extra touch.
I embellished the wreath with Flower Garden Clay Confetti Mix, it has the most adorable little clay flowers I have ever seen! I also added clear shimmer to the eggshells and used glossy accents on the ribbon, beaks and egg decoration.
I hope you got inspired o try new colour combos of your favourite colouring medium too and you hop on to Instagram to play along with us for precious prizes!