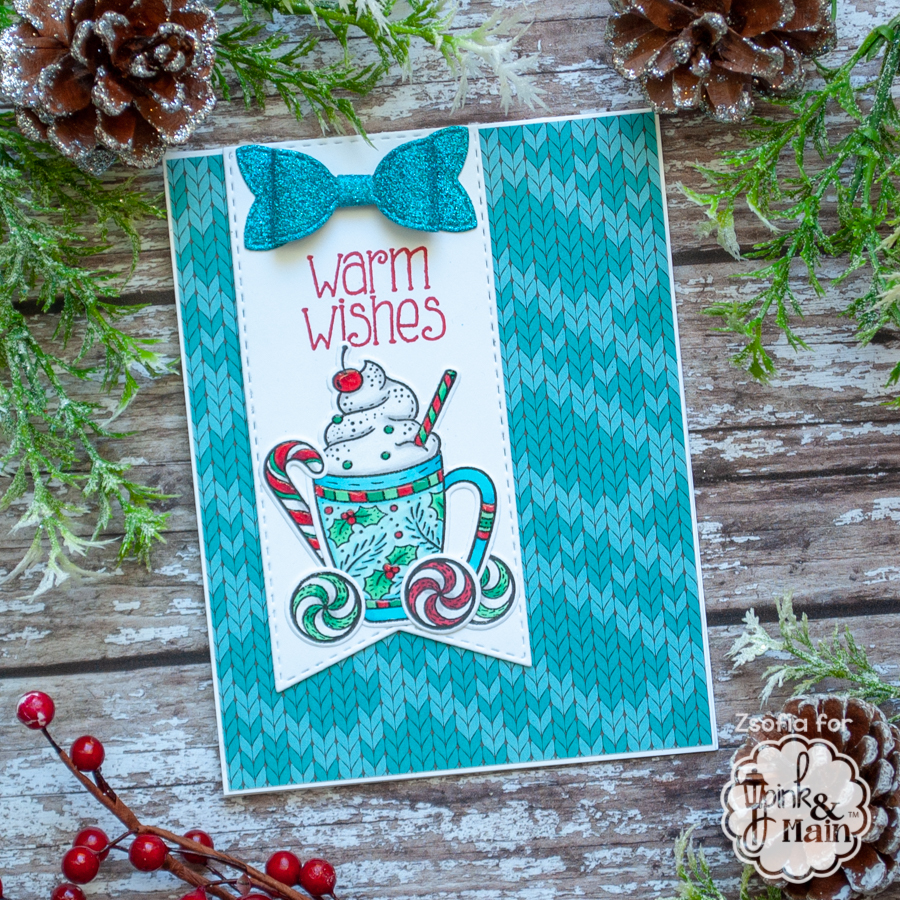
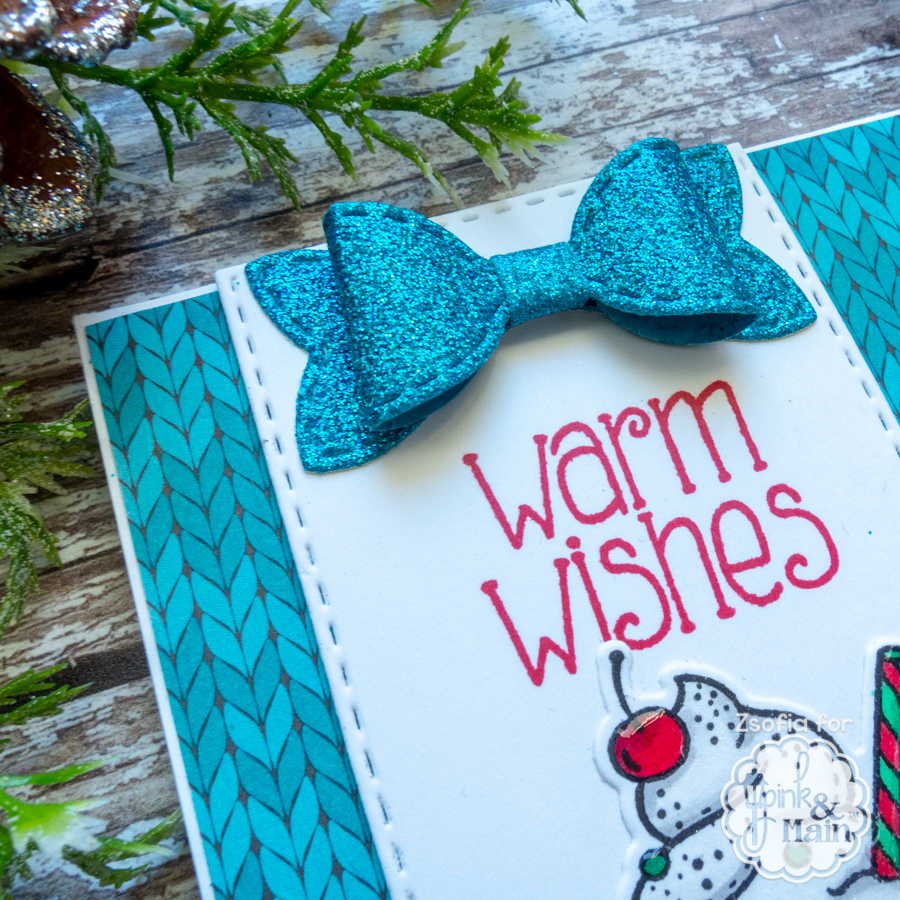
I guess you are all busy with the Christmas preparations and feel exhausted in a way. A good coffee always helps and if it comes in a pretty mug, well, it can bring back the energy in a second.
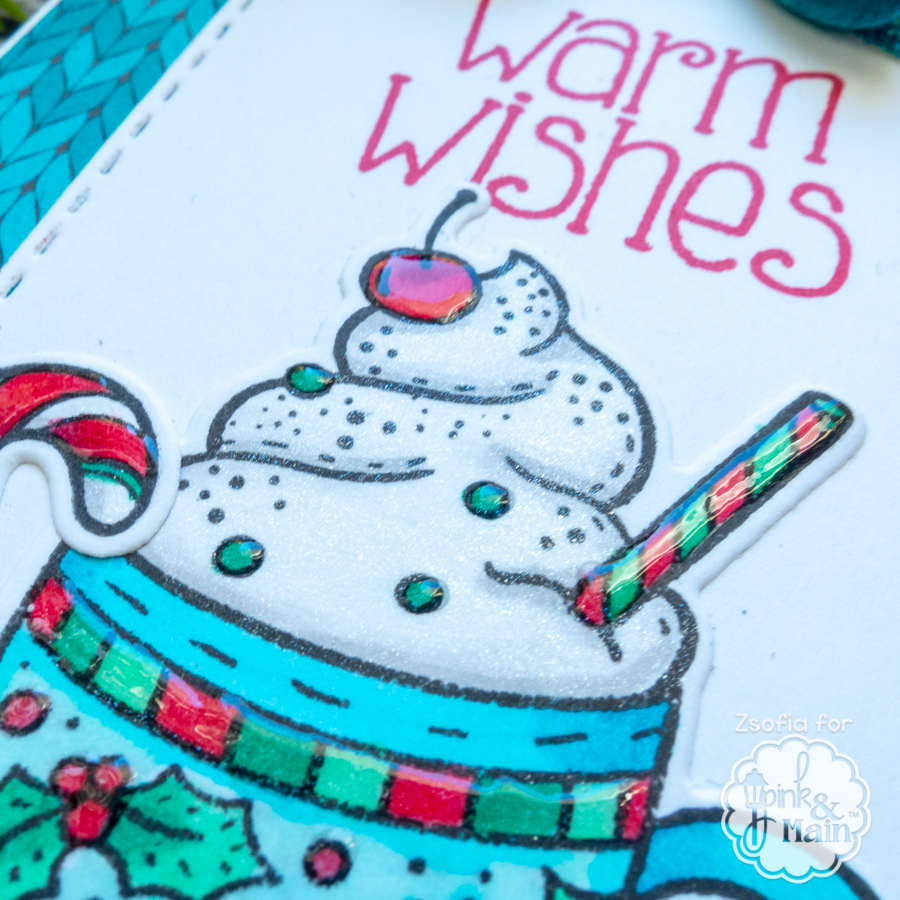
For my card I stamped and coloured the images from the Christmas mugs stamp set. I used copic markers and I cut them all out with the coordinating dies.
I partial die cut a Thin Fish Tail banner from white cardstock and adhered the mug and candies on the bottom. Above it I stamped a sentiment with red ink.
I die cut a Medium Bow from blue glitter sheets and assembled it on the top of the banner. For the background I chose a cozy pattern from the Sweater Weather paper pad. As a last step I added a ton of shimmer with a clear shimmer pen and shine with glossy accents. I love the sparkle!
I hope you enjoyed today’s inspiration and you manage to take a bit of rest during the holidays! Merry Christmas!
It is my second post today, this time I brought you a funny Christmas card for all of you with a sweet tooth. Because we all know that Christmas calories don’t count, right? I used Pink and Main products to make this card.
I white heat embossed the 2 sentiments from the same stamp set on dark green cardstock strip and adhered the die cut cakes and cookies in between them. I matted the panel with red glitter cardstock.
For the background I wanted some texture so I die cut the Basket cover die from white cardstock and adhered it to a white cardbase. As a finishing touch I added a ton of clear shimmer to the cakes and covered some parts with glossy accents to make it super special.
I hope you liked today’s inspiration and will pop in again soon!
I have wonderful and exciting news to share: I have joined the Heffy Doodle Design Team! YAY! It was a big dream for me to be part of such an awesome group of talented crafters and work with the super cute Heffy Doodle products! Of course when I am happy, I make cards. Here it is, as a celebration for this great news.
I started with stenciling over a piece of Cookie Monster cardstock with the Twinkle, twinkle stencil and Salty Ocean Distress Oxide ink. Then I shifted the stencil and added white Glitz Glitter gel with a stencil pal.
While the background was drying I stamped and coloured the penguins and the tree from the Wanna build a snowman set using Copic markers. I cut them out with the coordinating dies.
I white heat embossed the rest of the sentiment on black cardstock and cut it to a thin strip. I also used the coordinating die for the word wishes, I love the look!
I matted the background with Cherry on top cardstock and assembled the scene. I used my clear shimmer pen to add sparkle to the snow and accessories and went over the ornaments, beaks and feet with glossy accents.
I wish you enjoyed today’s card and will pop in again soon.
I had a little crafty free time and made a card for the current Lawnfawnatics 66 challenge. I adore critters and when I got the latest Chibitronics set I had to ink up the cute mice from the Merry Mice stamp set and make a funny little scene.
I used my new Arteza coloured pencil set to colour them in, I really enjoyed how bright the colours are. I used the coordinating dies to cut them out.
To set the scene, I cut the Stitched scalloped rectangle frames from Knit Picky paper and also from light blue. I chose a light pattern for the floor and my favourite colourful one for the background.
I assembled the scene and stamped the sentiment in red from the Winter wavy sayings set on fog cardstock and cut it out with the Fancy Wavy banners die. I adhered it to the scene and stamped another sentiment from the Ho-ho-holidays set. I embellished the banner with some extra baubles.
I used my clear shimmer pen on the presents and ornaments and added glossy accents too. Finally the eyes I emphasized with a black glaze pen.
I am back today with a sparkly whimsical holiday card made with a stencil, glitter paste and the cutest flamingo ever!
I started with applying Purple Glitz Glitter gel on kraft cardstock through the Herringbone stencil. I used Pixie spray first on the stencil and it ensured it stayed put while adding the gel with a stencil pal.
While the background was drying I stamped and coloured the flamingo from the Oh Deer stamp set with Copic markers and cut it out with the coordinating die. By the way this set is on SALE now at the Pink and Main online store! I cut a piece of kraft cardstock, matted it with purple cardstock and die cut a stitched fishtail banner from Ice Rink sparkle sheet. I also cut a smaller banner from purple cardstock and layered them on top of each other.
I assembled the card and used the top part of the sparkly banner as snow under the flamingo. The sentiment I stamped on yellow cardstock and cut it down to a flag shape with my scissors.
As a finishing touch I stamped a couple of white snowflakes around the flamingo and covered the beak and legs with glossy accents. I also added clear shimmer to its hat and emphasized the eye with a black glaze pen.
I hope you got inspired and will try this technique!
I am on the Newton’s Nook Designs blog today with this sweet and sparkly Christmas card. I love glitter paper and I am on a die cutting wave nowadays as the year is ending and the days are busier than usual.
I have the Peppermint die for a while but I have not had the chance to use it. So I die cut the full circle and the candy “wings” from white glitter cardstock, and the topper from pink and blue glitter cardstocks and adhered them together.
I cut a 2 inch wide strip of Fog cardstock, matted it with a slightly wider white on and adhered the candies leaving space for the sentiment, which is from the Sentiments of the season stamp set, stamped in green.
For the background I chose a matching candy paper from Doodlebug Designs. By the way, this design can easily be adapted to birthdays too, just swap the sentiment!
I hope you enjoyed today’s quick holiday card and will pop in again tomorrow for more fun!
I am super excited to be joining the 7th Annual Deck the Halls with Inky Paws Blog Hop organised by Newton’s Nook Designs! For this very special event I created this cute Christmas card using one of my favourite holiday stamp sets.
I started with stamping and colouring the cute bear in the car from the Winston’s home for Christmas set with Copic markers and fussy cut it out.
While it was drying I cut a piece of light grey cardstock with the same die to be the road, and a white scalloped rectangle from the same die set to be in the background. I decided to add a silver metallic layer in between the two just because I love layered cards.
The sentiment I white heat embossed on silver metallic cardstock and die cut it with the rounded tag die from the Tag times two die set. I also die cut some pine from dark green cardstock and a red bow using the Pines and holly die set. I layered these on top of each other and assembled the scene.
I added a red and white striped patterned paper to a white top folding card base before adhering the scene in place. I used a clear shimmer pen on the bow and the presents, added glossy accents on some parts of the car and ribbons and my card was all done!
GIVEAWAY
Enter to Win! Deck the Halls with Inky Paws Hop Prizes! We will be choosing two lucky winners to win a $25 store credit for Newton’s Nook Designs online shop! To enter, just leave comments on the Design Team Member and Guest blogs (see list below)! Two winners will be chosen at random from the collective blogs in the blog hop. Make sure to check out each of their blogs and comment for your chance to win. You will not know which blog has been chosen so the more you comment on, the better your chances are of winning! You have until Sunday, December 8th at 9 pm EST to comment — winners will be announced on the NND blog on Monday, December 9th.
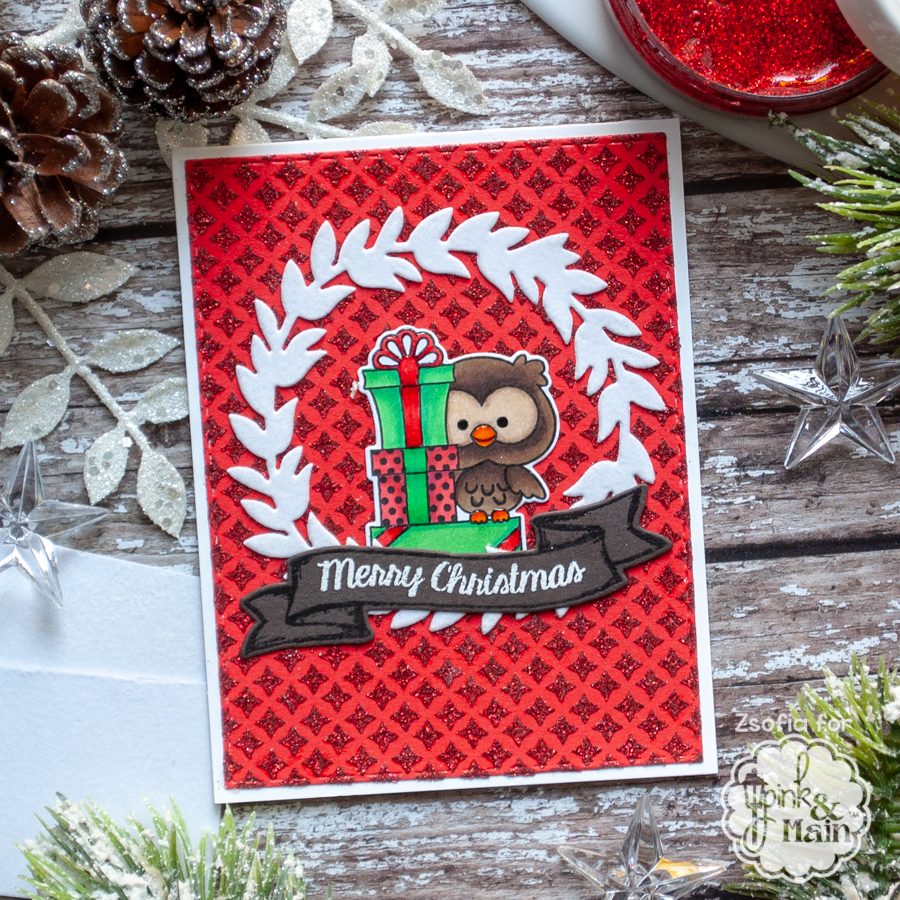
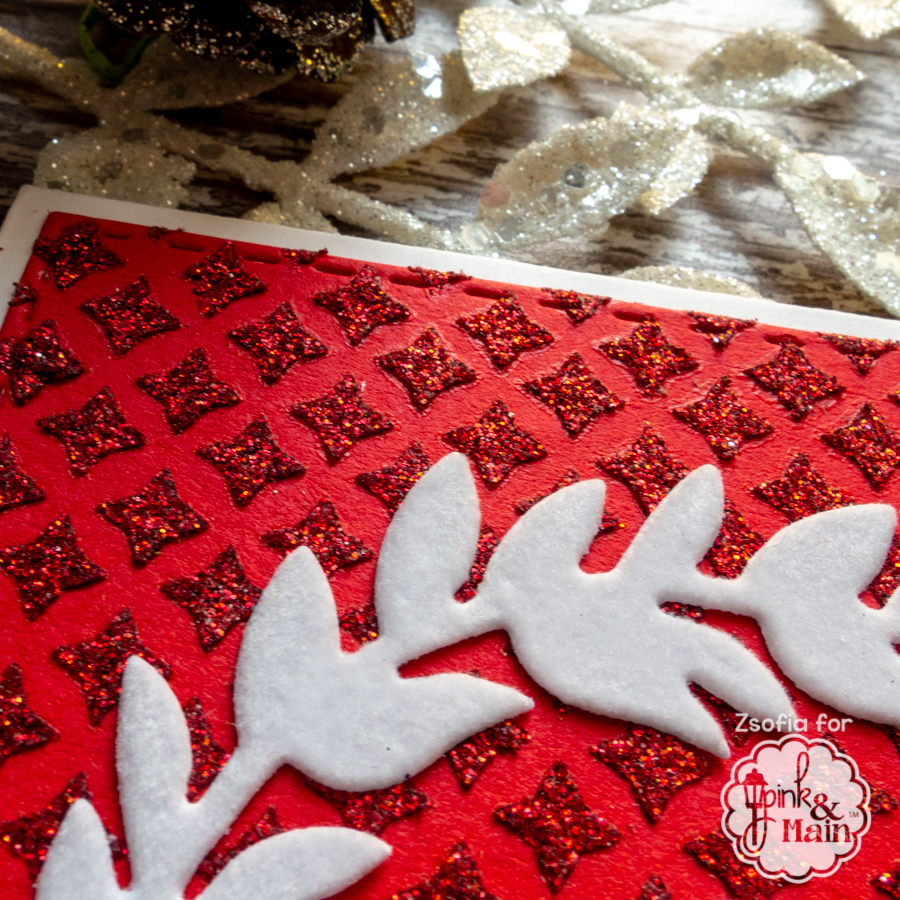
I am so excited to show you what I have created for the Pink and Main and Thermoweb Collaboration. For my project today I was playing with white Flock Transfer sheets and Red Glitz Glitter gel.
I started with the background: on a piece of red cardstock I secured the Four Point Star stencil with Pixie Spray to make sure it will not move while I am applying the Red Glitz Glitter gel. Believe me this spray is a game changer! No more gel seeping under the stencils! It ensure perfect results every time and can be washed off the stencil simply with warm water and a nail brush. I used a Stencil Pal to apply the glitter gel – it is so easy to get smooth results with this tool!
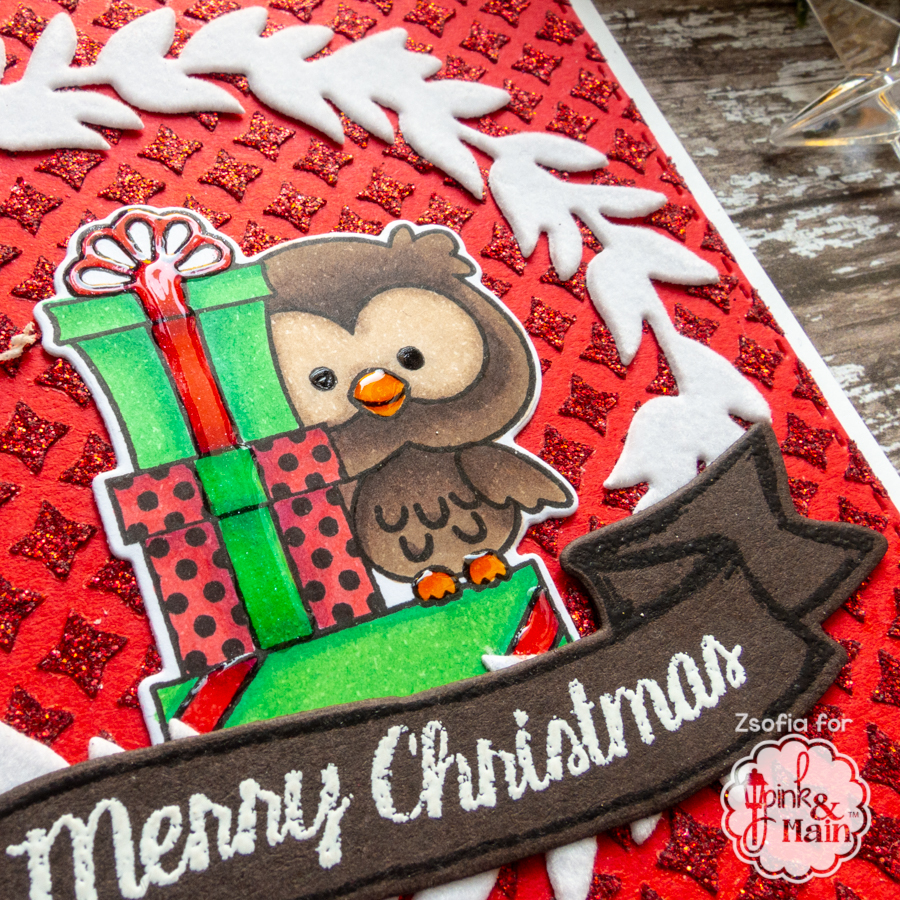
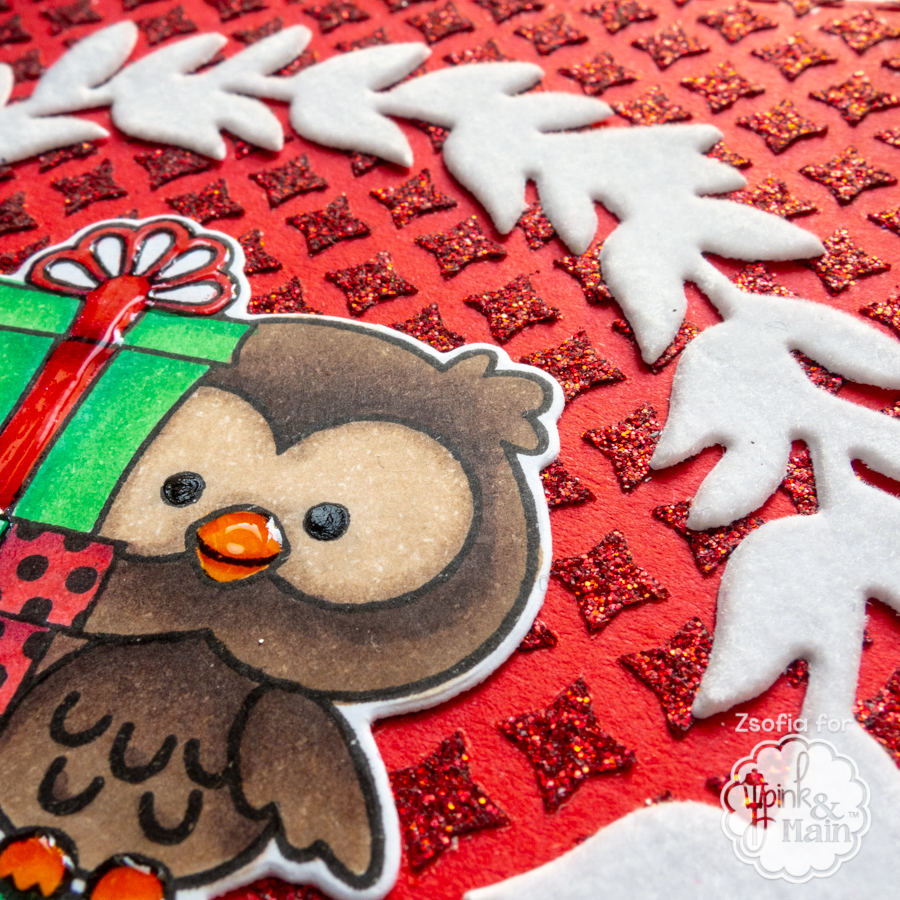
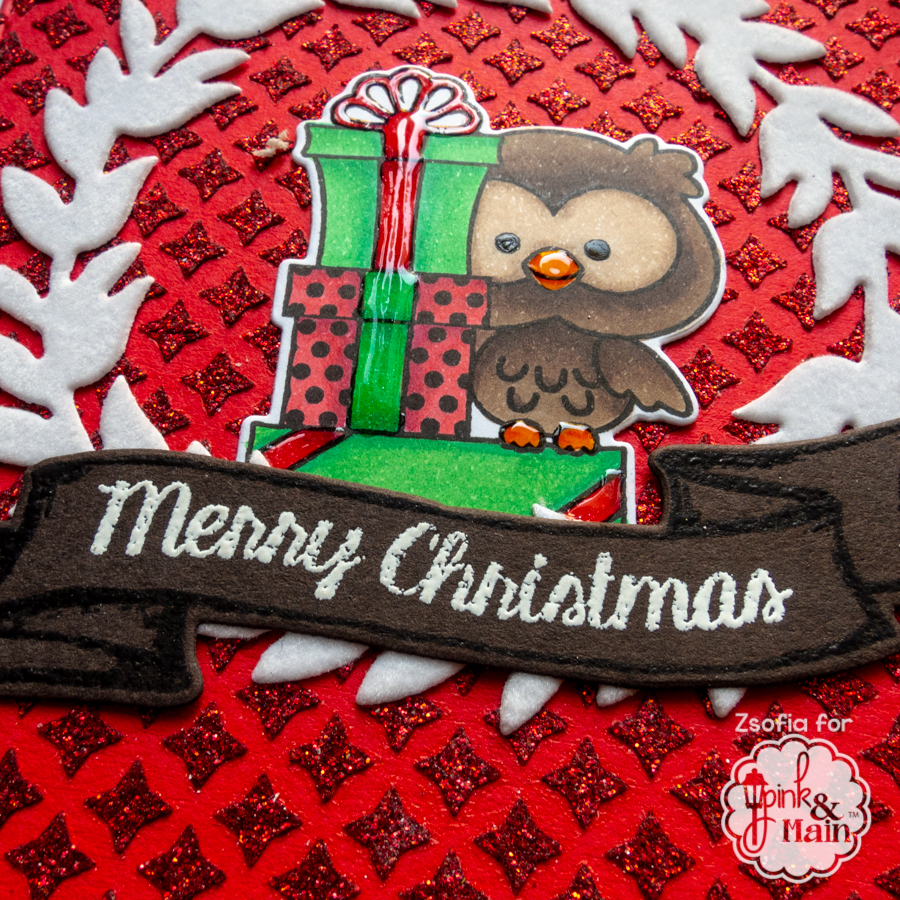
Until my panel was drying I stamped the cute owl from Howlidays and quickly coloured with Copic markers. I used traditional colours but it would look gorgeous in any colour combination. I used the coordinating die to cut it out.
To create the focal point I wanted a frame around my little owl, so I die cut the Wreath Base die from white Flock Transfer sheet. I love the touch, it is so warm and adds a lot of interest to a simple die cut! The thickness of it is just perfect, the die makes the edges beautifully rounded!
The sentiment I stamped on a banner which I created with the banner stamp from Sketched Easter. I heat embossed it on dark brown cardstock with Hot Chocolate Embossing Powder. It gives a shiny tone-on-tone look. I curved the Merry Christmas sentiment from the Howlidays stamp set to fit in the banner and white heat embossed it.
I die cut the background with a stitched rectangle die and assembled the card. I added some clear shimmer to the ribbons and covered them with glossy accents just as the beak of the owl. I used a black glaze pen on the eyes to make it shiny.
GIVEAWAY
We have TWO prizes to be won! Here is what you’ll need to do: like BOTH Therm O Web AND Pink & Main Instagram page and Subscribe to our YouTube Channels. Therm O Web Instagram Therm O Web YouTube