Card for coffee lovers

Hello,

I am still writing from Cairo, sharing a card i made for mum when she ran out of coffee and i wanted to refill her stocks 🙂

20160512_174351 wm.jpg

First of all i selected my background patterned paper, which is not the usual way i craft. But this time i wanted to use this beatiful paper from Lawn Fawn together with The Greeting Farm stamp of the cutie girl holding a cup of coffee. I coloured her in with alcohol markers to match the patterned paper, added a lot of shimmer and shine here and there with my usual combos: wink of Stella, black glaze pen, white gel pen and glossy accents.

20160512_174423.jpg

20160512_174418.jpg

Then i die cut my image with a Lawn Fawn die to achieve the stitched rounded edges. Before adhering it to my patterned backgound, i die cut a sticthed heart border from green cardstock and glued it down under my image for more interest.

20160512_174407.jpg

The sentiment is a YNS die cut several times from turquise cardstock and stacked up on each other with liquid glue. The rest of the sentiment i stamped from several stamp sets (mix&match). Wink of stella and a lot of glossy accent made my coffee title stand out. A few enamel dots finished off my card.

20160512_174501.jpg

I really enjoyed the colouring part of this image, i wish you like this card as much as i do.

I am participating in 3 challenges with this card:

  • SSS Wednesday Challenge Add some shimmer

Simon Wednesday Challenge Blog

  • SSS Monday Challenge Use patterned papers

Simon Monday Challenge Blog

  • Summer Coffee Lovers Blog Hop

13130832_10209657747231052_7266796962897251339_oThanks so much for stopping by.

Hugs,

Zsofi


Cat simpathy card

Hello again,

Today i wanted to show you a card which i made as a memory for my mum and dad as they have recently lost their beloved furry friend, Rebi. She was a cutie black cat, whom we found 18 years ago as a kitty on the street while walking our dog. The furry ones made friends immediately and we felt so pity for the cat that we took her home to my grandma. After my grandma passed away, Rebi moved to mum and dad and lived there happily till the very end. We all miss her so much!

20160328_171546-1.jpg

First i made a distress ink background for my sky on watercolour cardstock. I put more ink on the bottom and bit less towards the top to make it gradient. I also added some shimmer mist for a shiny look. The cat and accessories are from an MFT stamp set, coloured with Shinhan markers. I die cut some stitched clouds from plain white cardstock and using a cloud border die i cut a white and a vellum layer. I needed a hungarian sentiment, so i created and printed my own on the white panel. It says “You live in our hearts forever”.

20160328_171556-1.jpg

I added tiny ink on the edge of the white cloud border for some dimension. I also stamped the thought bubble from the same MFT stamp set on vellum with Versamark ink and heat embossed with white embossing powder. I die cut some red hearts and covered them with glossy accents as embellishments. Of course i had to finish it all off with some Wink of stella shimmer and i made the eyes pop using a black gel pen. The same black pen i used to go over the printed word “forever” too, to put more emphasis on it. I love the way it looks.

20160328_171706_001.jpg

While making this card i realized that crafting really has therapeutical effect. That stone of missing our furry little friend got lighter somehow on my heart. We will never forget you, little Rebi!

DSCN5321 (2)

I hope you liked my card today and got inspired. I am playing along in the SSS Wednesday Challenge Animal Magic.

See you soon,

Zsofi

####

Sziasztok!

Ma egy fájó témát hoztam, egy emléklapot, amit anyunak és apunak csináltam, mikor nemrég elvesztették szőrös kis kedvencüket. Rebi egy cuki fekete cica volt, akit 18 évvel ezelőtt az utcán találtunk kölyökként kutyasétáltatás közben. A kutyusunk és Rebi azonnal barátok lettek, és nem volt szívünk a cicát magára hagyni az utcán. Így hazavittük a nagymamámhoz, aki sok-sok éven át gondoskodott róla szeretetben.Amikor a nagyikám meghalt, anyuékhoz költözött Rebi és ott élt boldogan élete végéig. Mindannyiunknak nagyon hiányzik!

20160328_171830-1

Először is akvarel papíron distress tintával hátteret készítettem: alul több tintát használtam, felül kevesebbet az átmenetes hatás kedvéért. Végül shimmer mist-tel lefújtam az egészet, attól lett olyan szép csillogós. A cicát és kiegészítőit egy MFT nyomdakészlettel pecsételtem, alkoholos filcekkel színeztem és Big Shot-tal vágtam ki a hozzá tartozó vágósablonokkal. Néhány fehér felhőt is vágtam ötésmintás sablonnal. A feliratot magam készítettem és nyomtattam fehér kartonra, amit aztán egy felhő bordűrsablonnal vágtam ki és tintáztam a szélét. Ugyanezzel a sablonnal vágtam egy pausz réteget is. A kis gondolatfelhőt átlátszó Versamark tintával pecsételtem pausz papírra és fehér domborítóporral hődomborítottam. Egy pár piros szívet is vágtam és glossy accent-tel tettem fényessé. Nem tudtam megállni, és a szokásos csillámtoll – glaze pen kombóval emeltem ki pár részletet. A nyomtatott feliraton is átmentem a glaze pen-nel, ettől szép 3D-s és fényes lett.

Amíg a lapot készítettem, rájöttem, hogy terapeutikus hatása van az alkotásnak, a szívemen a kő kicsit könnyebb lett, mire elkészültem. Remélem nektek is tetszik a lap és hamarosan viszontlátlak itt egy újabb inspirációra.

Üdv,

Zsófi


Bon voyage card

Hello,

I am writing this post from Cairo, how nicely it mathces this week’s SSS Monday Challenge World Traveler 😀 I wanted to share a card with you today which i have made for one of my daughter’s group-mates from KG. They are leaving for France for a year and we just wanted to say good bye to them with this little note.

20160527_135047 wm

First of all, i stamped and coloured my images with alcohol markers and die cut them with the coordinating dies (MFT). As i didnt have any stamps or dies of Paris, i printed one from the web. It doesn’t have to be perfect, it is just the background of my scene anyways. Then i made my frames using several MFT and SSS dies in the olour of the french flag. I glued everyhing together and added my usual final touches: glossy accents, white gel pen, black glaze pen and some shimmer with clear wink of stella.

20160527_134948 (2).jpg

The sentiment had to be in french too, luckily i had a LAWN FAWN set with the Bon Voyage sentiment in it 🙂

I hope you got inspired and will try to make a travelling card. for someone going on vacation or just as a memory of a trip you had.

Simon Monday Challenge Blog

I will be back soon with another fun challenge post. Till then have a great weekend! We started a lazy one here already 😉

Hugs,

Zsofi


Altenew card set

Hello,

I am popping in to share what I was busy with in the last 2 days. I made a set of cards with a beautiful Altenew layering set and the gorgeous Altenew inks. I have been really waiting for long to try this stamp set, and I couldn’t stop at one card, I made four, I just changed the colour combos and the sentiments to have a variety. I will need these soon for a family gathering.

20160605_171315 wm

First I die cut my white panels for the stamping using my favourite stitched rectangle dies from SSS. Then I stamped my flower with all its layers, I masked it with a post it mask and stamped the smaller flower and the 2 leaves with all their layers. Then I masked these too and stamped the last 2 leaves with a bit of darker shades for contrast, I have never made monochrome cards before so it was a challenge, but I like the way it turned out. For the sentiment I used another 2 Altenew stamp sets and the darkest shade of the colour combos. Then I stamped them again in Versamark and heat embossed in clear embossing powder.

20160605_171346 wm

For the layering I used coloured cardstocks and some glitter paper from DCWV as my bottom scalloped layer. I must admit that I have problems wasting all the glitter paper under my panels, so I die cut their middle with a rectangle die and saved those precious pieces for later 😀 My dark panel is popped on the lighter shade with a piece of fun foam, to get more dimension.

20160605_171545 wm

A bit of shimmer,  glossy accents and 3 little gems in coordinating colours finished off my cards.

20160605_171438 wm

I will show them one by one also. I cannot decide which one is my favourite.

20160605_171534 wm

20160605_171454 wm

20160605_171405 wm

And as Ramadan starts tomorrow, I had to make one for the Holy Month.

20160605_171446 wm

I hope you enjoyed today’s inspiration and you will return soon.

I am joining in the SSS Monday Challenge Monochrome and the SSS Wednesday Challenge Mask it.

Simon Monday Challenge BlogSimon Wednesday Challenge Blog

See you,

Zsofi

Coffee card to start the day

Hello Coffee Lovers,

Yesterday I woke up and while drinking my morning coffee I checked my favourite sites on the net. I came across with the ongoing YNS sketch Challenge #40 and had to make a card to match my morning mood. And coffee 😀

20160603_140529 wm

First I took a piece of kraft cardstock and used the SSS swirly background on it, I love this BG die, it is one of my favourites and most used one. Then i cut a small strip of dark brown cardstock as the bottom of my card and placed a thin strip of patterned paper on top of it to hold my sentiment (Lawn Fawn). For the upper part of my card i wanted to try a technique i saw from one of my favourite cardmaker, Laura Bassen: to glue a piece of cardstock on fun foam and die cut together. I used this for the arch (MFT blueprints) and for the coffee die from YNS. I had to send it through few times and my cut was not perfect, but i found it good enough to go with it in the morning rush 🙂

20160603_140550 wm

The little cat is from the very first YNS set i bought: Coffee…right meow. I stamped him with Memento Rich Cocoa ink to match the background and coloured in with Shinhan alcohol markers. After die cutting with the coordinating die, i added some Spectrum Noir clear sparkle pen on the mug along with glossy accent to make it really in focus. I also cut the cat die of brown fun foam, to match the height and style of my other raised areas. I love the brown edge peeking through when i look at the card from the side.

20160603_140606 wm

After assembling the card, i added 3 die cut hearts from the same set, treated them with shimmer and glossy accent and it was ready. Relatively fast card and it felt so good to craft early morning before my kids woke up.

20160603_140618 wm

There is still time to play at the YNS #40 Challenge, give it a try.

YNSSketch40

See you soon,

Zsofi

####

Jó reggelt kávékedvelők,

Egy kis inspiráció, amit a  reggeli kávém ihletett, meg egy Sketch Challenge (#40) a kanadai Your Next Stamp oldalán.

20160603_140529 wm

Először is egy kraft kartonon használtam az egyik kedvenc háttérsablonomat (SSS), ami gyönyörű szaggatott vonalasa kacskaringókat vág a papírba. Imádom! Ezután barna kartonból vágtam egy csíkot a lap aljára a vázlatnak megfelelően, erre került egy vékony csík mintás papír és a felirat Memento Rich Cocoa tintával pecsételve (Lawn Fawn nyomda). A felső résznél egy technikát próbáltam ki, amit egyik kedvencemtől, Laura Bassen-től lestem el: vágás előtt egy darab dekorgumira kartont ragasztunk és együtt vágjuk őket ki. A felső panel könyyű volt, a felirat kicsit nehezebb, mert nagyon vékony a sablon, amit használtam. De azért többszöri áttekeréssel a Big Shot-on sikerült.

A kávés cica a legelső YNS nyomdakészletemből való, alig vártam, hogy használhassam. Barna tintával pecsételtem, alkoholos filcekkel színeztem, majd a hozzá tartozó sablonnal kivágtam. Barna dekorgumiból is, hogy egyforma magas legyen a lap többi részével. tetszik, ahogy oldalról ránézek és a barna alátét kikandikál a fehér papír mögül.

Miután összeállítottam a lapot még néhány kék kis szívecskét helyeztem a háttérre, ezeket és a bögrét csillámtollal és glossy accent-tel emeltem ki és kész 😀

Remélem inspirál és ti is játszotok! Még van egy kis idő!

Szép napot!

Zsófi


Welcome home shaped card

Hello,

I wrote this post on Thursday, it just didn’t get published due to any reason. Here you go.

Today is a special day for me as my husband has returned home after being away for a month for work. It is always a celebration when he comes home to us, the kids are flying into his arms. As it is a regular thing in our life, happening every other month, I make a lot of welcome home cards. This time I wanted to make a house shaped card.

20160602_070613 wm

I have that die from MFT (Sweet home) which gives you all parts to build a house, which makes it so much easier, but it could be done with a craft knife too. I die cut my cardbase first from an A2  white card, leaving the edge of the die on one side hanging off, so it doesn’t cut through. I cut the hole for the windows and the door. Then I cut my main house panel from adhesive cork sheet, with the windows and door placed exactly at the same spot as on the cardbase. I die cut all the decorative elements from dark brown cardstock, the roof 3 times and layered them on the base. before adhering the cork panel on the cardbase, I sandwiched a piece of acetate in between, so it looks like glass and still see through.

20160602_070639 wm

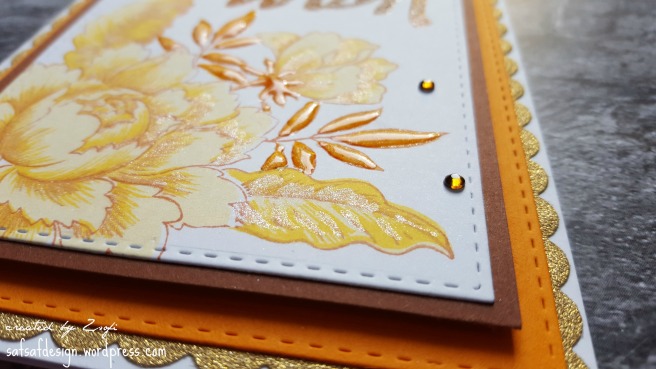
I cut a piece of grass with a lawn fawn border die from green cardstock and made a sweet home board hanging above the door using a cross stitch die from Lawn Fawn and heat embossing a sentiment from an older Lawn Fawn set in gold. I added 2 small gold brads and mounted it on the house with foam tape for dimension.

20160602_070619 wm

The last decoration I added was the 2 pots of flowers, using the house builder die elements and coloured cardstock. A tiny gold pearl in the middle of the flowers and my card was ready.

20160602_070628_001 wm

I love the way it turned out, I never made a shaped card before but it is super fun! Both my kids and even my mum asked me to make one for them 😀

20160602_070713 wm

That is it for today, I hope you try making a shaped card also. It looks so unique.

Thanks for stopping by,

Hugs,

Zsofi

 ####

Sziasztok!

Ez a bejegyzés csütörtökön készült, csak valamiért nem vált publikussá…Íme!

Ma egy különleges nap van számomra, hazajött a férjem egy hónap munka után. Ez mindig ünnep számunkra, a gyerekek repülnek a karjaiba, amikor megérkezik. Mivel ez egy rendszeres dolog nálunk (minden második hónapot tud velünk tölteni szabadságon), sok “üdv itthon” lapot készítek. Ezúttal egy ház alakút.

20160602_070613 wm

Egy MFT sablonkészletet használtam a házhoz, mert ebben minden részletre van egy vágókés, de készíthettek hasonlót egy művészkés és egy fémvonalzó segítségével is. Először is a lap alapját készítettem el: a házalap sablont egy félbehajtott fehér kartonra tettem úgy, hogy az egyik széle lelógjon picit a hajtásnál. Így azt a részt nem vágja ki, amikor áttekerem a Big Shot-on. Többször tekertem át, mert két réteg kartont vágtam egyszerre át. Utána kihajtottam a lapot és az előoldalra elhelyeztem az ajtó és ablak nyílásokat. Utána kivágtam a házalakot még egyszer parafa lapból és az ajtó-ablak nyílásokat ugyanott, ahol a fehér alapon van. Mivel a parafa a dekorgumihoz hasonlóan megnyúlik egy picit vágás közben, az illesztés nem let teljesen tökéletes, de a széleket ollóval megigazítottam, a nyílásoknál pedig a barna karton keret elfedte a hibákat. A parafa és fehér alap közé átlátszó műnyag lapot tettem. Általában csomagolásokat hasznosítok újra ehhez 🙂

A dekorációs elemeket a házra barna, zöld, rózsaszín és kék kartonból vágtam és rétegeztem a házra folyékony ragasztóval. A tetőt 3-szor vágtam ki és ragasztottam egymásra, sokszorozva a 3D hatást. A feliratot egy Lawn Fawn szettből Versamark tintával pecsételtem egy kivágott barna lapocskára, majd arany domborítóporral hődomborítottam. Két pici Milton kapocs szolgál “szögként”. A táblácskát 3D ragasztóval erősítettem a helyére. A virágok közepébe egy-egy mini arany gyöngy került (Rayher). Alulra egy kis fű (Lawn Fawn bordűrvágó) és kész 😀

20160602_070713 wm

A gyerekeimnek és anyukámnak is annyira tetszett, hogy egyből három megrendelést is kaptam a következő házra 🙂

Mára ennyi, remélem inspiráltalak és Ti is megpróbáltok készíteni valami hasonlót.

Üdv,

Zsófi