Newton’s Nook Designs April Release – Day 1

Hello Everyone,

I am so happy to be part of the Newton’s Nook Designs April Release reveals! Today our team features the awesome Never Enough Books stamps and dies and also a new Bookmark II die set! Who could resist these cuties?

All new designs will be available on 19/04/2024.

For my card I stamped and coloured all the images from the stamp set using Copic markers. I used pastel colours, 2-3 shades of each colour family. I cut them all out with their coordinating dies.

Then I die cut a kraft banner using the Basic Frames die set and popped up the shelves in the middle with 3D foam squares. I also die cut a dark green zig zag rectangle using the Frames and Tags die set, adhered the banner on the left side and popped up the stack of books on the other side.

I white heat embossed a sentiment on the bottom of the panel and used the remaining images to make the scene complete.

I chose a polka dot pattern for the background from the Bright Basics paper pad.

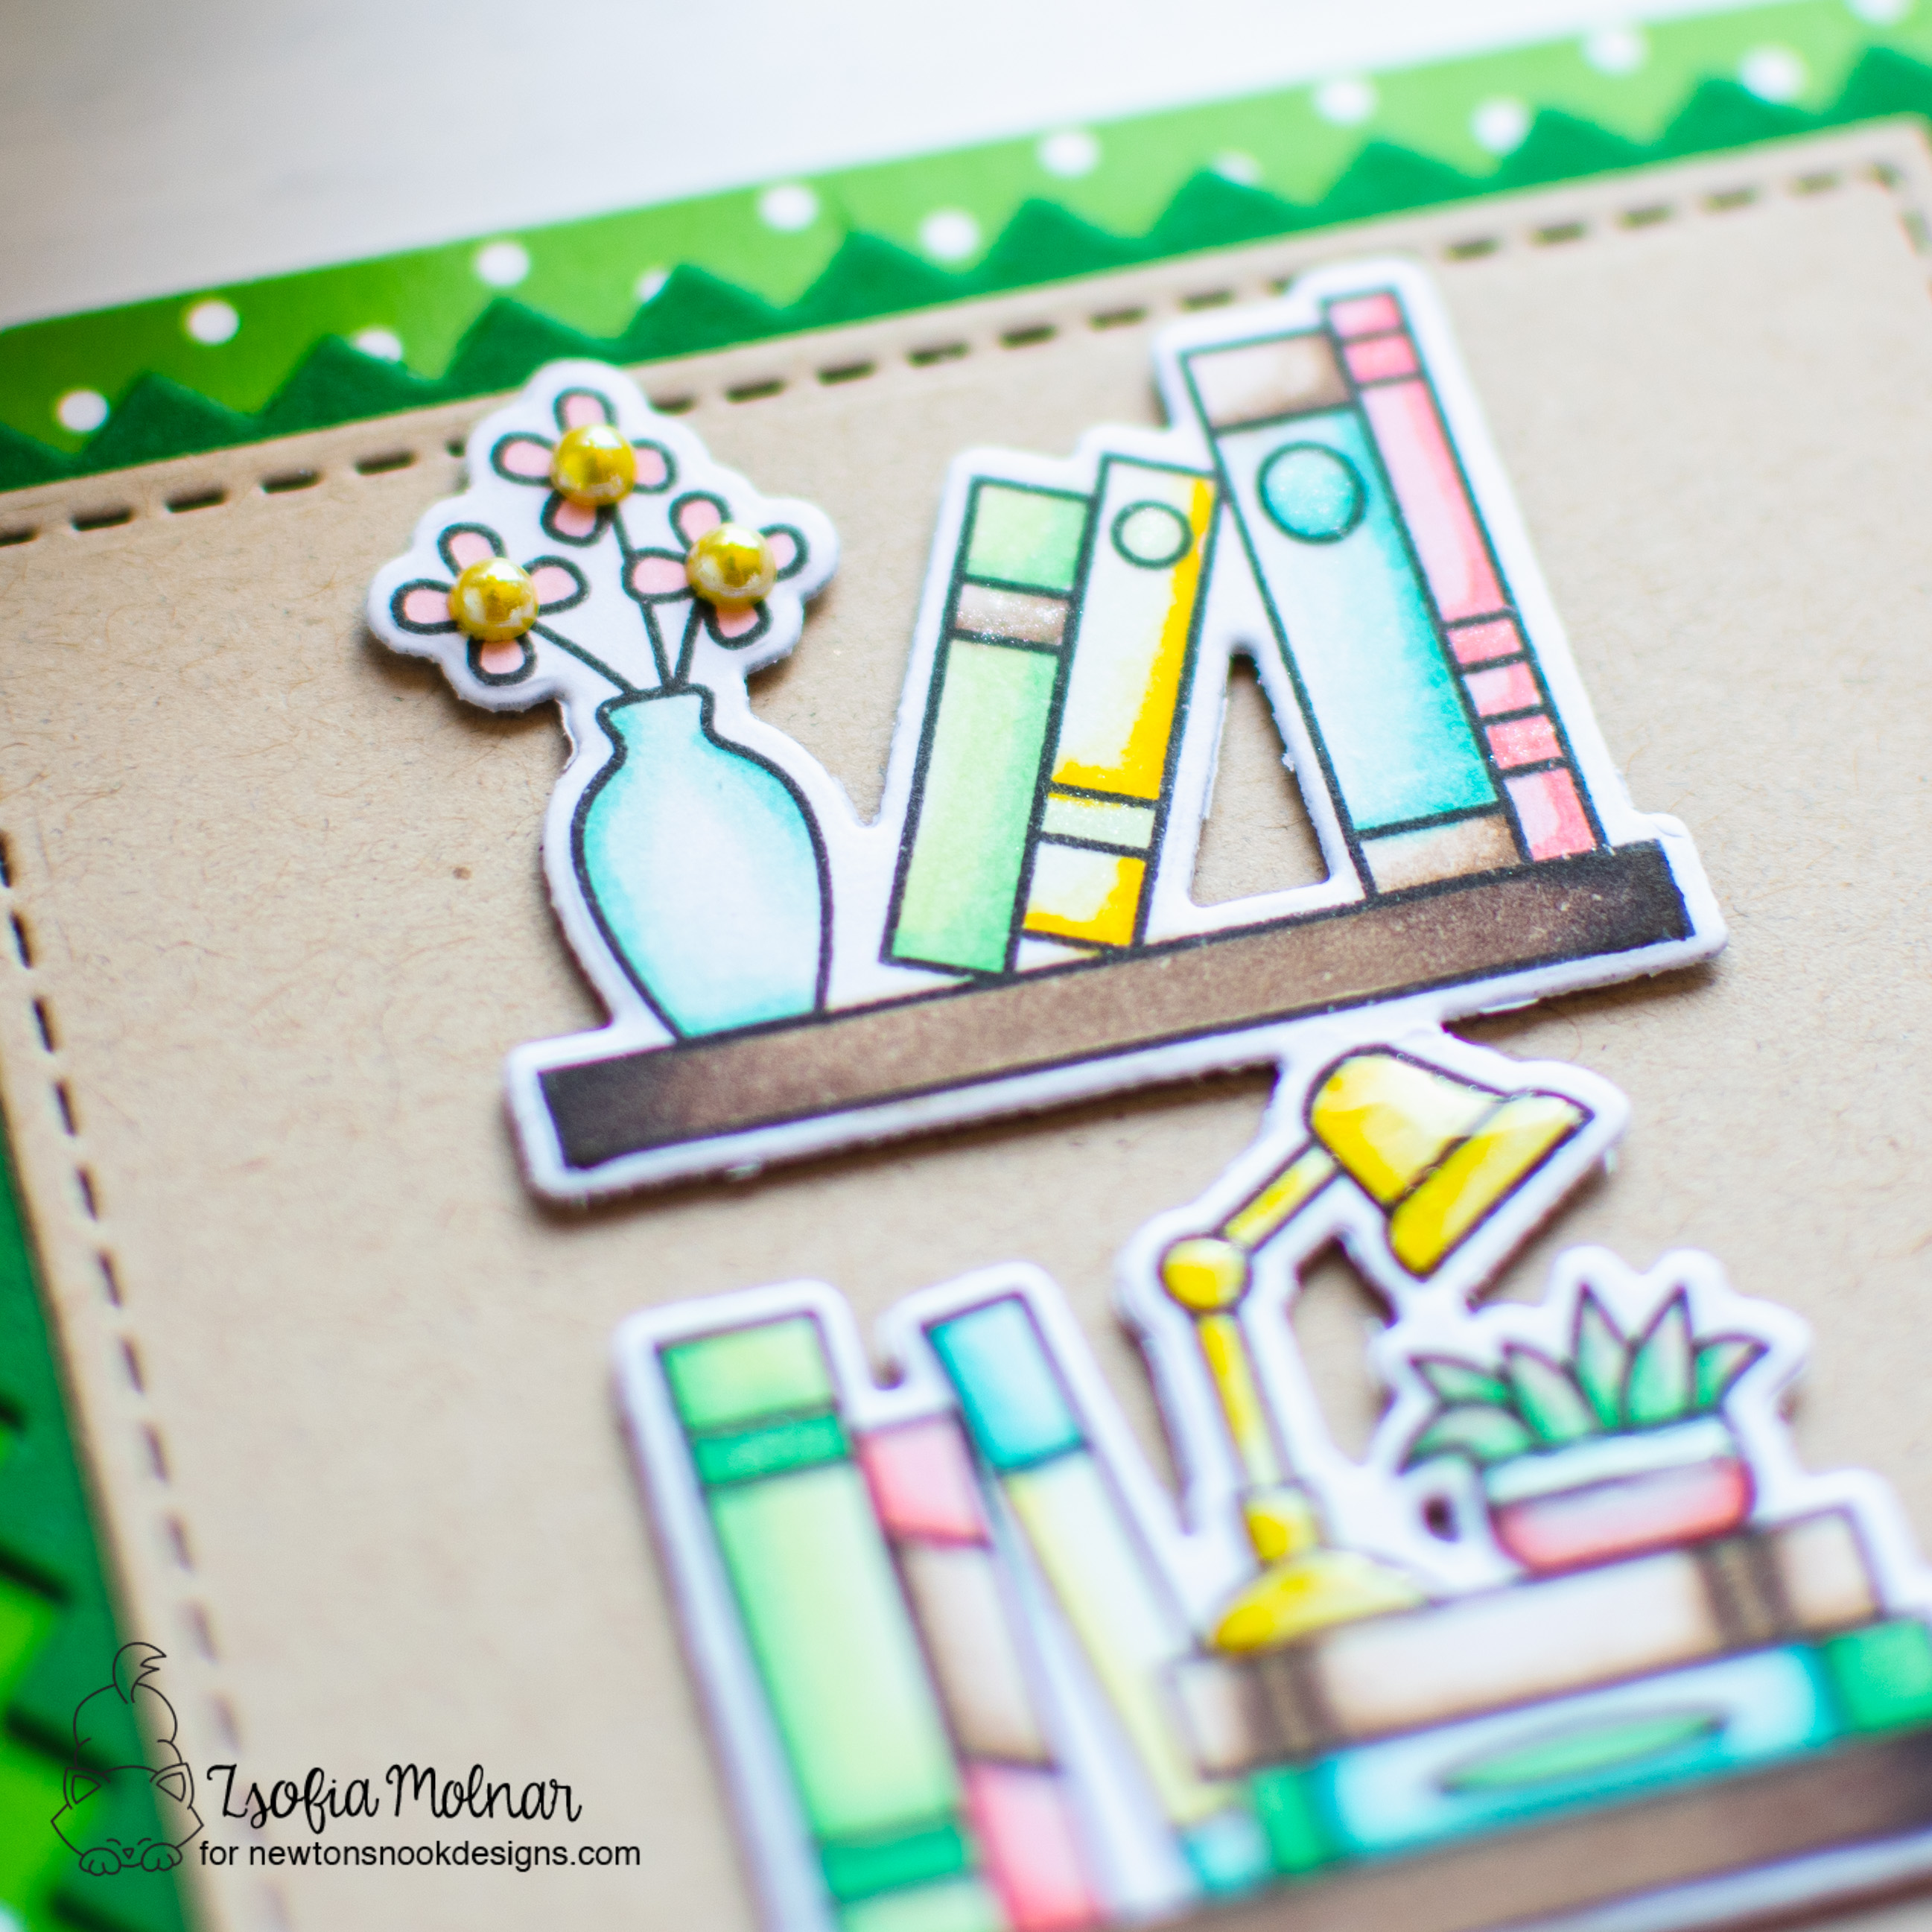
As a finishing touch I used a clear shimmer pen and glossy accents to emphasize some of the details. I also added some tiny pearls to the middle of the flowers.

GIVEAWAY

Enter to Win a $25 Prize! We will be choosing two lucky winners to win a $25 store credit for Newton’s Nook Designs online shop! The winners will be chosen at random from the collective blog posts featuring our new products this week. For a chance to win, leave comments on the Design Team Member Blog Posts (see list below) from Monday April 15 through Thursday April 18. You will not know which blog has been chosen so the more you comment on the better your chances are of winning! You have until Thursday, April 18th at 9 pm ET to comment — winners will be announced on the NND blog on Friday, April 19th.

Check out all the awesome Design Team Blogs below to enter:

Newton’s Nook Designs

Donna Idlet

Ellen Haxelmans

Larissa Heskett

Samantha Mann

Zsofia Molnar – you are here

Diane Morales

Farhana Sarker

Tatiana Trafimovich

Amanda Wilcox

I hope you enjoyed the first day of the reveals and will come back tomorrow for more inspiration!

See you,

Zsofi

Coffee Love – Newton’s Nook Designs

Hello Everyone,

I am back today with a colourful and cheerful love card, which I made for my husband who is a true coffee addict. He loves his Turkish coffee in a way that nothing can substitute it. I am not that picky, a good latte or cappuccino will make me happy, mostly if it comes in a cute mug. All products used for this card are from Newton’s Nook Designs.

First I did some hot foiling with the Coffee Beans Hot Foil Plate. I like to use Hammermill white cardstock with these plates and Spellbinders foils. This time I chose a metallic one which has a bit of brownish tone to it. I used the Spellbinders Glimmer Hot Foil system to apply the foil and ink blended over it with Distress Oxide inks: Abandoned Coral, Worn Lipstick and Scattered Straw. I used a die from Framework to die cut it.

Then I stamped the cute mugs from Love Cafe and coloured them with Copic markers. I used the coordinating dies to cut them out.

I also cut a small fancy edge rectangle from black cardstock using a die from Framework to hold the sentiment and a piece of vellum with a die from Frames Squared. I white heat embossed the sentiment on the black piece and popped up the images o the vellum using 3D foam squares.

I adhered the sentiment and vellum with thin 3D foam tape, so it has even more dimension. I mounted it all on a white top folding notecard and added my finishing touches: clear shimmer to the hearts ad some glossy accents.

I hope you enjoyed todays inspiration.

See you soon,

Zsofi

Newton’s Nook Designs Cozy Release – Day 1

Hello everyone,

Surprise! Newton’s Nook Designs is having a brand new, coffee and books themed release on 16th November, yay! On the first day we are revealing the gorgeous new hot foil plates and silhouette dies along with the new Heartfelt Coffee stamp set which coordinates perfectly with the previously released Heart Frame dies.

All new products will be available on 16/11/2023.

CARD 1

I stamped and coloured the Heartfelt Coffee stamp set using a rainbow of Copic markers. I used the Heart Frame die set to cut it out and matted it with a larger stitched heart from the same set,

For the background I simply cut some strips of cardstocks in rainbow colours and adhered those in the middle of a top folding kraft card base.

For the sentiment I heat embossed one from the Heartfelt Coffee stamp set on brown cardstock and cut it out with a skinny banner die from A7 Frame and banners, I popped it up with thin 3D foam squares and finished the card with a bit of clear shimmer on the patterns of the mugs and adding glossy accents to the coffee beans.

CARD 2

I used pink hot foil with the Coffee Mug Hot Foil Plate and cut it out with its coordinating die. I used the Circle Frames die set to cut a piece of vellum to go behind the mug.

For the background I use the Mugs stencil on a previously ink blended cardstock, where I used Scattered Straw-Worn Lipstick-Picked Raspberry Distress Oxide inks. For the stencil I went back with the same colours just with heavier hands. For the yellow part I used a bit of Fossilized Amber too, to make the pattern stand out more. Before removing the stencil I used a Gold Shimmer Spray to add a subtle sparkle to the mugs. When it was all dry, I added some black and white splatters to the whole panel and cut it down with a die from Frames and Flags.

I stamped a sentiment from the Heartfelt Coffee stamp set, coloured it with Copic markers and cut it out with a skinny banner from A7 Frames and Banners. I gave it a bit bigger black banner mat, for which I used a die from Frames and Flags.

After assembling the card I added black twine to the top and used glossy accents on the sentiment.

CARD 3

I used the Coffee Beans Hot Foil plate with gold foil on dark brown cardstock, cut it down to a strip and added some white scalloped edge with a die from A7 Frames and Banners. I adhered it to the middle of a kraft card base.

Then I die cut a few mugs from coloured cardstock scraps with the Coffee Silhouette die set. I used Copics to add a bit of shading to each. I die cut a piece of vellum and white cardstock with some dies from Circle Frames and prepared the focal panel as on the pictures.

I stamped a sentiment on green cardstock from the Heartfelt Coffee stamp set with brown ink and cut it down to a thin strip. I finished the card with glossy accents on the hearts.

GIVEAWAY

Enter to Win a $25 Prize!

We will be choosing two lucky winners to win a $25 store credit for Newton’s Nook Designs online shop! The winners will be chosen at random from the collective blog posts featuring our new products this week. For a chance to win, leave comments on the Design Team Member Blog Posts (see list below) from Monday November 13 through Wednesday November 15. You will not know which blog has been chosen so the more you comment on the better your chances are of winning! You have until Wednesday, November 15th  at 9 pm ET to comment — winners will be announced on the NND blog on Friday, November 17th.

Check out all the awesome Design Team Blogs below to enter:

Newton’s Nook Designs

Donna Idlet

Ellen Haxelmans

Larissa Heskett

Samantha Mann

Zsofia Molnar – you are here

Diane Morales

Farhana Sarker

Tatiana Trafimovich

Amanda Wilcox

I hope you enjoyed the inspiration today and will be back tomorrow for more fun!

See you,

Zsofi

Pumpkin Spice Wishes – Newton’s Nook Designs

Hello Everyone,

Today’s coffee card is a bit more elegant and cozy: I was playing with some of my favourite things from Newton’s Nook Designs.

I started with a kraft cardbase and used the Tree Rings stencil with Gina K Glitz Glitter gel which I mixed with Ground Espresso Distress Oxide ink. The result is a gorgeous, dimensional and glittery background, I love it!

Until it was drying I stamped and coloured the girl from the Pumpkin Latte stamp set using Spectrum Noir Illustrator markers.I cut her out with the coordinating die.

I also cut a bunch of Autumn Leaves from coloured cardstock scraps and a banner with the Frames and Flags die set from Speckled Eggshell (Lawn Fawn) cardstock to hold the sentiment, which I stamped in brown.

After assembling the card I decided to distress the edges of the background with Ground Espresso ink and a blending brush. It gives a bit more depth.

I will upload this card to the Fall/Winter Coffee Lovers Blog Hop and also to the Simon Says Stamp Wednesday Challenge Stencil it.

I wish you like my coffee card today and will join me again tomorrow for another cute one.

See you,

Zsofi

Monstrous love – MFT

Hello Everyone,

I am back today with a very funny card, still expressing my special relationship with COFFEE. I used stamps and dies from My Favorite Things and even the sketch is a relatively recent one from their Sketch Challenges (#613).

I started with stamping and colouring the cute monsters from MFT Monster Sized (retired set) and the coffee cups from MFT Friends At First Sip using Spectrum Noir Illustrator markers: CG3, CG2, CG1, CG05, BT8, BT7, BT5, BT4, BT3, MB2, MB05, EB7, EB5, EB3, IG9, IG7, IG5, IG3, IG1. Then I cut them out with their coordinatig dies.

Then I die cut two smaller MFT Double Stitched Rectangles from white cardstock and blended them with Ground Espresso and Antique Linen Distress Oxide inks. I added some water and diluted ink splatters and adhered the panels to a white top folding card base.

I stamped a sentiment in between the two panels using brown ink and die cut the word “coffee” with the Emitt Alpha dies from brown and bronze cardstock and layered them on top of each other tiny offset. I adhered the letters to the monsters and popped them up on the card using 3D foam suares.

As a finishing touch I used a white gel pen to add highlights and added glossy accents to the eyes an teeth, horns and cup covers.

I will link this project up on the Fall/Winter Coffee Lovers Blog Hop as my second entry.

I wish you enjoyed this funny card and it made you smile. Come back tomorrow for another caffeinated project.

See you,

Zsofi

Coffee-love – Pretty Pink Posh

Hello Everyone,

I am back today with a card which is a tribute to my love for coffee 🙂 I made this cutie with stamps, dies and a fun layering stencil from Pretty Pink Posh, let me show you how!

First I created the background on cream cardstock using Distress Oxide inks with the Layered Coffee Cups stencil: Scattered Straw and Worn Lipstick for the mugs, Ground Espresso for the coffee layer and Abandoned Coral for the hearts. I also added white texture paste to the on-the-go cups and spritzed the mugs with Shimmer Mist for a subtle sparkle. After removing the stencil I added some splatters of the same diluted inks, it makes the whole background so playful.

Then I stamped the cups from Winter Drinks using brow hybrid ink for a warm feel. I coloured them with Spectrum Noir Illustrator markers: EB7, EB5, EB3, RB4, RB1, RB05, GB4, GB2, GB1, DR1, DR05, FS5. I die cut them with their coordinating dies.

While I was die cutting I also cut a brown tag from textured cardstock with the Fall Circles die set, white heat embossed the sentiment on the top from the Simple sayings: Life stamp set and popped up the cups with foam squares under it.

I trimmed the background piece tiny so I could mount it on a guava top folding card base, popped up the focal panel with 3D foam squares and added a matching twine to the top of the card.

As a finishing touch I used a clear shimmer pen and glossy accents on the cups and scattered a bunch of Sparkling clear jewels all around the card.

I will link this project up to the Fall/Winter Coffee Lovers Blog Hop.

I wish you like my card and will pop in again soon for more inspiration. I have some more caffeinated cards to share this week 😉

See you,

Zsofi

Merry Chrismugs – Heffy Doodle

Hello Everyone,

Welcome to another edition of my Perfect Combos series for Heffy Doodle. Christmas is close and as a real coffee addict I had to create a special card with the adorable Perfect Blend stamp set. Let me show you how I created this card!

First I stamped the coffee cups from the Perfect Blend stamp set and coloured them with Spectrum Noir Illustrator markers: DR4, DR2, DR1, AG5, AG3, AG1, RB2, RB1, RB05, EB5. I used the coordinating dies to cut them out. Then I took the faces of the Veggie Patch stamp set and personalized the cups. It is so easy and gives them a lot of character!

Then I die cut a wreath 4 times from green cardstock wit the Leafy Laurel Circle die and layered the on top of each other. I also cut some darker green sprigs and red glitter berries to make the wreath festive.

For the background I chose a woodgrain cardstock and distressed it with Antique Linen Distress Oxide ink and added some Ground Espresso and gold splatters. After giving it a red mat I mounted it on a white card base an adhered the wreath and cups in place.

For the sentiment I used the Holiday Sentiment duo set and white heat embossed “merry” on a dark green cardstock strip. I also cut a fun sentiment with the Stitched Alphabetters set from red glitter cardstock and adhered the letters in a playful way. Isn’t it cute?

As a finishing touch I used a bit of clear shimmer on the foam and glossy accents on the lid. I also emphasized the eyes of the green cup with a black glaze pen.

I hope you enjoyed today’s inspiration. Don’t forget to show us what you create in our Facebook group, we love to see your cards!

See you soon,

Zsofi

Pretty Pink Posh October Blog Hop

Hello Everyone,

I am thrilled to be part of the October Release Blog Hop of Pretty Pink Posh!

If you are looking for the Heffy Doodle and WOW Embossing powders Blog Hop, click here!

This is such an incredibly rich release that it was hard to choose which products to feature today. I have decided to showcase the Winter mug and Christmas Greetings Script die sets along with the Layered Snowflakes stencil set.

First I created the background: on a piece of aqua cardstock I used the Layered Snowflakes stencils. Because I wanted to use different mediums on each layer, I slightly modified the stencil order. I used Layer B first, with Versamark ink and heat embossed it with Salvaged Patina Distress Glaze for a tone on tone look. Then I used Layer C with white texture paste as it dries relatively fast. I waited like half an hour and applied Gina K Designs White Glitz Glitter Gel through Layer A as these are the biggest snowflakes and it takes a bit longer for the gel to dry.

Then I die cut the Winter Mug from SSS Blue Violet cardstock, and added a bit of shading to it with white pigment ink. It gives a frosted look somehow, I love it! I adhered a glittery white die cut snowflake in the middle and created a candy cane from white and red glitter cardstock. I also die cut the marshmallows from white glitter cardstock. I love how rich the Winter Mug die set is, it makes it super versatile!

While I was at die cutting, I also cut the Christmas Greetings Script from red glitter cardstock. I stamped part of the sentiment on a thin strip of white cardstock from the Pine Wreath stamp set and assembled the card.

I could not resist, but had to try a new-to-me product, the Cosmic Shimmer Fluffy Stuff in Sweet Caramel colour. It has a liquid texture and when you heat it with your heat tool, it is going to puff. I added some to the mug and also to the marshmallows, it is absolutely yummy!

As a finishing touch I added a few white clay snowflakes from the Winter Snowflakes Clay Confetti mix and cut some of the sprinkles to smaller pieces so that I can adhere them to the foam. Looks fun, doesn’t it?

GIVEAWAY

Be sure to leave comments on each stop of the Blog Hop. We are giving away 3 $30 gift certificates to three random comments (1 winner each day) left before October 24, 2022 at 11:59 PM PST. The winners will be announced next week on the Pretty Pink Posh Blog, so be sure to check it there! Here is the line up for today:

Pretty Pink Posh blog 
Caly Person

Nichol Spohr
Dana Kirby
Zsofia Molnar – you are here
Marge
Carly Minner
Mindy Eggen
Leica Palma

I hope you enjoyed my card today and will pop in again soon!

See you,

Zsofi

Coffee Card Series – Simon Says Stamp

Hello Everyone,

Welcome back to the last day of my Coffee Card Series in honour of the Fall/Winter Coffee Lovers Blog Hop. For today I have a Fall coffee card made with goodies from Simon Says Stamp.

First I stamped and coloured the cute dog with the latte and a bunch of pumpkins from the SSS Fall Frenchies stamp set. I used Spectrum Noir Illustrator markers and cut verything out with the coordinating dies.

For the background I really wanted to use the new SSS Coffee Drinks stencil and there was a technique in my mind I wanted to try. So I applied white texture paste on white cardstock usin the stencil and let it dry. After that I did some ink blending with Salty Ocean Distress Oxide ink. I added black and white splatters of acrylic paint when it was done. This way I got a wonderful tone-on-tone background with a lot of texture. I really need to do this techique more often!

While the background was drying I white heat embossed a sentiment from the same stamp set on a brown banner and added a smaller orange banner under it. I also die cut grass from gree cardstock and shaded it with Mowed Lawn Distress Oxide ink.

I assembled the card, popped up the banner and the dog with 3D foam squares. As a finishing touch I used a clear shimmer pen on the scarf, a black glaze pen on the eyes and nose and glossy accents on the mug.

I will link this up to the Coffee Lovers Fall/Winter Blog Hop.

I hope you enjoyed the last week with me, I had a lot of fun sharing these caffeinated projects. Now it is time to move on to holiday cards, so stay tuned. If you like my style, please follow me on Instagram, where I also share my creations. Your support means so much to me, thank you!

See you soon,

Zsofi

Coffee Card Series – Pink and Main

Hello Everyone,

Welcome back to my Coffee Card Series in honour of the Fall/Winter Coffee Lovers Blog Hop. Today’s card fills me with nostalgia as I used to be part of Pink and Main’s Design Team a few years ago. I love this brand ever since and I really enjoyed colouring their cute critters for today’s coffee card.

I started with stamping and colouring the images from the Pink and Main Cozy Critters stamp set. I used Spectrum Noir Illustrator markers: EB5, EB4, EB3, RB2, RB1, GB9, GB7, BT9, BT7, BT5, VB1, CT1, LY1, BO4, BO3. I cut everything out with the coordinating dies.

I used the largest of the Pink and Main Stitched Rectangle Set 2 to cut a piece of a pretty patterned paper from their Pumpkin Season paper pad. I also die cut grass from a textured light yellow cardstock and adhered it to the bottom of the patterned panel. I popped up the images with thin 3D foam tape, doubling it up under the squirrel in the middle.

For the sentiment I chose the Thanks word die from Pink and Main, cut the shadow from white cardstock and the word from teal. I also heat embossed a sentiment from the Cozy Critters stamp set on a thin brown cardstock strip and popped it up under the thanks die cut.

I gave the whole scene a teal mat before mounting it on a white card base. As a finishing touch I used a clear shimmer pen on the thanks die cut and also on the scarves of the critters. I emphasized their noses with a black glaze pen and added a drop of glossy accent to the coffee cup and cupcake.

I will link this up to the Coffee Lovers Fall/Winter Blog Hop.

I hope you enjoyed today’s cute critter card and will come back tomorrow for the last day of the Fall/Winter Coffee Lovers Blog Hop. I saved the cutest for last 😉

See you,

Zsofi