Heffy Doodle New Release Inspiration Blog Hop

Hello Everyone,

Welcome to the Heffy Doodle New Release Inspiration Blog Hop!  We are so excited to share amazing cards from our Design Team members using the new release which goes live today in the stores! Scroll down for the details, and grab a coffee/tea before you start hopping!

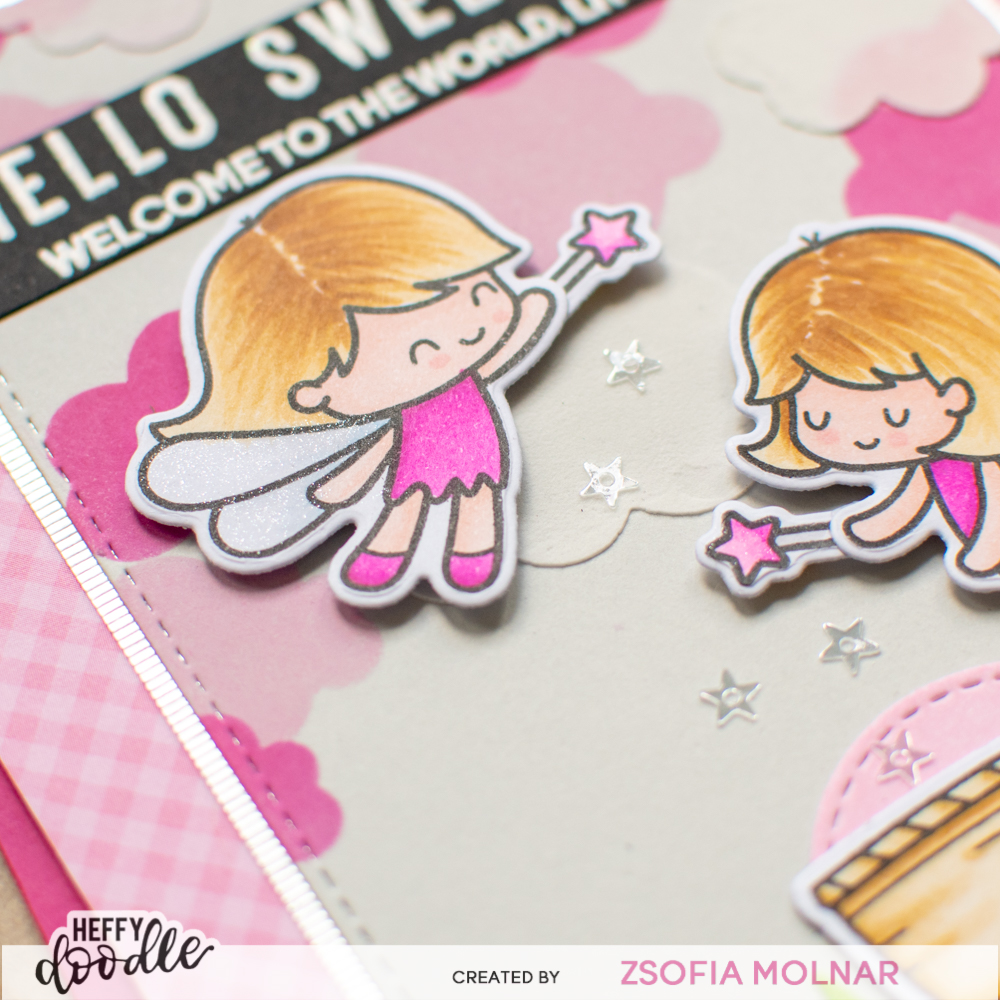
For my card I stamped and coloured the cute images from Be Hoppy and Special Delivery as I wanted to make a new baby scene.

The Copic markers I used are the following:

  • frogs: G28, G16, G02, G00
  • leaves: YG09, YG06, YG05, YG01
  • reed: E57, E55, E53, YG67, YG17, YG03
  • stork and pebbles: N7, N5. N3, N1
  • log and bag: E59, E57, E55, E53, E51
  • flower: YR09, YR04, Y38

Then I cut them all out with their coordinating dies.

For the background I did some simple inkblending on a white card base with Tumbled Glass Distress Oxide ink for the sky. Then I masked off a part for the river with Heffy Memo Tape and blended Salty Ocean Distress Oxide ink very gently before using the Ripple Waves stencil. I applied the same ink just with a heavier hand an before removing the stencil I sprayed it with a clear shimmer mist. I love the effect it gives!

I also die cut a grassy bank with the Freshly Cut Grass die set and blended it with Mowed Lawn Distress Oxide ink.

After assembling the scene, I stamped the sentiment on the very top of the card from the Special Delivery stamp set and white heat embossed another one on black cardstock. I used its coordinating die to cut it out and adhered it under the stamped line.

GIVEAWAY

For today’s special Blog Hop, you can win a £50 voucher to the Heffy Doodle store! To be entered to win the giveaway, all you need to do is comment at each stop along the Blog Hop before March 14th, 2023 at 11:59 PM EST.  The winner will be announced on the Heffy Doodle Blog on March 16th at 10:00 AM EST!

Heffy Doodle Blog
Tallie Clewley
Kari VanNoy
Zsofia Molnaryou are here
Joy Baldwin
Ali Farmer
Lidya Wirani
Lauren Taylor
Peggy Emmerink
Claudia Mauri
Jarle Franceus
Amanda Fitterer
Natasha Davies
Amanda Stevens
Francesca Vignoli

I hope you got inspired and enjoy the hop. If you don’t mind a bit of curiosity, I would love to know which products are your favourites from this release!

See you soon.

Zsofi

Heffy Doodle New Release reveals – Day 3

Hello Everyone,

Welcome back to the 3rd day of the Heffy Doodle new release reveals! Our Design Team showcases a galore of fun new products today, for all the info please visit the Heffy Doodle blog.

For my card today, I used the Sky High Cloud Backdrop die, the Special Delivery stamp/die set, the New Arrival sentiment set, the Moxy Alphabet die set and the Starry Night Sparkle Mix.

First I worked on the background: I die cut the Sky High Cloud Backdrop die from white cardstock and did a little ink blending with Tumbled Glass and Salty Ocean Distress Oxide inks. I also added a little shading to all the little die cut clouds, I love the depth it gives. I mounted it on an A2 sized notecard and popped up all the clouds with 3D foam squares for dimension.

Then I stamped and coloured the cute stork with the bag from the Special Delivery stamp set using Copic markers. The coloulrs I used are: T7, T5, T2, T1, T0, E44, E42, E41, YR09, YR07, YR04. I used the coordinating dies to cut them out.

While I was die cutting I also cut my custom sentiment which I made with the Moxie Alphabet die set. I cut each letter twice: once from white and also from silver glitter cardstock. I adhered them together and adhered them to the clouds. Some letters needed extra support, so I used teeny tiny 3D foam squares for that.

I also stamped the rest of the sentiment under the letters from the New Arrival stamp set.

I popped up the stork and embellished the card with a few sequins from the Starry Night Sparkle Mix. I wish I have made a pink version of this card immediately, but I was not wise enough. Next time 🙂

I wish you enjoyed today’s reveals and will come back tomorrow for more fun! And don’t forget that every preorder after 28/02 gets a freebie!

See you,

Zsofi

Hello baby – Heffy Doodle

Hello Everyone,

Welcome to another edition of my Perfect Combos series for Heffy Doodle, this time a new baby card. I used a couple of stamps, dies and stencils to create this cutie, let me guide you through the process.

First I stamped and coloured the images from the Absotoothly Awesome and Mewniverse stamp sets using my Spectrum Noir Illustrator markers. The colours I used are the following: FS4, FS7, FS8, BP6, BP4, BP2, BP1, BP05, BG1, GB7, GB5, GB2, GB1. Then I die cut them all with their coordinating dies.

For the background I took a piece of Oyster Shell cardstock and cut it out with an Imperial Stitched Rectangle die. Then I used the Head in the Clouds stencil with Kitch Flamingo Distress Oxide ink first. I made sure not to add clouds to the bottom part of the panel. Then I shifted the stencil and ink blended it with Picked Raspberry Distress Oxide ink. I made sure the first two layers were dry before adding a third layer of clouds, this time I used white texture paste.

While the clouds were drying, I white heat embossed a sentiment on a thin strip of black cardstock from the Special Day Sentiment duos.

I also cut grass with the Grassy Lass border die set and a pink blanket using a small Stitched Circle die. I assembled the scene using 3D foam squares to pop up the images.

I chose a pink checked patterned paper (Doodlebug Designs) for the background and added a shiny silver mat to the focal panel before adhering it to the card base. As a finishing touch I added Clear Star Sequins as falling blessing from the fairies and used a clear shimmer pen on their wings.

I wish you enjoyed my card today and share with us in our Facebook group if I inspired you. Follow me on Instagram if you like my cards, your support means so much to me! Thank you!

See you soon,

Zsofi

Newton’s Nook Designs February Release – DAY 2

Hello Everyone,

Welcome back to my blog! It is Day 2 of the February release reveals at Newton’s Nook Designs. We are showing you the super cute  Bitty bibs stamp set and Baby bibs die set. There is also a great new scene-building die set called Sky scene builder (I will show this in action later this week) All new products will be available on 21st February.

CARD 1

My first card idea was inspired by the setiments in the set. I stamped and coloured the cute bibs and coloured them with Copic markers. I used the coordinating die to cut them out.

I chose a blue watercolour wash patterned paper as the background, cut it tiny smaller than A2 and backed it with a dark blue pattered paper. I cut 2 thin strips of dark grey cardstock as poles and some grass with the Land border dies.

I used twine in between the poles and hanged the bibs using 3D foam squares. The sentiments I stamped with grey ink.

I added a bit of shimmer to the critters on the bibs, used a black glaze pen on their eyes and a drop of glossy accents I put on the beaks and the water splash. Looks so cute, right?

CARD 2

I love the layering Baby bibs set, I had to make a card using only those! So here it is:

First I created the background using the new Petite Flowers stencil with Metallix Deco Foil White Pearl Gel from Thermoweb on vivid pink cardstock.

Until it was drying I die cut the Baby bib from pink cardstock, heat embossed a sentiment on it in white and backed it with the scalloped piece cut from white cardstock. While I was at die cutting I also cut a few frames using the Frameworks set, stacked them together for dimension and topped it with a white glitter one. I cut the ribbon for the bib from the same cardstock.

When the background was dry, I die cut it with the scalloped rectangle from Frames and Flags, backed the frames with vellum and attached the bib to it. Perfect for a new baby girl!

GIVEAWAY

Would you like to win the “Bitty Bibs” Stamp Set? This stamp set will be given away to ONE lucky winnerHere’s how to win: Comment on the NND blog and Design Team blogs (see list below)! Thewinner will be chosen at random from the collective reveal posts. Make sure to check out each of their blogs and comment for your chance to win. You will not know which blog has been chosen so the more you comment on the better your chances are of winning! You have until Thursday February 20th at 9pm EST to comment  — winners will be announced on the blog post on Friday, February 21st. 

Check out all the awesome Design Team Blogs below to enter:

Newton’s Nook Designs

Ellen Haxelmans

Larissa Heskett

Samantha Mann

Zsofia Molnar – you are here

Naki Rager

Maria Russell

Andrea Shell

Tina Smith

Tatiana Trafimovich

Amanda Wilcox

I hope you enjoyed today and will join us tomorrow for more fun!

See you,

Zsofi

Congrats! It’s a boy!

Hello Everyone,

I am back again with my second post for today with a cute baby card, perfect for sending congratulations to the new parents. I made it for a new baby boy, but it can easily be adapted for a girl too. The goodies I used to create this card are all from Pink and Main.

I started with stamping the baby and some accessories from the Bundle of Joy stamp set. I quickly added some colour with my Copic markers keeping the colours used very minimal: light brown and blue. I used the coordinating dies to cut them out.

I also die cut a stitched star from white cardstock and also from a pretty golden metallic one. I used the Congrats die set to cut the sentiment from the same cardstocks and layered these on top of each other.

For the background I chose a blue toned patterned paper with foiled stars on it from the Galaxy foil paper pad (the best ever!)

I assembled the card using liquid glue and popped up the coloured images with 3D foam squares. The only embellishment I used was a touch of glossy accents on the jar and the hearts on the bottle.

I hope you enjoyed today’s inspiration and you will be back tomorrow for more fun! Till then happy crafting!

Zsofi

IPC #66 – more inspiration

Inky Paws Challenge

Happy Monday Everyone,

I am back here again with some more baby cards for the Inky Paws Challenge #66 Baby theme.

Image may contain: text

IPC66_NewtonsNookDesigns_09.jpg

IPC66_NewtonsNookDesigns_02

IPC66_NewtonsNookDesigns_01

I purchased the Lovable Laundry stamp and Stitched onesie die set last year from Newton’s Nook, and it became one of my favourites since then. The images are super cute, so easy and fun to colour, the possibilities are endless. It makes the sweetest baby cards and the die adds some faux stitching which is adorable.

IPC66_NewtonsNookDesigns_03

For this week I wanted something really colourful and suitable for a new baby boy. I selected a couple of Doodlebug patterned paper and die cut them using a stitched collage die from MFT. I cut the same die also from coordinating coloured cardstock and paper pieced them on a white top folding card base.

IPC66_NewtonsNookDesigns_07

IPC66_NewtonsNookDesigns_04

I stamped the sentiments in black ink on the blue panels on both cards. Then I stamped the onesies on Copic friendly cardstock and coloured them with Copics. After die cutting them I popped them up on the cards using extra layers of the onesie cut from white cardstock. It looks like chipboard in this way.

IPC66_NewtonsNookDesigns_06

On one of the cards I added some white fancy scalloped circles under the onesies for more contrast. It would not be a card from me without some  Tonic Aqua Shimmer and glossy accents.

IPC66_NewtonsNookDesigns_08

I hope you got inspired and will participate in the Inky Paws Challenge #66. You have time until Friday (2nd March) to upload your projects on their website to be eligible to win a 20USD gift certificate to the Newton’s Nook Designs online store.

Newton's Nook DesignsNewton

Thanks for stopping by, hope you return soon.

Have a lovely week,

Zsofi


IPC #66 – fun baby card

Inky Paws Challenge

Hello Everyone,

A new challenge is live on the Inky Paws Challenge site. The theme is Baby cards, such a fun thing to create.

25289485_10155609952931311_7654735708788320033_n

20180214_152928 wm

For my card today I wanted to challenge myself and use the latest Newton’s Nook Designs stamps I have. So I created a little cupcake family using images from Sending Hugs and Love bites. I coloured them with Copics and cut them out with the coordinating dies.

20180214_153133 wm

Then I set the scene: I die cut a stitched heart from white cardstock, 2 stitched scalloped edges from green, a piece of Doodlebug patterned paper and some strips of purple cardstock. I assembled the card on a white card base ad popped up the little cupcake with 3D foam tape to put it in the spotlight.

20180214_153147 wm

The sentiment is from Lovable Laundry, stamped in Lavender ink.

20180214_153020 wm

I wanted to make it more playful, so I hand drew a face to the little cupcake to match the “parents” in style. I used a black glaze pen on the eyes and glossy accents on the hearts. I added a tiny amount of shimmer with my Tonic Aqua Shimmer pen to the cupcake holders.

20180214_153118 wm

I hope you got inspired and you will play along with us at the Inky Paws Challenge Inky Paws Challenge this week. You have 2 weeks to link up your projects to be eligible for the 20USD gift certificate to the NND online store.

Newton

See you soon with another fun card. Have a lovely day!

Zsofi


Welcome Aliz

Hello Everyone,

This is a special blog post, as yesterday evening my niece was born. Thanks God she is a cute, healthy little baby, and we could not be happier to have her. I had to make a welcome card for Aliz (Alice in Hungarian), I used the current MFT sketch challenge as inspiration:

Sketch Challenge 349 #mftstamps

Here is my card:

20170911_171644 wm

I started with selecting the background paper. I wanted something playful but not very pink (I just made my brother and my sister-in-law a very pink card when we gave some clothes a day before the delivery – blog post later this week). I cut a stitched rectangle with Blueprints 15 and a matching blue stitched rectangle frame. I also cut another 3 frames from leftover packaging and stacked them together for dimension.

20170911_171655 wm

I also cut a piece of white heavy weight vellum and adhered it to the back of the stacked frames. It muted the background pattern enough to make the little critters pop. I white heat embossed a sentiment from the MFT Essential sentiments set on a pink stitched banner and glued it flat to the bottom of the frame.

20170911_171709 wm

The cute little images are from the Up in the air stamp set, stamped in black and coloured with Copics. I used the coordinating dies to cut them out and adhered them to the frame using 3D foam tape.

20170911_171732 wm

I gave a light grey mat to the whole panel and mounted it on a white top folding card base. A bit of Spectrum Noir shimmer pen on the heart garland, glossy accent on the noses and a black glaze pen on the eyes finished it off.

I will link this up on the MFT Sketch Challenge #349 and the Simon Says Stamp Wednesday Challenge Stamp it.

I hope you like this cute welcome baby card and will return for more inspiration soon.

Have a wonderful day,

Zsofi