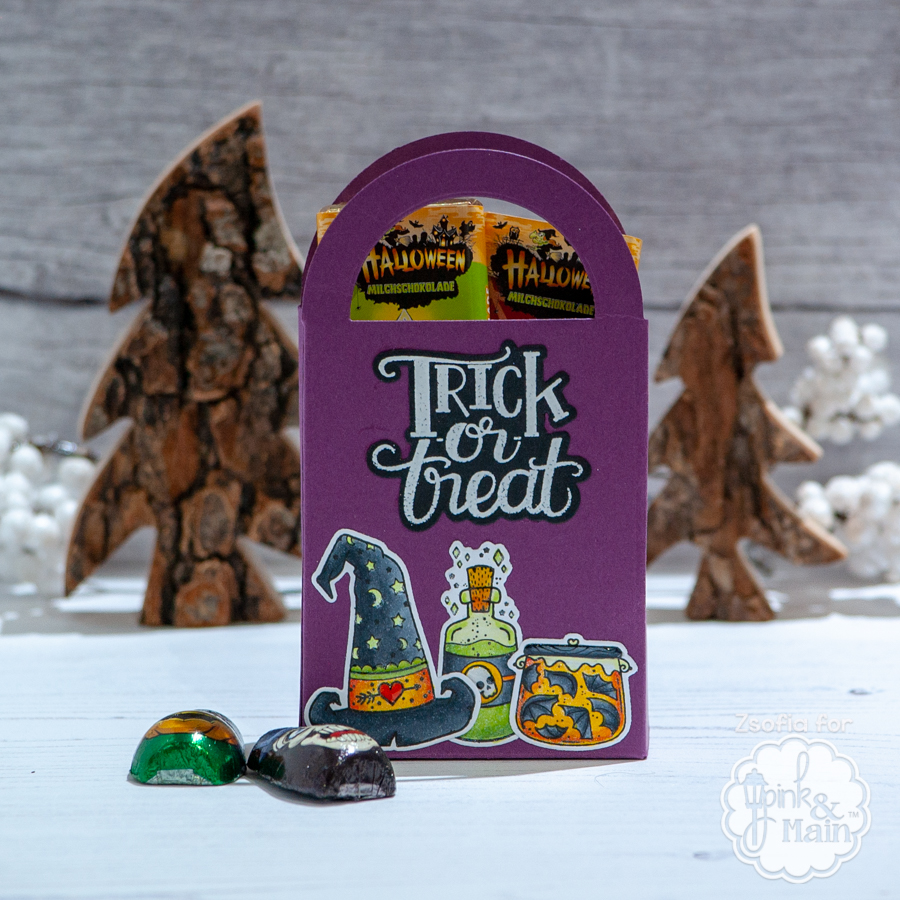
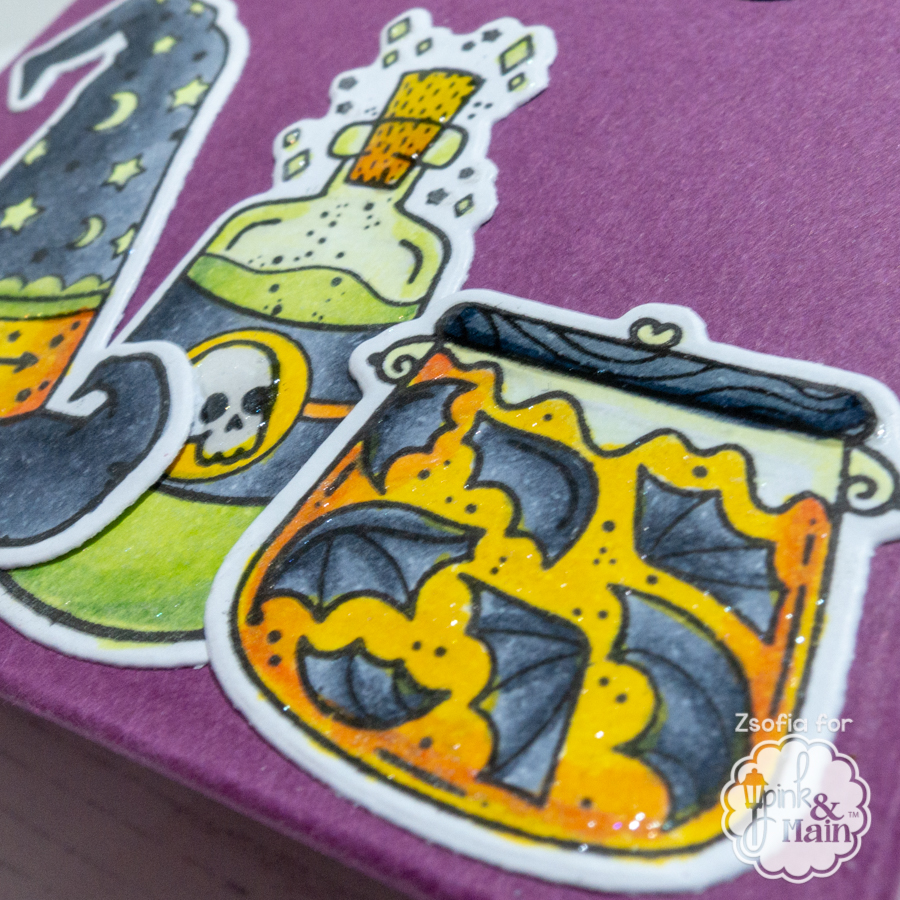
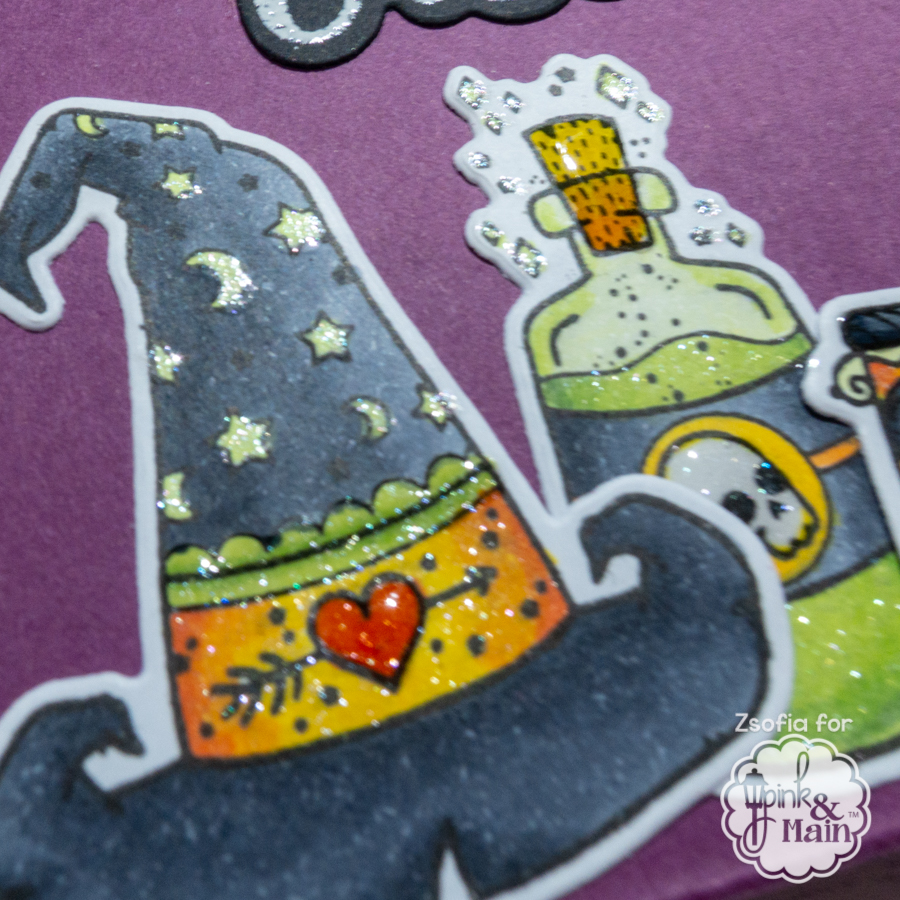
Tomorrow is Halloween and even though we do not celebrate it here in Hungary, my kids are so excited to put costumes on and go trick or treating in our block of flats. We did that last year too and they had a ton of fun (all kids are under 9 years). For this occasion I made some gift bags to give away with chocolate inside. I used stamps and dies from Pink and Main.
I started with creating purple bags with the Gift Bag die: I cut the base twice and folded at the crease lines which the die created. I used strong tape to assemble it, it is so easy and quick!
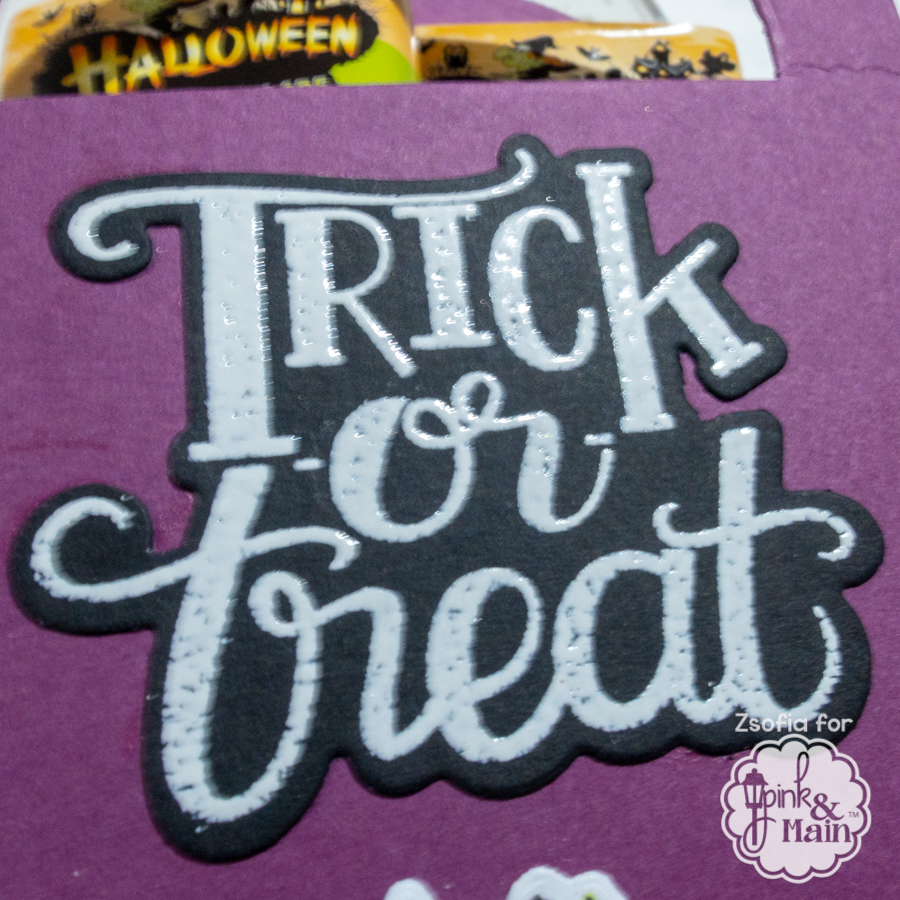
I also heat embossed the sentiment from the Trick or treat stamp set with white embossing powder on black cardstock and cut it out with the coordinating die too. I love the shadow!
I adhered all the images and sentiment after assembling the bag, but it would have been easier to do it before, while it is still flat. I used a bit of clear shimmer on the images and drops of glossy accents. I cannot wait to give these little treats to the kids tomorrow!
Hope you enjoyed today’s post and will check back soon for more inspiration! Till then, happy crafting!
I am back today with a cute Santa card inspired by the current stenciling challenge at Pippi (my favourite Hungarian crafts store).
I created a soft ink blended background with Salty Ocean and Picked Raspberry Distress Oxide inks. Then I used the Card Sized Confetti stencil from MFT to add some tone-on-tone stars. I used the other stencil in the set with some Nuvo Shimmer paste to add some sparkly texture too.
Until it was drying I stamped and coloured the images from the MFT Santa and Friends set using Copic markers and cut them out with the coordinating dies.
I also cut some snow slopes from Lawn Fawn white glitter cardstock and adhered it to the bottom of the inked panel.
Finally I white heat embossed a sentiment from the same stamp set on a slim black banner.
As a finishing touch I added some white puff embossing powder to the santa hat and uniform with the help of a clear embossing pen. I used glossy accent on the boots, buttons and saddle and added some white gel pen highlights.
I hope you liked my card today and will pop in again soon for more fun projects. Until next time, happy crafting!
I was so happy to learn that Heffy Doodle has now their own challenges! YAY! It inspired me to create this Fall card for someone special.
I stamped and coloured images from the Hootiful and Veggie Patch stamp sets using Copic markers. I cut everything out with their coordinating dies.
I wanted a simple yet stunning night sky as the background for these cute owls. I masked off a circle on a white top folding note card and sponged Blueprint Sketch, Chipped Sapphire and Black Soot Distress Oxide inks with a blending brush. I added some water droplets, some diluted blue and black ink splatters and also a sprinkle of Lawn Fawn Liquid Stardust. It gives amazing shimmer, like real stars! I love it!
After removing the mask I added a little bit of Iced Spruce Distress Oxide to the moon. I also die cut grass from black cardstock and sponged some white pigment ink for a foggy look.
I adhered the images flat to the card and popped up only 2 owls with 3D foam squares. I white heat embossed a sentiment on black cardstock and added them at an angle to the card. Finally I used a black glaze pen on the eyes and glossy accents on the beaks.
I am here with yet another Halloween cutie which shows you a good example how to use a small image as the focal point on a card. The product I used to make this card are from Pink and Main.
Then I cut a 2 inches wide strip of chevron patterned paper and matted it with orange cardstock. I adhered it to the middle of a black card base.
I die cut a stitched banner from blue cardstock and a small one from green and layered them on top of each. I heat embossed a sentiment from the Fall Sentiment stamp set on purple cardstock and assembled the banner.
After popping up the hedgehog with 3D foam squares and adding some orange glossy dots to the small banners, I felt there is something missing, so I stamped the Boo! sentiment in black above the little critter.
A bit of black glaze pen on the pumpkin and a drop of glossy accent on the stem finished it off.
I hope you enjoyed this simple design and will return soon for more.
Iam back today with another Halloween cutie inspired by and made for the Lawnfawnatics Challenge #62 – last minute as always. All stamps and dies are from Lawn Fawn.
I started with ink blending a spooky sky background: I used Bristol Smooth cardstock and Peacock Feathers and Black Sooth Distress inks. I spritzed it with water and added some Peacock Feathers, Black Sooth and White acrylic paint splatters for a textured feeling.
I also added Twisted Citron Distress ink on another piece of Bristol Smooth cardstock, die cut some grass with the Grassy Border and a Simple Grassy Hillside border. I added some Black Sooth Distress ink to the bottom to make it more fitting the mood.
Then I stamped a bunch of images from Booyah, Pick of the Patch and Happy Haunting sets,coloured them with Copic markers and cut them out with their coordinating dies.
After assembling the scene I white heat embossed a sentiment from Pick of the patch on a thin strip of black cardstock and adhered them flat to the card.
I covered the cute ghosts with clear shimmer and added a bit of glossy accents to the roofs, stems and costumes to make them extra special.
While my blog was all in Christmas mood this week, today I wanted to give you another quick and easy Halloween card idea. This cute card was made with goodies from Pink and Main.
I stamped the cute bear from Less Tricks on white cardstock and coloured him with Copic markers. I used the coordinating dies to cut him out.
For the background I chose a pretty foiled night sky from the Galaxy paper pad, cut it down to cover the front of an A2 sized card. I added a thin strip of dark grey cardstock to the bottom and adhered the corner web too. Then I popped up the bear with 3D foam squares.
I white heat embossed a sentiment and added 3 cute little spiders (Doodlebug stickers). That is the only embellishment I used on this cute and simple Halloween card.
I hope you enjoyed today’s inspiration an will pop in again soon! Till next time, happy crafting,
We reached the last day of the Holiday Release reveals at Newton’s Nook Designs, but don’t be sad, the sweetest we saved for last. I was dreaming of a stamp set with a kitty family for long and now my wishes came true! The Newton’s Christmas Kittens is the perfect family stamp for the holidays. And the 2 minis are just create easy and fantastic tags!
CARD
For my card I stamped and coloured the image with Copic markers and die cut it with the coordinating die. I created santa hats to all the cats and dressed them up for the holiday.
I die cut a stitched rounded rectangle die from the Frames and flags die set from white cardstock and used the same die to cut a piece of green patterned paper for the bottom of it.
I adhered the cats and stamped the sentiment in red on the top left corner. It is one long sentiment but with partial inking I managed to stamp it in 2 rows.
For the background I chose a golden foiled patterned paper from my stash and popped up the focal panel with 3D foam squares at an angle. It is more playful this way.
I felt I needed something in the right upper corner too,so I white heat embossed another sentiment on a small rounded tag die from the Tag times two die set, which I die cut from gold cardstock. I added a red bow on the top so it looks like a Christmas ornament.
The finishing touches I couldn’t leave behind, a lot of clear shimmer was applied on the presents and glossy accents on the ribbon.
To make it super fun, I used a Marvy Snow Marker on the caps and puffed them up with my heat tool. I love the texture!
I cut the base from patterned paper (Doodlebug) and from vellum.
On the vellum I adhered a small snowbank cut with the Land border die from white glitter cardstock. I silver heat embossed the sentiments on the vellum directly.
To embellish the tags, I cut a scalloped topper from red cardstock and a white reinforcer. I attached the two tags together and used chunky red twine to finish them.
Of course glossy accents I had to add to the presents and I also used some glitter on the santa hat.
GIVEAWAY
Would you like to win the “Newton’s Christmas kittens” Stamp Set? This stamp set will be given away to ONE lucky winner! Here’s how to win: comment on the NND blog and Design Team blogs (see list below)! The winner will be chosen at random from the collective reveal posts. Make sure to check out each of their blogs and comment for your chance to win. You will not know which blog has been chosen so the more you comment on the better your chances are of winning! You have until Thursday October 17th at 9pm EST to comment — winners will be announced on the blog post on Friday, October 18th.
Check out all the awesome Design Team Blogs below to enter:
I hope you enjoyed this festive week with us and will keep checking back. All new products will be available tomorrow, so get your shopping lists ready!
I stamped the Holiday Fringe stamp on kraft cardstock with Versamark ink and heat embossed it with Gold embossing powder.
I used my Prismacolour pencils to add colour, it is so relaxing and pure joy!
When I was done, I trimmed it down with my paper trimmer to have a little frame and matted it with a white scalloped square from the Frames Squared die set.
I popped it up on a red 4,25×4,25 inch card base with 3D foam squares and added some clear shimmer to the ribbons and baubles.
I also added glossy accents to the Merry sentiment,the light string, berries and candy cane. I love the texture and dimension!
I die cut it with its coordinating die and added some white Flower Soft to the roofs with liquid glue.
For the background I die cut a scalloped stitched rectangle from Frames and Flags and masked off the scallop part with Purple Tape. I sponged blue distress oxide inks and added some water sprinkles. I also splattered the background with white acrylic paint.
I die cut the word joyful from white glitter cardstock and stamped the santa sleigh in black next to it. I adhered the panel to a kraft note card and popped up the houses with 3D foam squares.
CARD 3
I really wanted to make a more pastel version of the Main Street Christmas, so I white heat embossed it on SSS Fog cardstock. I used Tombow markers to add some grey, pink and blue to the houses and used a white pencil to add white details.
When it was ready I created a mask with the coordinating die and simple printer paper. I also masked off a frame with Purple tape and sponged a light layer of Tumbled Glass Distress Oxide ink. I tried to get it lighter towards the houses.
I also used the Petite Snow stencil and White Glitz Glitter gel from Thermoweb/Gina K designs to add a layer of snow.
I white heat embossed a sentiment on vivid pink cardstock and die cut it with a skinny banner die (Lawn Fawn).
When the snowflakes were dry I popped up the sentiment banner with 3D foam squares and adhered it all to a white card base.
GIVEAWAY
Would you like to win the “Main Street Christmas” or the “Holiday Frings” Stamp Set? We will choose ONE lucky winner for each stamp set! This stamp set will be given away to ONE lucky winner! Here’s how to win: comment on the NND blog and Design Team blogs (see list below)! The winner will be chosen at random from the collective reveal posts. Make sure to check out each of their blogs and comment for your chance to win. You will not know which blog has been chosen so the more you comment on the better your chances are of winning! You have until Thursday October 17th at 9pm EST to comment — winners will be announced on the blog post on Friday, October 18th.
Check out all the awesome Design Team Blogs below to enter:
I hope you enjoyed what you saw today and will join us tomorrow again for the last day. I will not reveal a secret if I tell you, that we saved the cutest for last!
It is Day 2 of the Holiday Release reveals at Newton’s Nook Designs and we are showcasing the cutest ever Festive Fawns stamp and die set. All new products will be available on 18/10!
For my card I stampd and coloured all the images from the set with Copic markers. I used the coordinating dies to cut them out.
It often happens that I love every image from a stamp set and I cannot choose which ones to use. And then I make a slim card which fits them all 🙂
I made a card base from white cardstock, which measured 8,5 x 8,25 inches and folded it in half. I used the postage stamp die from Frameworks to cut a pretty panel from Sea glass cardstock: I partial die cut almost until the end, turned it around in my die cutting machine, lined it up with the stitching and partially cut the other half. In this way I could create a longer fancy rectangle for my scene.
I used the petite snow stencil over it with some white texture paste. I love that it looks like real snow!
I did the same partial die cutting with the land border die to create snowbanks from white glitter cardstock. When the paste dried I adhered the snowbank and popped up the coloured images with 3D foam squares.
The sentiment I white heat embossed on a red stitched die cut (Framework die set) and used 3D squares to adhere it in place.
The trick in this simple card is the embellishments: I added a ton of shimmer to the presents, hat an scarf. I used a black glaze pen on the eyes of the critters and added glossy accents here and there to emphasize some details.
GIVEAWAY
Would you like to win the “Festive Fawns” Stamp Set? This stamp set will be given away to ONE lucky winner! Here’s how to win: comment on the NND blog and Design Team blogs (see list below)! The winner will be chosen at random from the collective reveal posts. Make sure to check out each of their blogs and comment for your chance to win. You will not know which blog has been chosen so the more you comment on the better your chances are of winning! You have until Thursday October 17th at 9pm EST to comment — winners will be announced on the blog post on Friday, October 18th.
Check out all the awesome Design Team Blogs below to enter:
I am super excited to switch to Winter this week here on my blog as we start the Newton’s Nook Designs Holiday Release reveals! It is a gorgeous, jam packed release all about the upcoming holidays. Lets dive in! Today our team showcases new stencils and 2 fantastic stamp/die sets: Christmas Trimmings and Holiday Lights. All new products will be available on 18/10!
CARD 1
If you follow me you know how much I adore stencils! NND has the most unique ones in my opinion. The Light Strings stencil has 2 pieces for easy layering.
I started with the strings layer on white cardstock adding Versamark ink directly from the ink pad. I poured silver sparkle embossing powder on top and heat set it with a heat gun.
Then I added Distress Inks in rainbow colours through the Lights layer using a mini dauber and before removing the stencil I covered them all with Cosmic Shimmer Frosty Sparkle paste (Creative Expressions).
Until it was drying I die cut a banner from silver metallic cardstock and a smaller one from peacock cardstock using the Frames and Flags die set. On the silver one I heat embossed a sentiment from the Sentiments of the Season stamp set using WOW White Sparkling Snow embossing glitter.
When the paste was dry I trimmed the paneldown a little and adhered it to a grey card base. I popped upthe layered sentiment with 3D foam squares. Look at the sparkle, so beautiful!
CARD 2
On my next card I used the Ornaments stencil on Audrey Blue cardstock (Simon Says Stamp) with Gina K Designs Glitz Glitter Gel (Turquoise Sea).
I applied it with a stencil pal from Thermoweb – it is a fabulous tool and makes spreading the pastes evenly and so fast!
Until it was drying I stamped and coloured the images from the Christmas Trimmings stamp set. I used Copic markers and cut them out with the coordinating dies.
I die cut a stitched Oval (Simon Says Stamp) from Sea glass cardstock and adhered the images. I added some shading under them with a grey Copic marker and a colourless blender.
I also die cut two white circles using the Frames Squared die set and heat embossed some of the sentiments from the stamp set with Antique Gold embossing powder from Simon Says Stamp.
After assembling the card, I added some shimmer to the shoes, ribbon, cap and the baubles with a clear shimmer pen and emphasized some details with glossy accents.
CARD 3
I was so happy to see the face of the girl finally that I had to use that image on another card. I coloured a bunch of presents and baubles too and adhered them all on a strip of Audrey blue cardstock.
I stamped the sentiments around her with Audrey Blue ink and once more with Versamark so I could heat emboss it with clear embossing powder. This way the colour got darker and shiny.
I added some scalloped edges from white cardstock (Sky border die set) and popped it up on a pretty patterned paper from Doodlebug Designs using 3D foam tape.
A bit of clear shimmer and glossy accents were the only embellishments used on this card.
CARD 4
My last card for today is also a very festive one with a lot of shimmer.
I stamped the Holiday Lights images on Bristol Smooth cardstock with Versamark ink and heat embossed with WOW Metallic Gold Sparkle Embossing glitter.
I used some Tombow markers to add colour and spread them out with a clear shimmer pen. I used the coordinating dies to cut them out.
I die cut the postage stamp die from Frameworks from heavy weight white cardstock, sprinkled it with gold paint (Finetec) and added 2 strings of gold sparkle twine (Lawn Fawn). I secured them on the back of the panel.
I stamped the sentiment in green in between the 2 strings and popped up the lights with 3D foam squares. I adhered the panel down to a kraft card base.
I love the shimmer and shine on the lights. Simple design but still so unique!
GIVEAWAY
Would you like to win the “Christmas Trimmings” Stamp Set? This stamp set will be given away to ONE lucky winner! Here’s how to win: comment on the NND blog and Design Team blogs (see list below)! The winner will be chosen at random from the collective reveal posts. Make sure to check out each of their blogs and comment for your chance to win. You will not know which blog has been chosen so the more you comment on the better your chances are of winning! You have until Thursday October 17th at 9pm EST to comment — winners will be announced on the blog post on Friday, October 18th.
Check out all the awesome Design Team Blogs below to enter:
I hope you enjoyed today’s post and will return tomorrow again for some more cuteness! Thanks for leaving a comment for me, they are always so heartwarming and encouraging!