About my creativity…

Hello Everyone,

Just in case you wonder what makes me so creative, I made a card to answer your question 😀 Made it especially for the Summer Coffee Lovers Blog Hop.

18622230_10213446220340512_5157922663339630764_n

20170628_074636 wm

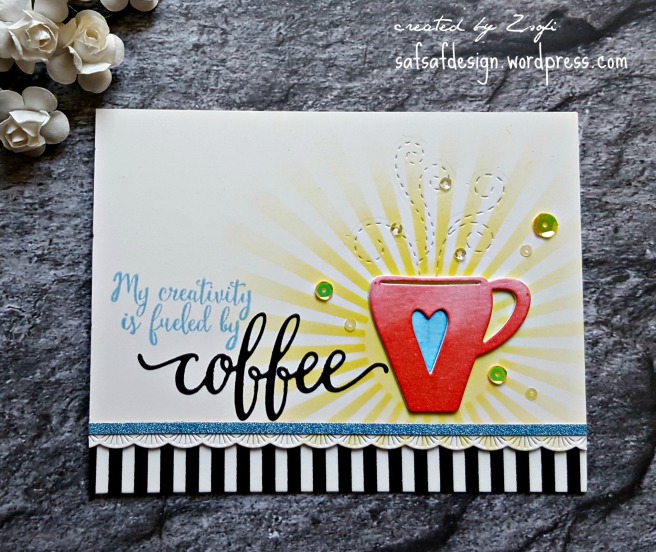
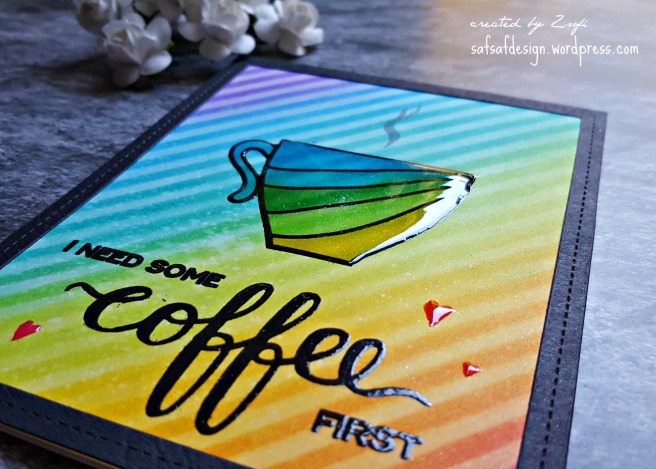
I started with die cutting the Simon Says Stamp Coffee cup 4 times from Ranger Distress watercolour paper. I adhered 3 layers together and inked up the 4th one with Distress ink (Barn Door) in an ombre way before gluing it on top of the others. The little heart I inked with some blue distress ink too.

20170628_074657 wm

I took a piece of Bristol Smooth cardstock and I used the MFT Sunray stencil to add colour to it. Then I used some cute stitched swirls dies from Paper Smooches for the steam. I also die cut the Coffee word die (Your Next Stamp) from black cardstock and using an Elizabeth Crafts Designs mini stamp set I stamped the rest of the sentiment on the left corner with some blue ink (Altenew).

20170628_074718 wm

I wanted something special to the edge of my focal panel, so I used a pretty border die from Memory Box and also adhered a skinny strip of Cornflower blue patterned paper above to anchor the blues I used on my card.

20170628_074728 wm

I used a black and white striped washi tape on the bottom of a white card base and I used 3D foam tape to mount my stencilled panel. After placing the cup in its place, I used some Sunshine sequins (Simon Says Stamp) to embellish the card.

I will upload this card also to the Simon Says Stamp Monday Challenge Stencil it, and to the Wednesday Challenge Anything goes.

I hope you like my card and will return soon for more 😉

See you,

Zsofi


Rainbow cup – coffee card

Good morning,

I am popping in today with a fun, bright rainbow card I made for the Summer Coffee Lovers Blog Hop.

20170628_074421 wm

A started with creating the background on Bristol Smooth cardstock. I temporarily adhered a striped stencil on it and applied Distress Inks in rainbow order. Then I removed the stencil and went back with the same colours and the mini ink blending tool to smoothen the effect. A bit of water spritzing and I dabbed it off with a paper towel.

20170628_074431 wm

When it was completely dry, I stamped the cup and the sentiment from Create a Smile in the middle using Versafine Onyx black ink and clear heat embossed it all. Then I painted over the cup using the same distress inks and my Spectrum Noir Shimmer pen as my paint brush.

20170628_074531 wm

I also stamped the steam and hearts in coloured inks and adhered a black stitched frame (Lawn Fawn) around the scene. I mounted it all on a white card base.

20170628_074426 wm

To make this card even more special, I applied a generous amount of glossy accents on the cup and the hearts. It looks gorgeous in real life.

20170628_074505 wm

I will link this project up to the Simon Says Stamp Monday Challenge Stencil it as well.

18622230_10213446220340512_5157922663339630764_n

I hope I cheered you up with this card early morning. If you like my cards, please subscribe and pop in again soon.

See you,

Zsofi

Million thanks flower card and happy news

Hello Again,

I am back with my second post today as I wanted to share some great news with you. As of July I am joining the Newton’s Nook Designs Inky Paws Challenge Design Team! I am so excited and happy, I love the stamps and dies of Newton’s Nook Designs so much. I hope to inspire you with my cards to try them too and to participate in the fun we have with each Challenge.

Image may contain: 5 people, people smiling, text

There are also some retiring stamps at Newton’s Nook Designs, actually 2 of them are my all time favourites: Flower Garden and Garden Starter. I love how pretty those floral images are! Grab yours until you can!

No automatic alt text available.

Here is a card I made with the beautiful sunflower from the set:

20170625_152632 wm

I stamped the image first on a piece of Copic friendly paper and coloured with Shinhan Markers. I stamped another sunflower on another piece of paper and after colouring I fussy cut some of the petals which I popped up on the focal image using thin foam squares. I gold heat embossed a sentiment from MFT (Essential Sentiments) on the side and gave it a scalloped square mat. I added some brown twine (Lawn Fawn) and a bow.

20170625_152652 wm

I used and older IPC Sketch for the arrangement, I layered some Lawn Fawn patterned paper and some banners (one patterned and one from golden foil for more elegance) on an A2 sized white card base. I mounted the focal panel using 3D foam tape.

20170625_152738_001 wm

And now the trick: I added Ranger Multi Matte Medium liquid glue in the middle of the sunflower and poured some brown prills on it. I let it dry completely and tapped off the access. And voila, a very special thank you card is ready.

20170625_152749 wm

I wish I inspired you and will see you back soon!

Have a lovely day!

Zsofi

I need coffee :)

Good morning Everyone!

The best thing in summer is that I can manage with less sleeping which makes the days longer. It is a rainy day here in Budapest but at least not so hot. As every morning when I wake up, the first thing is to make my favourite coffee. My lovely husband is the same. This thought and the current Inky Paws Challenge at Newton’s Nook Designs inspired the following card:

20170626_080717 wm

I started with stamping the only image I have never used from the Newton loves coffee stamp set on Copic friendly paper. I adjusted the length of the table and stamped the sentiment in the upper right corner. I used Copic markers to colour the panel. I gave it a brown mat and stamped the coffee beans in Espresso ink (Altenew) on the other side of the table.

20170626_080729 wm

I crated the mats according to the sketch using Doodlebug patterned paper (it is only one sheet, I used both sides of a 6×6 paper). I also used a white scalloped stitched square as a mat to bring more white to the card design.

20170626_080737 wm

As a final touch I used some Spectrum Noir Shimmer pen and glossy accents on the mug and coffee beans.

20170626_080748 wm

I will upload this card to the Inky Paws Challenge #49 Sketch challenge, to the Simon Says Stamp Wednesday Challenge Use patterned paper and to the Summer Coffee Lovers Blog Hop.

Image may contain: text18622230_10213446220340512_5157922663339630764_n

 I hope you like my card and will return soon.

See you,

Zsofi

Relax – summer card

Hello Everyone,

I am back with another post today. It is a summer card I made for the Inky Paws Challenge #49 which is a sketch challenge. I love to work with card sketches and as yesterday we were at the swimming pool with the kids, I was already in the chillin’ mood.

Image may contain: text

20170625_154247 wm

I started with stamping the adorable kitty from the Aloha Newton set on Copic friendly paper with Lawn Fawn Jet black ink. before colouring it I die cut it with a double stitched rectangle die from MFT and adjusted the line of the sand with a Copic friendly black marker to reach across the whole panel. I coloured the image with Copics and matted it with Peacock cardstock piece. I also stamped some additional images from the same set and after colouring I fussy cut them with scissors.

20170625_154211 wm

I die cut the letters from the word RELAX from black cardstock using the MFT Bottlecap letter dies. I embellished the scene with the additional images and glued the sentiment on it too. I used a Spectrum Noir shimmer pen and glossy accents to emphasize some of the details. The hibiscus I popped up with 3D foam squares.

20170625_154207 wm

I used pretty Doodlebug patterned paper as my background and mounted the matted focal image with thin 3D foam tape (SSS).

20170625_154239 wm

I will also submit this card to the Simon Says Stamp Wednesday Challenge Use Patterned paper and Simon Says Stamp Monday Challenge Lets take a vacation.

I hope this card cheers you up also and you will pop in again soon.

See you,

Zsofi


Eid Mubarak

Hello Everyone,

Ramadan has come to its end, today is the first day of Eid-al-Fitr and I wanted to wish all my beloved family and muslim friends a very happy feast. I made this card as part of our celebration:

20170625_162214 wm

I started with white heat embossing a gorgeous background stamp from Simon Says Stamp (Cora) on Bristol Smooth paper and applied several distress inks with a mini ink blending tool. I stamped the sentiments (Altenew Eid Greetings) on white cardstock with SSS Clear embossing ink and heat embossed with SSS Silver and WOW Opaque Primary Azure embossing powders.

20170625_162309 wm

I die cut the panel with a dotted rectangle die from Lawn Fawn (I adjusted the size of the rectangle by die cutting the already die cut panel once more with the same die, slightly shifting it to make the rectangle shorter).

20170625_162221 wm

I matted it with a vellum rectangle and adhered to the distressed background with 3D foam tape. Then I adhered it to a white side folding notecard.

I will upload this project to the Seven Hills Crafts June challenge Die cut a die cut.

SHOP OUR STORE

I hope you like my simple but festive card and will check back soon for more inspiration.

See you,

Zsofi

Pretty flowers card

Hello Everyone,

I am back with the last card for MFT Camp Create. It was the Campfire Bonus task, Divine Dry Embossing.

This is what I came up with:

20170622_081205 wm

I started with a piece of Bristol Smooth cardstock and applied Shaded Lilac distress ink on a bit more than half of it, make it gradually fading out towards the top. Then I sprinkled it with water, dabbed it off with a paper towel and added some Shaded Lilac and Black Soot splatters. When it was dry, I embossed it with the Modern Morocco background die using the Multipurpose platform and an embossing mat.

20170622_081226 wm

For the flower I heat embossed the Balloon strings background stamp on Bristol Smooth cardstock using Black sparkle embossing powder (WOW) and applied several distress inks on it for a gradient look. Here is a picture of the ready background (I admit it was hard to cut in it).

20170622_063407 wm

I die cut 2 of the Layered Rose dies from it and layered them on top of each other using foam squares. I cut also some leaves from the Leafy Greenery die set and coloured them with distress inks (Shabby shutters and Peeled Paint). I adorned the flower with a light purple gem stone.

20170622_081305 wm

The sentiment is from the Essential sentiment set (my most used stamp set ever), white heat embossed on a piece of stitched strip (Pretty Pink Posh die) from black cardstock. I gave a light purple mat for my panel and adhered it to a white card base.

20170622_081259 wm

That card is closing the Camp, I really enjoyed the tasks. I feel I moved my creative muscles and I am ready for the new challenges 😉

Hope you enjoyed this intense week with me and will continue to check back on my creations in the future too.

Have a wonderful day!

Zsofi

All about glitter

Hello Again,

I am back with a very sparkly card which I have created for the MFT Camp Create Day 5 Glitzy Glitter.

Here is my card, full of glitter:

20170621_154026 wm

I started with a piece of white cardstock and covered it with a wide double sided tape (I used Sookwang which is I guess the same as Be Creative). I removed the release paper and covered the entire surface with Elizabeth Crafts Designs Warm diamond glitter. I made sure to burnish it with my fingers so it stays.

20170621_154037 wm

Then using the Abstract stencil I applied blue and green colours of ZIG dual brush markers. I was afraid of using alcohol markers although I heard from other crafters that the glitter does not necessarily ruin the tip of Copics or Shinhan markers – still I did not dare to try 🙂

20170621_154045 wm

When the pattern was done, I die cut the piece with an A2 sized stitched rectangle die (Blueprints 25) and also another 2 white ones. From these I die cut the edge die “Hello” 4 times and stacked them together to get a thick panel. The word beautiful I die cut from Cornflower glitter paper and adhered it on the white space.

20170621_154105 wm

I wish I could capture the sparkle better, in real life it is stunning.

20170621_154051 wm

I will also upload this project to the Seven Hills Crafts June Challenge Die cut a die cut.

I hope you enjoyed my card and you will return soon to see the Campfire bonus card tomorrow.

See you,

Zsofi

Underwater cake

Hello hello,

I am back with a funny underwater cake card which I have create for the MFT Camp Create Day 4: Sensational sliders.

20170620_190448wm

I am so in love with the Birdie Brown mermaid set that I really had to use all the mermaids from it on a card. This card features the last mermaid from the set, and I had the idea of an underwater cake slider to make her a party.

20170620_190631 wm

I started with cutting the Cake slider elements from Bristol Smooth cardstock and applied distress inks on the different pieces. I sprinkled them with water and dabbed it off with a paper towel. I stamped some of the greenery from the stamp set on the cake using distress and oxide inks. On the second tier I heat embossed a sentiment from the Magical unicorns set in white.

20170620_190540 wm

I assembled the card to make it a slider and added 3 candles on the top of the cake. I used a small scalloped stitched rectangle as a base and a coordinating aqua coloured cardstock as a mat before adhering it to a white card base.

20170620_190509 wm

I used the previously coloured and die cut mermaid and shells as embellishments, added some clear shimmer (Spectrum Noir) and glossy accents. I also used a few tiny drops of Tonic Nuvo Jewel drops.

20170620_190532 wm

I hope you like my card and will check back soon for the last day’s homework.

Have a nice day,

Zsofi

Beach bunnies shaker card

Hello Everyone,

Today I want to show you my card for the MFT Camp Create Day 3: Sensational Shakers.

It has been a while since I made cards for my kids without any occasion. They kept asking me to make something for them, but there was no time for “just because” cards. Until today morning, that is the beauty of summer holidays 🙂

20170619_103708 wm

I started with a piece of Bristol Smooth cardstock and applied Distress Inks with a mini ink blending tool (Tumbled Glass, Salty Ocean and Faded Jeans). Then I placed the MFT Sunray stencil on top of it and applied the same inks a bit more heavily. After removing the stencil I sprinkled some water and dabbed it off with a paper towel. I also added a bit of shimmer mist. I set it aside to dry a little.

20170619_103748 wm

Meanwhile I stamped the clouds from the Beach Bunny set on a piece of acetate with white STAZON ink. I also stamped the sentiment from the Because set with Black STAZON ink. I used Hero Arts Ultra Clean to clean my stamps immediately. The little images from the Beach bunny set I stamped on copic friendly paper (I love Xpress it the most) and coloured with Copic markers. I used the coordinating dies to die cut them out.

20170619_103853 wm

When the background was dry I used the Pierced Rectangle frame die to cut the frame, adhered the acetate to it with double sided tape and added 3D foam tape on the back of it. The inner part I adhered to a white card base with tape runner and placed my shaker elements in the middle of it. The I removed the release paper from the frame and carefully placed it on the card base.

20170619_103720 wm

I embellished the frame with the bunnies and used a Spectrum Noir shimmer pen on the dress, added some details with a white gel pen and also used a black glaze pen on the eyes and noses. A little bit of glossy accent finished it off.

20170619_103817 wm

20170619_103834 wm

My daughter has a pink version of this card 🙂 I just forgot to capture it…

I wish you like my card and will return soon for the next homework.

Have a lovely day!

Zsofi