Mother’s Day is this Sunday in Hungary and the next one in the US so I thought I would do a mini series with some pretty and fun ideas for the upcoming event. I hope you will enjoy what I prepared for you.
Today I have a pretty slimline card made with one of my favourite stamps from Pretty Pink Posh. I stamped the bouquet from Mother’s Day twice and coloured them with Copic markers. I used a colourless blender to add the striped pattern to the vases, it is so fun! I cut them out with the coordinating die.
Then I die cut te scalloped rectangle from the Slimline Frames and Portholes die from Newton’s Nook Designs using pink cardstock and the frame from the Slimline Frames and Windows die set from yellow cardstock. I used a floral patterned paper from Doodlebug Designs for the inside little squares. To have some instant dimension I tripled up the frame, I love the look!
On the middle little square I white heat embossed the sentiment and popped up the vases with 3D foam squares.
As a finishing touch I used a black glaze pen and a white gel pen on the flowers and a bit of glossy accents in the centres.
I hope you enjoyed today’s slimline inspiration and will pop in again soon!
Welcome to another edition of my Perfect Combos series for Heffy Doodle. May is a birthday heavy month in my family and I thought I would show you an sweet interactive card today made with stamps and dies from the new release. Usually I am intimidated from interactive cards but the newslider pop-up is super easy even if you are not an experienced crafter. Let me guide you through the process.
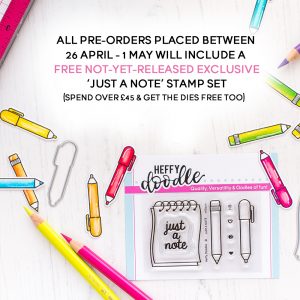
Pre-orders are open and all order get a freebie stamp – if you spend above 45 GBP you even get the coordinating die!
First I stamped and coloured the images from the Popping by stamp set using Copic markers. I went with cheerful, rather girlish colours but I cannot wait to make the same with more masculine colours too. I die cut all with the coordinating dies and assembled the little present using Glubert.
Then I created the interactive part: first I die cut the stitched frame from patterned paper and also from light blue cardstock. I cut off the “flap” of the patterned paper one so all I had left was a frame. I adhered it to the blue panel with Glubert and folded the flap at the crease lines.
I embellished the flap: added a thin Oyster Shell strip to the bottom until the first crease line and popped up the coloured image right above using 3D foam tape. I made sure to adhere only the present and let the balloons be free of adhesive so the mechanism could work properly. I needed the insert piece which I die cut from white cardstock, and adhered the bottom of the blue flap to it (until the first crease line). The top of the insert I embellished with a small die from the Slimline Pull Tab dies: I cut the stitched part from Banana Split and the arrow from Ice blast cardstock scraps.
The first half of the sentiment I stamped directly on the top of the blue flap using a Catherine Pooler ink. The other half of the sentiment I stamped directly on the white card base. To ensure the right placement I put the frame on the card base in my Misti, in this way I could see where the sentiment had to be.
Finally it was time to assemble the interactive part: I put thick 3D foam strips on the back of the frame in a U shape, leaving the top free. I adhered it to the card base and it was all done! So easy! As a finishing touch I covered the balloons with clear shimmer and added glossy accents to the ribbon. I also adhered a bunch of blue star sequins to the background to make it even more festive!
I hope you enjoyed today’s Perfect Combo and will check back later for more inspiration. If you like my cards, please make sure to follow me on Instagram where I share my happy creations! Thank you!
This week Newton’s Nook Designs and Therm O Web are partnering for a fabulous inspiration week! All week long both design teams will be sharing ways to add use Therm O Web products with Newton’s Nook Designs stamps! There are prizes too! Read all the way to the end of this post to find out how you can win!
For my project I stamped and coloured images from the Gnome Garden stamp set using Copic markers. I made sure to have multiples of the butterflies and flowers to fill my little scene. I cut everything out with the coordinating dies.
I created a textured background directly on a heavy weight white card base (I prefer to use the Neenah Solar White 110lb cardstock for that). I sprayed the back of the Hardwood stencil with Pixie Spray to ensure it is not gonna move while I am applying Aged Copper Metallix Gel with a Stencil Pal from Thermoweb. After removing the stencil I set it aside to dry for an hour or so.
Meawhile I created my scene: I die cut a Stitched Oval (Heffy Doodle die) from Sea Glass cardstock and added a bit of shading to it with a blending brush. I used Salty Ocean Distress Oxide ink, but to be honest only the residues I had on my brush as I wanted a very subtle shading. I used the same die to cut a piece from Thermoweb Green Flock Transfer Sheet and used the Land border die to cut it down to be the grass. The greatest thing about these Flock Transfer sheets – apart from their fluffy touch – is that they are sturdy and can be inked. Therefore I used a bit of Mowed Lawn Distress Oxide ink to add shading to the edges.
After assembling the scene I die cut a white Speech Bubble and stamped a sentiment on it with black ink.
When the card base was dry I used a blending brush and Gathered Twigs Distress Oxide ink for an uneven ink blending. This way I got a really textured, natural looking background. I love it!
I popped up the focal panel with 3D foam tape and added my usual finishing touches: black glaze pen on the eyes and dots of the ladybugs, clear shimmer on the wings of the butterflies and glossy accents on the belt an flower centres. Isn’t it cute?
There are more amazing projects today over on the Therm O Web blog so pop over there for more inspiration!
It is the last day of the New Release reveals at Heffy Doodle, but still so many new products are being introduced on the Heffy Doodle Blog. It is definitely worth to check!
Pre-orders are open from today and don’t forget: with every pre-order you can get a freebie stamp, and if your order is above 45GBP you will receive even the coordinating dies! Wohoo!
My inspiration for you today is a cute, layered design with a lot of texture.
First I started with ink blending through the Balloon Room stencil on Bristol Smooth cardstock with Tumbled Glass Distress Oxide ink. Then I shifted the stencil and added a second layer of balloons with Salty Ocean Distress Oxide ink. I shifted again and for the last layer I applied Brilliant Blue Glitz Glitter Gel from Thermoweb using a stencil pal. I removed the stencil, cleaned it right away and set the panel aside to dry.
Meanwhile I stamped and coloured the cute fox and party hat from the Popping by stamp set using Copic markers. I used the coordinating dies to cut them out.
While I was at die cutting I also cut the Happy Birthday Shadow die from glitter cardstock and its shadow from blue.
When the stenciled background was dry I trimmed it down a little and added black and gold splatters. I dried it with my heat tool, adhered the sentiment and popped up the fox with thin 3D foam tape. I added an orange mat to the panel before adhering it to a white card base.
As a finishing touch I used a black glaze pen on the eyes, glossy accents on the nose and party hat too.
I hope you enjoyed today’s inspiration with the new release and will come back soon for more!
It is the 3rd day of the new release reveals at Heffy Doodle! There are wonderful new stamps and dies and stencils being shown on the Heffy Doodle blog, it is worth to check them out!
With every pre-order you can get a freebie stamp, and if your order is above 45GBP you will receive even the coordinating dies! Wohoo!
I got you a quite clean and simple design today to showcase the Pebble Sentiments stamp set.
On a white stitched rectangle I placed 6 different messages from the set and inked them up with red, yellow and orange inks. I used my Misti stamping tool which allowed me to stamp back several times without shifting and this was all the intricate sentiments stayed crisp. I chose Catherine Pooler inks because they come in beautiful colours and so juicy.
I gave this panel a thin red mat and die cut the biggest stitched rectangle from orange cardstock. I love to add layers to my simpler cards too.
I embellished each pebble with sequins and jewels in coordinating colours. I used the Glubert glue, it is perfect to add thin dots too. It totally gives the extra bling this card needs.
I hope you enjoyed today’s inspiration with the new release. Don’t forget: pre-orders starts on 26/04!
It is the second day of the new release reveals at Heffy Doodle with a whole bunch of great new products. On the Heffy Doodle Blog you will see a lot of details and I have a project for you to tease you further.
With every pre-order you can get a freebie stamp, and if your order is above 45GBP you will receive even the coordinating dies! Wohoo!
For today’s card I stamped and coloured the images from the Pandtastic Painters stamp set using Copic markers and cut everything out with the coordinating dies. I adhered them on a kraft tag which I die cut with the Tag along die set, added a black reinforcer and black and white twine.
I added tiny little confetti to the canvas, I made these with the little dies from the Tag along set. So fun to use these as embellishments!
The sentiment is made with the new Create die: the shadow I die cut from black cardstock and the word “create” from white 3 times and stacked them together. Then I used a bunch of Copic markers to add the rainbow colours. I tried to colour the edges too, for a smoother look. When I adhered it to its place I covered the letters with glossy accents and set it aside to dry.
The background I also created with a fun new stencil. I laid the Broad strokes stencil on a piece of Bristol Smooth cardstock and applied different Distress Oxides in each row: Blueprint Sketch, Speckled Egg, Twisted Citron and Mustard Seed. Before removing the stencil I added some splatters with water and black ink and also sprayed it with Tsukineko Shimmer Mist. It gave a subtle sparkly look to it, so gorgeous!
I used a kraft card base, adhered the stenciled panel and popped up the tag at an angle using 3D foam tape. As a finishing touch I added glossy accents to the colour palette, the panda’s nose and the little heart.
I hope you enjoyed my card inspiration with Heffy Doodle’s new release, make sure to pop in again tomorrow for more reveals!
I am thrilled to share with you my projects in the coming days for the new release of Heffy Doodle! There is a ton of cuteness coming and I am happy to tease you further with my inspiration.
With every pre-order you can get a freebie stamp, and if your order is above 45GBP you will receive even the coordinating dies! Wohoo!
I used the Just a note stamp/die set for my card today. I stamped and coloured the notebook an pen with Copic markers and cut them out with the coordinating dies.
I die cut a stitched rectangle from Bristol Smooth cardstock and used the new Messy Desk stencil to create a fun splashy background: I blended Salty Ocean and Blueprint Sketch Distress Oxide inks with a blending brush. I popped up the die cut images in the middle using 3D foam tape.
I love die cut setiments and could not help adding a “Hello” die cut above the image. It adds so much to this clean & simple design.
I gave the stitched panel a grey mat and used a bit of glossy accents on the pen and my card is all finished!
I hope you enjoyed today’s inspiration with the new release. Don’t forget: pre-orders starts on 26/04!
All new products will be available on Friday, 23rd April, 2021.
CARD 1
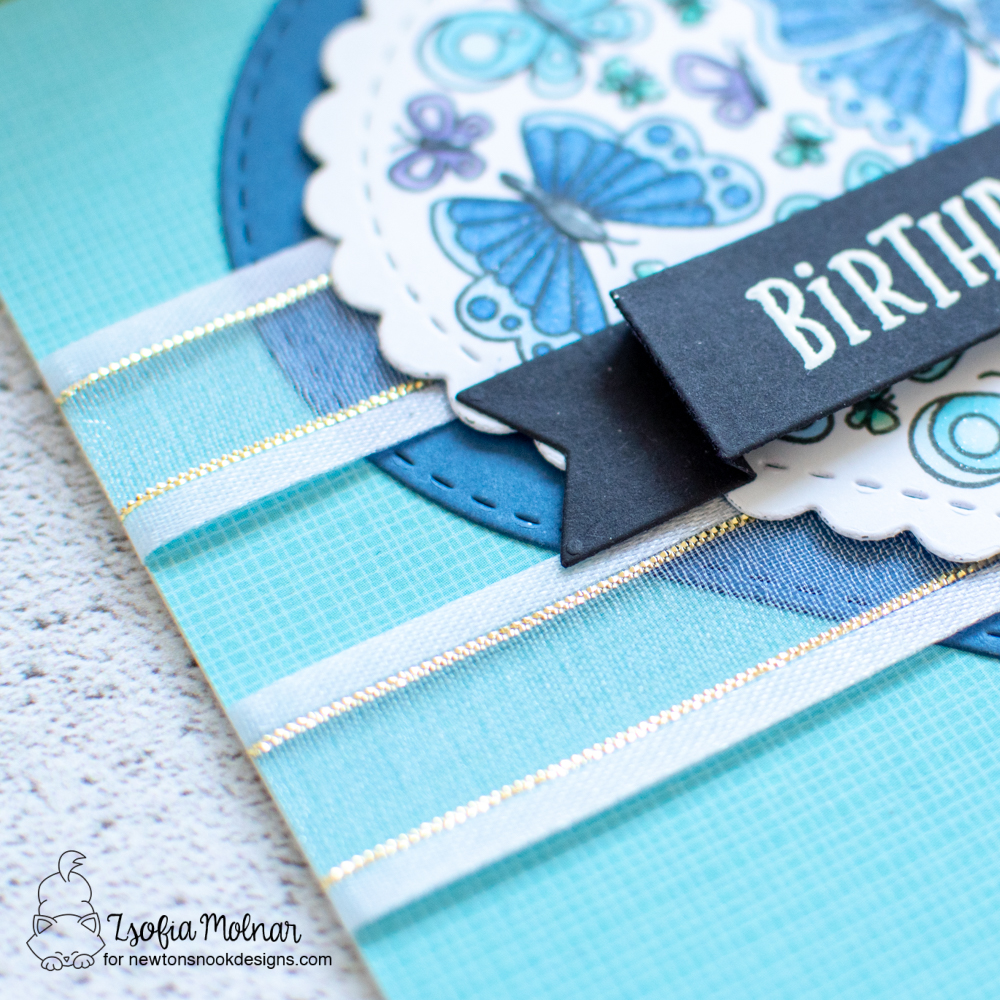
For my first card I stamped the Heartfelt Butterflies stamp on alcohol ink friendly cardstock and coloured them with Spectrum Noir Triblend alcohol markers.
This marker is very special as it has all 3 shades in one marker which makes it super easy for a smooth blend and shading. It was the first time for me to use these markers, but I fell in love with them: high quality nibs, beautiful colours and handy for on-the-go colouring too.
I went with the blue shades: True blue Shades, True Blue Blend, Blue Turquoise Blend, Green Turquoise Blend, Ice Blue Blend, Hydrangea Blend, Lavender Blend. (If you want to know more of these markers, check the Spectrum Noir website.)
When it was all pretty and colourful, I die cut it with the Heart Frames scalloped heart die. I also die cut a stitched heart from navy cardstock and a folded banner (Banner Trio die set) from black cardstock. I white heat embossed the sentiment on this and popped it up with 3D foam squares on the coloured piece.
I used a teal patterned paper for the background, added the stitched heart but before adhering the panel to a card base, I wrapped some ribbon around it. Then I popped up the scalloped heart piece with 3D foam squares. This card has a lot of dimension!
As a finishing touch I added clear shimmer to the wings and glossy accents to the bodies and the tiniest butterflies. I love how it makes the card even more special.
CARD 2
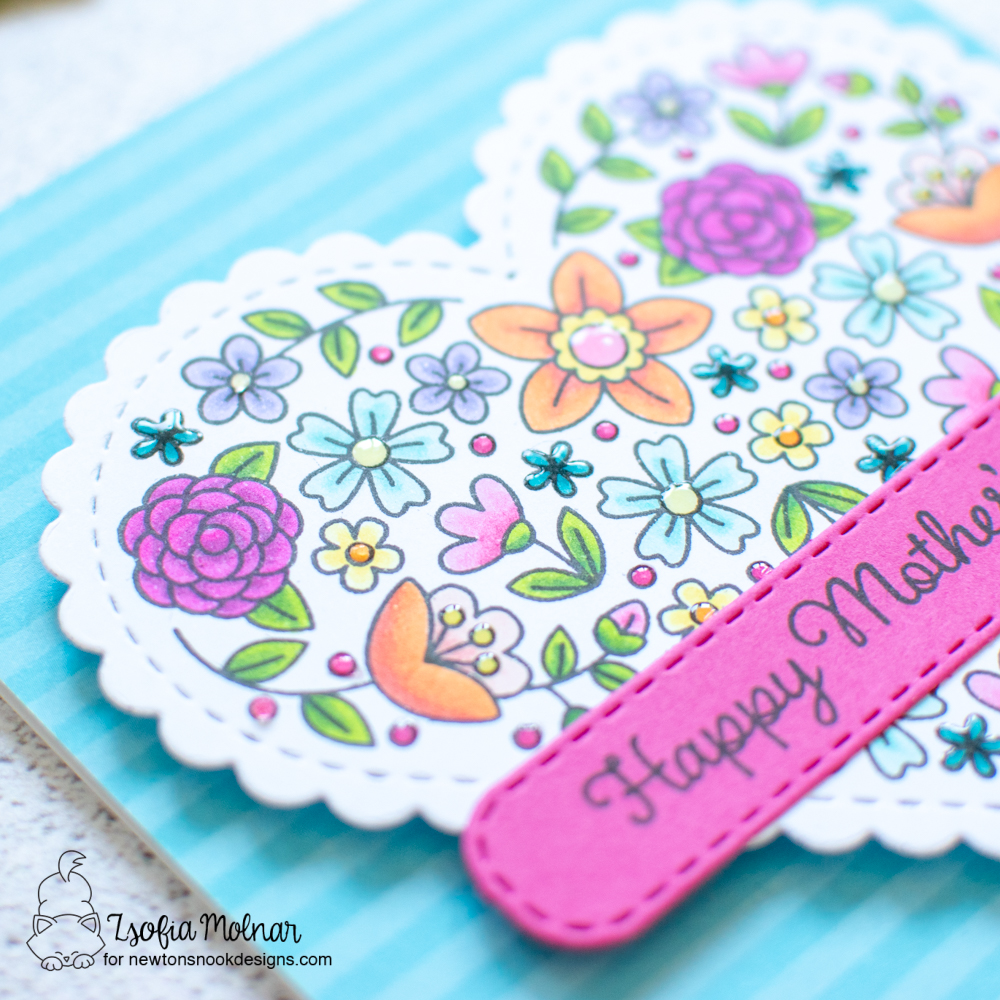
I started again with stamping and colouring the Heartfelt Blooms, just this time I used different blends of the same marker set: Alpine Green Blend, Magenta Blend, Orange Blend, Citrus Blend, Coral Blend, Bright Pink Shades, Aqua Blue Blend, Blue Turquoise Shades, Lavender Blend.
I die cut it with the Heart Frames scalloped heart die and popped it up on an A2 sized card front which I created from teal patterned paper.
As a finishing touch I used glossy accents on the flower centres and dotted details. I love these type of cards when I just want to enjoy colouring and keep the rest of the design simple.
GIVEAWAY
Would you like to win the “Heartfelt Butterflies” or the “Heartfelt Blooms” Stamp Set? We will choose ONE lucky winner for each stamp set! Here’s how to win: Comment on the NND blog and Design Team blogs (see list below)! The winner will be chosen at random from the collective reveal posts. Make sure to check out each of their blogs and comment for your chance to win. You will not know which blog has been chosen so the more you comment on the better your chances are of winning! You have until Thursday April 22nd at 9pm ET to comment — winners will be announced on the blog post on Friday, April 23rd.
Check out all the awesome Design Team Blogs below to enter:
I hope you enjoyed our inspiration week. Now it is time to get your shopping lists ready as the new release goes live tomorrow! If you like my cards, make sure to subscribe to my blog and also follow me on Instagram. Your support means the world to me, thank you!
We are halfway through the April release reveals at Newton’s Nook Designs, but we still have loads of cute stamps to show you. Today we are introducing Puppy friends and its coordinating dies. I have a clean and simple slimline design for you to showcase these little pups.
All new products will be available on Friday, 23rd April, 2021.
I stamped and coloured all the images with Copic markers and cut them all out with their coordinating dies.
Then on a slimline white card front (3,75*8,5 inches) I used the Slimline Masking Circle stencil to add colourful spots. I wanted to make it more playful so I shifted the stencil along the engraved gridlines and made 2 of the circles to the right and one to the left. I used Spiced Marmelade and Twisted Citron Distress Oxide inks. I made each circle one by one, but thanks to the gridlines on the stencil it was super easy. Before removing the stencil I added water and diluted black ink splatters each time.
When the background was dry I stamped a sentiment in each circle with black ink and popped up the dogs with 3D foam squares.
I cut a tiny bit off the panel on each side and matted it with dark brown cardstock to make the images pop even more. Of course I could not leave it without finishing touches: I added black glaze pen on the eyes, glossy accents on the noses and covered the collar and scarf with clear shimmer.
GIVEAWAY
Would you like to win the “Puppy Friends” Stamp Set? This stamp set will be given away to ONE lucky winner! Here’s how to win: Comment on the NND blog and Design Team blogs (see list below)! The winner will be chosen at random from the collective reveal posts. Make sure to check out each of their blogs and comment for your chance to win. You will not know which blog has been chosen so the more you comment on the better your chances are of winning! You have until Thursday April 22nd at 9pm ET to comment — winners will be announced on the blog post on Friday, April 23rd.
Check out all the awesome Design Team Blogs below to enter:
All new products will be available on Friday, 23rd April, 2021.
CARD 1
For my first card I stamped and coloured the kitty with the flowers with Copic markers and I used the coordinating dies to cut it out. I used Warm Greys for the kitten and some bright Yellow Greens with Blue Violets for the flower.
To create the scene I die cut a small stitched rounded rectangle from Neenah Solar White cardstock using a die from Frames and Flags. I used the Petite Clouds stencil with Blueprint Sketch and Salty Ocean Distres Oxide inks. I made sure to fade it out towards the bottom. To create the grass I used the Hills and Grass stencil with Twisted Citron Distress Oxide ink. I matted the panel with a vivid blue rectangle and adhered it to a green scalloped rectangle which I cut with the biggest die from Frames and Flags.
The sentiment I white heat embossed on a wide blue violet banner and to tie the colours more I added a slimmer banner under it cut from teal cardstock. All the banner dies are part of the Frames and Flags die set.
As a finishing touch I used a black glaze pen on the eyes and added clear shimmer to the bee’s wings.
CARD 2
I used the same colours as for the previous card when colouring the kitten and cut it out with the coordinating die.
I created a tag with the Fancy edges Tag die set: the base is from patterned paper and the topper from purple and white cardstocks. I love to make my tags stand out more with a shadow, so I die cut the base once more from dark grey cardstock and adhered it to the back of the patterned paper one slightly offset. I used lime green twine to adorn it.
The sentiment I stamped in black on a lime green banner (Frames and Flags die), adhered it across the bottom of the tag and popped up the kitty with 3D foam squares.
I created my card base from Fog cardstock and cut a scalloped rectangle from patterned paper. I popped up the tag with 3D foam squares. I emphasized the eyes with a black glaze pen and added glossy accents to the butterflies.
GIVEAWAY
Would you like to win the “Captivated Kittens” Stamp Set? This stamp set will be given away to ONE lucky winner! Here’s how to win: Comment on the NND blog and Design Team blogs (see list below)! The winner will be chosen at random from the collective reveal posts. Make sure to check out each of their blogs and comment for your chance to win. You will not know which blog has been chosen so the more you comment on the better your chances are of winning! You have until Thursday April 22nd at 9pm ET to comment — winners will be announced on the blog post on Friday, April 23rd.
Check out all the awesome Design Team Blogs below to enter: