Lunchbox gifts – Heffy Doodle

Hello Everyone,

Welcome to another edition of my Perfect Combos series for Heffy Doodle. With the school starting I was thinking about a way how to cheer up my kids while they are away from home. After being with me for the last 6 months, they need extra encouragement to get back to the school swing. Therefore I brought you some lunch box gift ideas which may help you all to bring a smile to your kids’ face.  Let’s dive in the details!

BOOKMARK

I started with die cutting the Mark my words bookmarks 2 times for each bookmark using heavy weight white cardstock. I wanted them to be double sided so they are sturdier and I could add a sentiment on the back this way.

I blended Distress Oxide inks with the Cloudy sky stencil to create a cloudy sky on each side. The colours I used for the pink bookmark: Chipped Zapphire, Wilted Violet, Picked Raspberry and Spun Sugar. The colours for the blue bookmark are: Chipped Zapphire, Blueprint Sketch, Peacock Feathers and Tumbled Glass. I sprinkled some pearlized water and some white acrilyc paint on them for a textured look. On the pink one I even added diluted pink distress oxide splatters too.

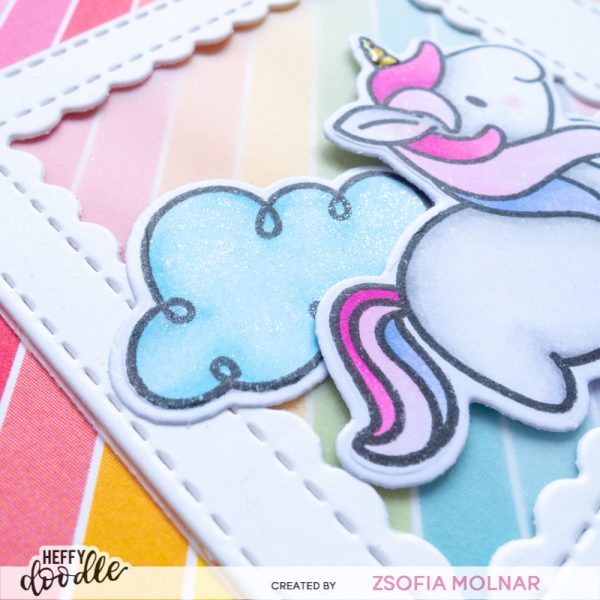
While the backgrounds were drying I stamped, coloured and die cut a Fluffy Puffy Unicorn using my Copic markers. I also die cut  four Skinny Circle frames from coloured cardstock and another four from white to use the inner pieces for the sentiment. 

I also die cut my kids’ names from a bunch of coloured cardstock scraps with the Stitched Alphabetters die set. I assembled the bookmarks and stamped a sentiment on the back with Catherine Pooler inks directly on the cloudy sky and another one on the small white circle for the top of the bookmark. All sentiments are from the Fluffy Puffy Unicorns set.

I finished the bookmarks with silver heat embossed stars, which is also from the Fluffy Puffy Unicorns set. It makes them super special!
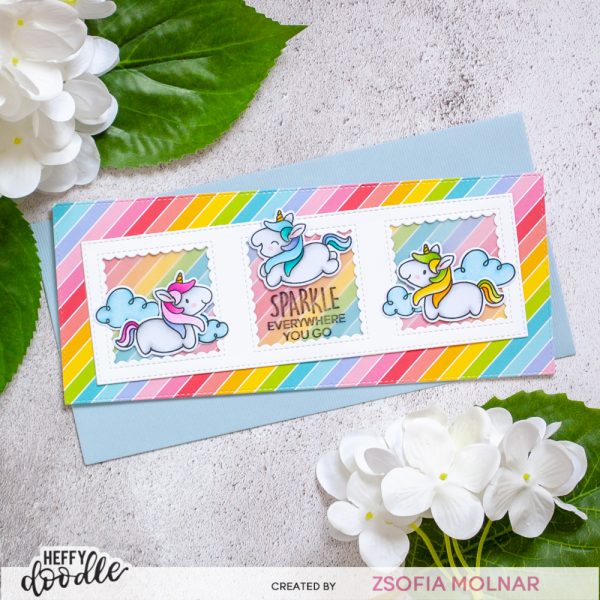
MINI CARD

I usually create A2 sized cards but that wouldnt fit the lunchbox, so I went with 4bar card size this time. The background I created the same way as for the bookmarks, using the same colours.

Then I die cut the Starry Rainbow die from the same cardstock scarps which I used for the letters for the bookmark. I also cut 2 from silver glitter cardstock so I could inlay the stars. I realized that the Rainbow Builder coordinating die is slightly bigger than the Starry rainbow, so I die cut it from white glitter cardstock and used it as a mat while assembling my rainbows. It gives a little shadow on the top (the bottom is a bit wider but I simply trimmed it off with my scissors). So fun!

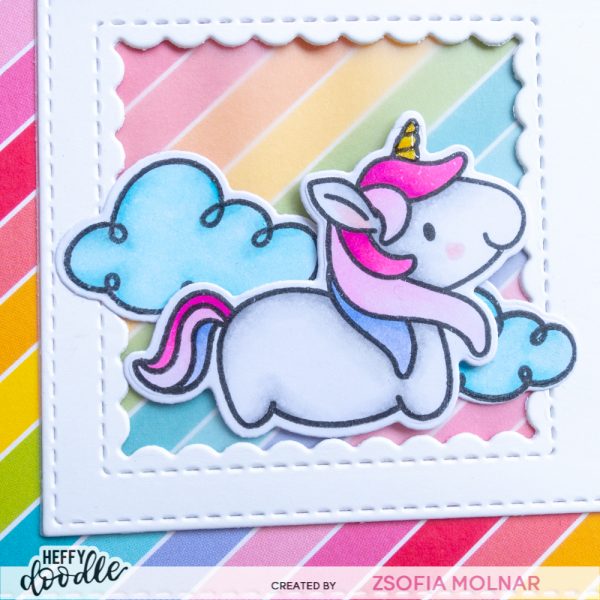
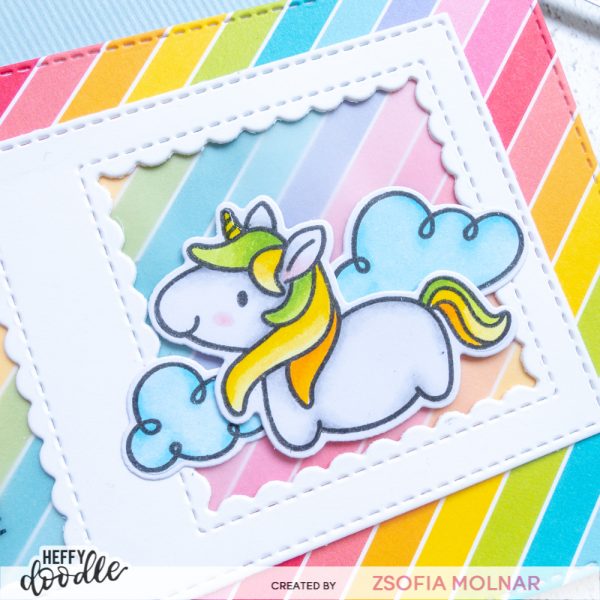
I also used the cloud coordinating dies from the Fluffy Puffy Unicorns to cut a bunch of mini clouds from white gitter cardstock and assembled the scenes using 3D foam squares to add dimension.

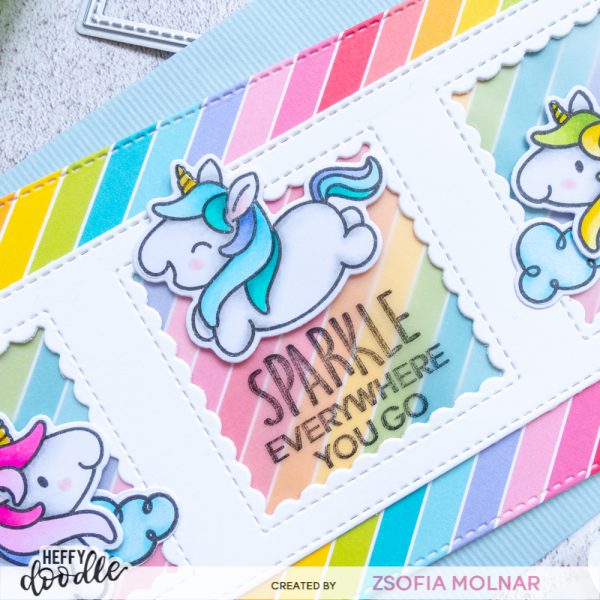
For the sentiment I used 2 of the Roundabout sentiments and the same Catherine Pooler inks as above. I could not resist adding a flying unicorn on each rainbow, it ties the bookmarks and the little cards together perfectly. 

I cannot wait to hide these in my kids’ lunchboxes tomorrow, I just wish I could see their smile when they find them in school.

I hope I inspired you with this Perfect Combo project, please share your ideas in the comment section or in our Heffy Doodlers FB Group! I would love to hear what you come up with! 

If you like my cards, please make sure to follow me on Instagram where I also share my happy creations! Thank you!

See you soon,

Zsofi

Rainbow unicorns – Heffy Doodle

Hello Everyone,

Welcome to another edition of my Perfect Combos series for Heffy Doodle. I hope you all had a chance to shop your favourites from the new release! Today I brought you a fun rainbow slimline card filled with Fluffy Puffy Unicorns. Let’s get started!

First I stamped and coloured the cute chubby unicorns with Copic markers. I used some light greys from the N series for their bodies and went rainbow with their hair and tails. When choosing the colours I was heavily inspired by a gorgeus patterned paper from Lawn Fawn which I wanted to use for the background. When the unicorns were all coloured I used their coordinating dies to cut them out.

Then I used the Stitched Slimline trio die set to cut down the patterned paper. I also used the window die from the same set to cut a white frame. I love the stitching details so much! I backed the frame with vellum and stamped a sentiment in the middle window using black STAZ-on ink.

I created a card base from heavy weight white cardstock, measuring 8,5 x 7 inches and scored it in half. I adhered the patterned piece, then the white frame at an angle. I used liquid glue to attach the clouds and popped up the unicorns with 3D foam squares.

As a finishing touch I added some clear shimmer to the clouds for a subtle sparkle and my card is finished!

I hope you enjoyed today’s Perfect Combo and will check back later for more inspiration. If you like my cards, please make sure to follow me on Instagram where I share my happy creations! Thank you!

See you soon,

Zsofi

Heffy Doodle July Release – Reveal Day 4

This image has an empty alt attribute; its file name is JULY2020release_BANNER.jpg

Hello Everyone,

It is the last day of the July Release reveals at Heffy Doodle, for all the information and product close-ups, please visit the Heffy Doodle blog. Pre-orders are now open and the whole new release will be available on 03/07! There is a gorgeous freebie with every pre-order!

This image has an empty alt attribute; its file name is LILLIGHTHOUSE_PREORDER_SQ-300x300.jpg

For today’s post I was playing with the new Head in the clouds stencil.

I applied Spun Sugar Distress Oxide ink with an ink blencing brush then shifted the stencil and repeated I with Picked Raspberry. I shifted it again and finished the background with Shaded Lilac. I cut the panel down with a Stitched rectangle die and matted it with Lavender cardstock.

I had a Fluffy Puffy Unicorn coloured and die cut with its coordinating die which I popped up with 3D foam squares on a vellum circle. I used the Skinny Circle frames dies to cut a light and a dark pink frame to embellish the vellum and to hide the adhesive under them.

The sentiment is die cut with the new Miss you – Shadow Heffy cuts die from Lavender cardstock 3 times and layered on top of each other. The shadow I cut from white cardstock.

To finish the card I added some clear stars from Studio Katia and covered the hair of the unicorn and the Miss you sentiment with a clear shimmer pen.

I hope you enjoyed the July Reveals and you are ready to shop! I will be back tomorrow with one last card for Release week, are you curious which set I am gonna show you?

See you,

Zsofi

Heffy Doodle July Release – Reveal Day 3

This image has an empty alt attribute; its file name is JULY2020release_BANNER.jpg

Hello Everyone,

It is Day 3 of the July Release reveals at Heffy Doodle, for all the information and product close-ups, please visit the Heffy Doodle blog. Pre-orders open on 24/06 and the whole new release will be available on 03/07! There is a gorgeous freebie with every pre-order!

This image has an empty alt attribute; its file name is LILLIGHTHOUSE_PREORDER_SQ-300x300.jpg

For today’s post I was playing with the 2 slimline die sets: Stitched Slimline Trio and Slimline Pull Tab dies and the most adorable Fluffy Puffy Unicorns stamp and die set.

I started with stamping the cute unicorns, the rainbows and the clouds with black ink onto Copic friendly white cardstock. I used aqua, blue and purple shades to colour their hair and used the same colours for the rainbows too.

I love to restrict my colour palette to a few colours only so I can give my whole scene a united look. I die cut everything with the coordinating dies.

I wanted to keep the card simple, but to have a lot of dimension I die cut the different slimline dies from different coloured cardstock. I also used the scalloped slimline die for a final mat. I created my own cardbase from dark grey cardstock – I cut an 8,5*7 inches piece and scored it in the middle.

I stamped a sentiment with purple ink directly on the white stitched slimline rectangle and popped up the unicorns with 3D foam squares. The clouds and rainbows I adhered flat behind them.

As a finishing touch I added some tiny sequins from Studio Katia, covered the rainbows with a clear shimmer pen and used glossy accents on the horns.

I love how clean and simple it is yet so super cute! It would make anyone smile!

I hope you enjoyed today’s inspiration and will pop in tomorrow again for the last day of the July reveals.

See you,

Zsofi

Birthday Unicorn – ft. Neat and Tangled

Unicorn_FB

Hello Everyone,

I am back with another unicorn card in my series. This time I am featuring Neat and Tangled Magical Day.

N&T_unicorn_01

I stamped, coloured and die cut the images first, added some extra shimmer with a clear shimmer pen and some glossy accents. Tiny detail with a white gel pen and a dot on the eye with a black glaze pen took this cute image to another level.

N&T_unicorn_02

Then I ran my card base through the Big Shot with the Lil’ Inkers Designs Stitched Swirls die for a subtle background texture.  I cut a piece of black and white striped patterned paper (MFT) and  a thin strip of pink to go on top.

N&T_unicorn_04

The sentiment I stamped in pink on a very thin strip of white cardstock and embellished it with some enamel dots in coordinating colours.

N&T_unicorn_05

I will link this project up on the Simon Says Stamp Wednesday Challenge Add texture .

I hope you like my card and will keep checking back for more unicorns.

See you,

Zsofi


Unicorn card set – Lawnfawnatics #26

Unicorn_FB

Hello Everyone,

To continue the Unicorn Card Series, I made a set of 4 cards inspired by the Lawnfawnatics Challenge #26.

Here is my card set:

LF_unicorn_cardset_01

I wanted to repurpose some packaging material from Pretty Pink Posh, I just love the subtle polka dot cardstock they use to back their stamps and dies. So I cut 4×4 inch squares from them and mounted them on square card bases.

LF_unicorn_cardset_03

LF_unicorn_cardset_02

LF_unicorn_cardset_04

LF_unicorn_cardset_05

I also die cut several stitched star frames (3 layers for each card, reusing some packaging material again for the bottom layers) and adhered them together for a thicker frame.

LF_unicorn_cardset_06

The inside of the frame I ran through the big shot machine with a Snowy Backdrop die to create the night sky. I sponged Chipped Sapphire and Black Soot Distress Oxide inks on them and backed the panel with silver glitter paper.

LF_unicorn_cardset_08

I stamped and coloured the unicorn costumed kid from the Costume Party stamp set using Copic markers. I used the coordinating dies to cut them out. I added some Tonic Aqua Clear shimmer to the hair and horn and emphasized some details with glossy accents.

LF_unicorn_cardset_09

The sentiment is from the Critters Ever After stamp set, I white heat embossed it on matching coloured cardstock scraps. Then I die cut them with Sentiment Banners. When assembling the card I used 3D foam tape under the coloured image.

LF_unicorn_cardset_07

I will upload this project to the Lawnfawnatics Challenge #26 Card sets and Simon Says Stamp Wednesday Challenge Add Some Texture.

Lawn Fawnatics Challenge Badge

Thanks for stopping by and hope to see you soon. I still have some unicorn card I have not shared yet 😉

Zsofi


Magical birthday – ft Avery Elle

Unicorn_FB

Hello Everyone,

Another card in my Unicorn Card Series, this time featuring Avery Elle.

AveryElle_unicorn_01

I started with the background by stencilling the colourful clouds. I used Distress Inks and MFT Cloud stencil.

AveryElle_unicorn_02

Then I stamped, coloured and die cut the images from the Avery Elle Pegasus Duo stamp set. I used Copic markers. After die cutting I added some shimmer with a Tonic Aqua Shimmer pen and some shine with glossy accents.

AveryElle_unicorn_03

I heat embossed a sentiment from the set on a strip of black cardstock with white embossing powder. I mounted the elements on the background using 3D foam squares. I embellished the card with some silver glitter die cut stars.

AveryElle_unicorn_04

It was the perfect card for a unicorn birthday gift pack.

AveryElle_unicorn_05

I will upload this project to the Simon Says Stamp Wednesday Challenge Happy Birthday.

I hope you like my card and got inspired. Be sure to check back soon for more unicorns.

See you,

Zsofi


Unicorn party – IPC#69

Unicorn_FB

Hello Everyone,

It is time for some fresh inspiration for the Inky Paws Challenge #69 Birthday Theme. As I am totally into unicorns these days, I made a unicorn party, heavily inspired by the challenge photo.

26815189_10155694295756311_8572599981006706149_n

Here is my card:

IPC69_zsm02_IG

I started with a piece of Bristol Smooth cardstock, and applied stripes with distress inks using masking tape. I flicked some water and some paint drops too for more texture and spritzed it all with Tsukineko Shimmer Mist for a subtle sparkle.

IPC69_zsm02_04

Then I stamped and coloured the unicorns from the Believe in unicorns set, and used the coordinating dies to cut them out. I adhered them to the distressed panel.

IPC69_zsm02_02

I wanted some colourful sentiments, so I stamped the handwritten ones from Pretty Pink Posh Birthday set using Altenew inks.

IPC69_zsm02_01

A bit of glossy accent and Tonic Aqua Shimmer pen on the hair of the unicorns finished off this fairy tale-style card.

IPC69_zsm02_05

I hope I inspired you and you will participate in the Inky Paws Challenge #69. You have time till Friday (13/04/2018) to upload your projects to be eligible to win the 20 USD gift certificate to the Newton’s Nook online store.

Newton's Nook DesignsNewton

I will also upload this project to the Simon Says Stamp Monday Challenge (Trio of something) and Wednesday Challenge Happy Birthday.

See you tomorrow with another unicorn card.

Have an amazing day!

Zsofi


Wishing you unicorns – MFT

Unicorn_FB.jpg

Hello Everyone,

Today is my first card of the Unicorn Themed Card-Series, inspired by the MFT Sketch Challenge #379.

Here is my card:

MFT_unicorn_01

I started with the Cloudy sky stencil, I sponged distress inks on Bristol Smooth cardstock. I used Cracked Pistachio, Mermaid Lagoon and Blueprint Sketch to make the colourful clouds. After removing the stencil I sponged the same inks on the background for an ombre effect. I added water and ink droplets for more texture. I placed the stencil back and sprayed Altenew Iridescent ink spray over it for a subtle sparkle.

MFT_unicorn_05

Then I stamped and coloured some images from the Magical Unicorns Birdie Brown stamp set. I used the coordinating dies to cut them out.

MFT_unicorn_03

I added some dotted details, some Tonic Aqua Shimmer and glossy accent on some areas.

MFT_unicorn_04

The sentiment I white heat embossed on a strip of black cardstock, and die cut a puffy cloud border at a diagonal to follow the sketch.

MFT_unicorn_02

When assembling the card I used 3D foam tape for more dimension on the upper half of the card.

MFT_unicorn_06

I will link this project to the MFT Sketch Challenge #379 and to the Simon Says Stamp Wednesday Challenge Happy Birthday

Thanks so much for popping in and I hope you will follow the rest of my mini card series in April.

See you soon,

Zsofi