Newton’s Nook Designs Back to Basics – Day 3

Hello Everyone,

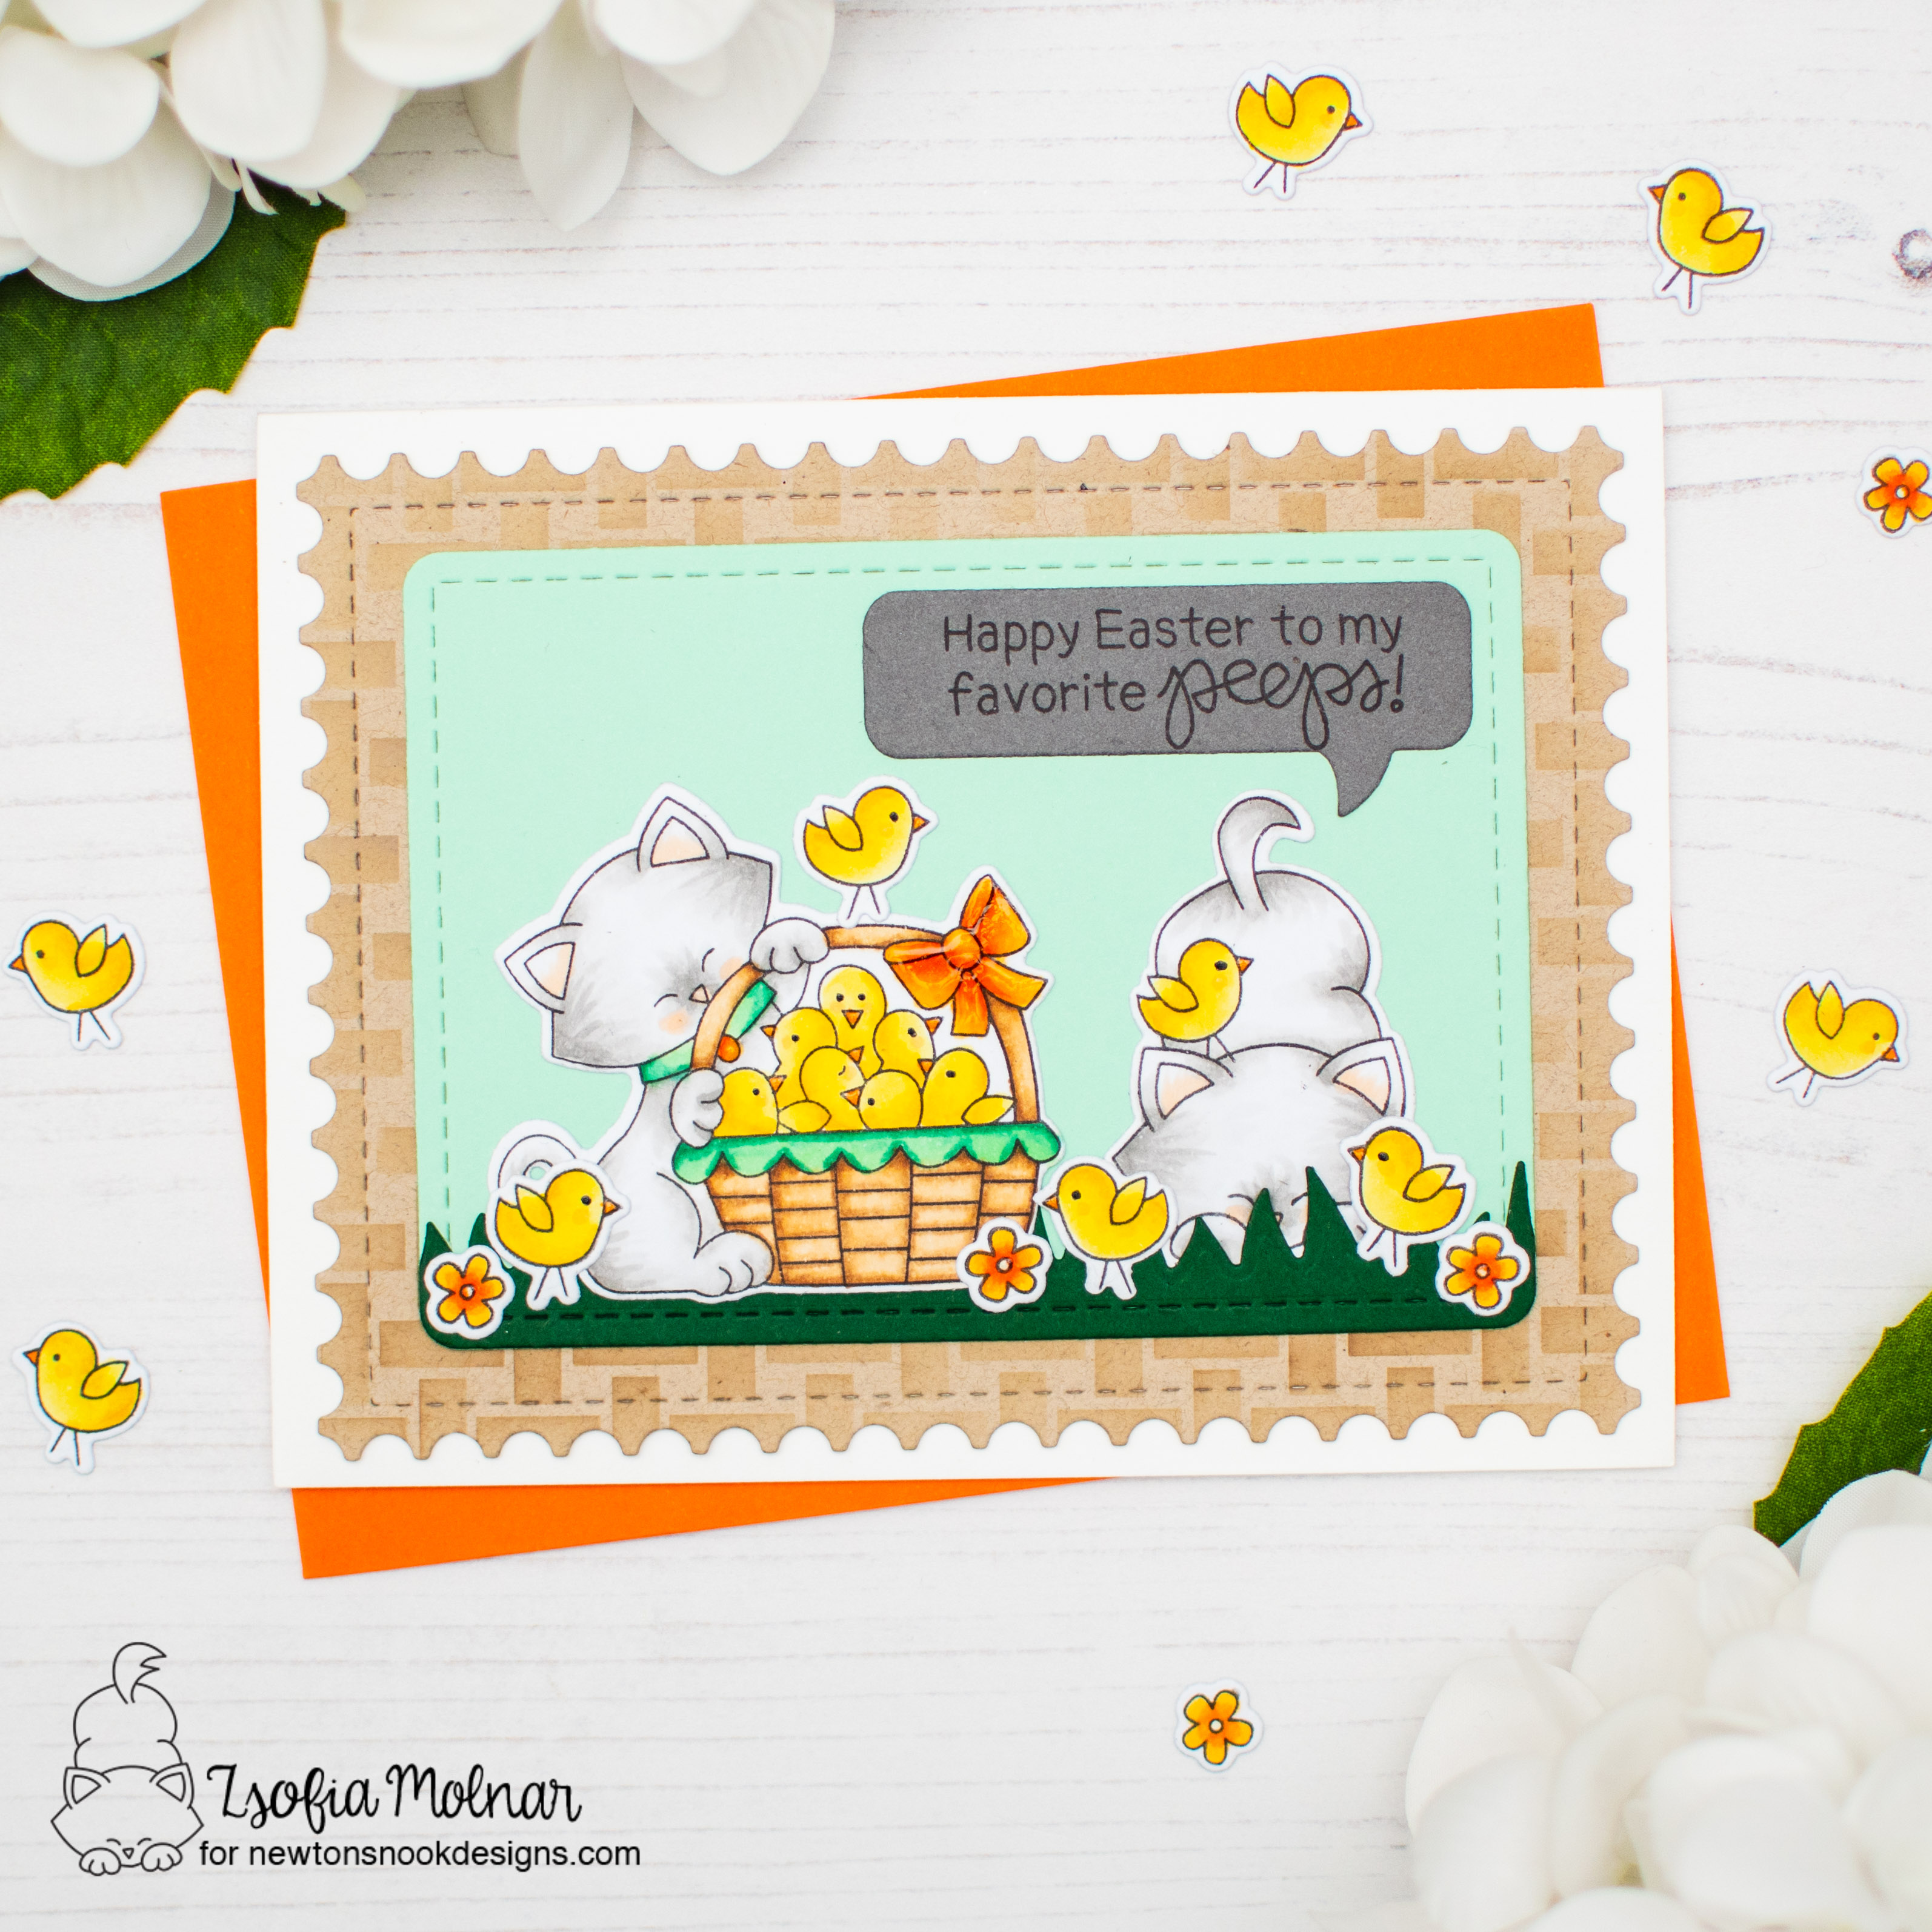
It is the last day of the Back to Basics release reveals, but I must admit that this die is my favourite: it is called A2 card layout die set and It is gorgeous! I love all the paper piecing options it gives, plus the stitching details always have my heart.

I started with cutting the die one from patterned paper from the Pastel Basics paper pad, once from peacock cardstock and the middle part from a matching light blue scrap. I paper pieced them on an A2 sized white notecard.

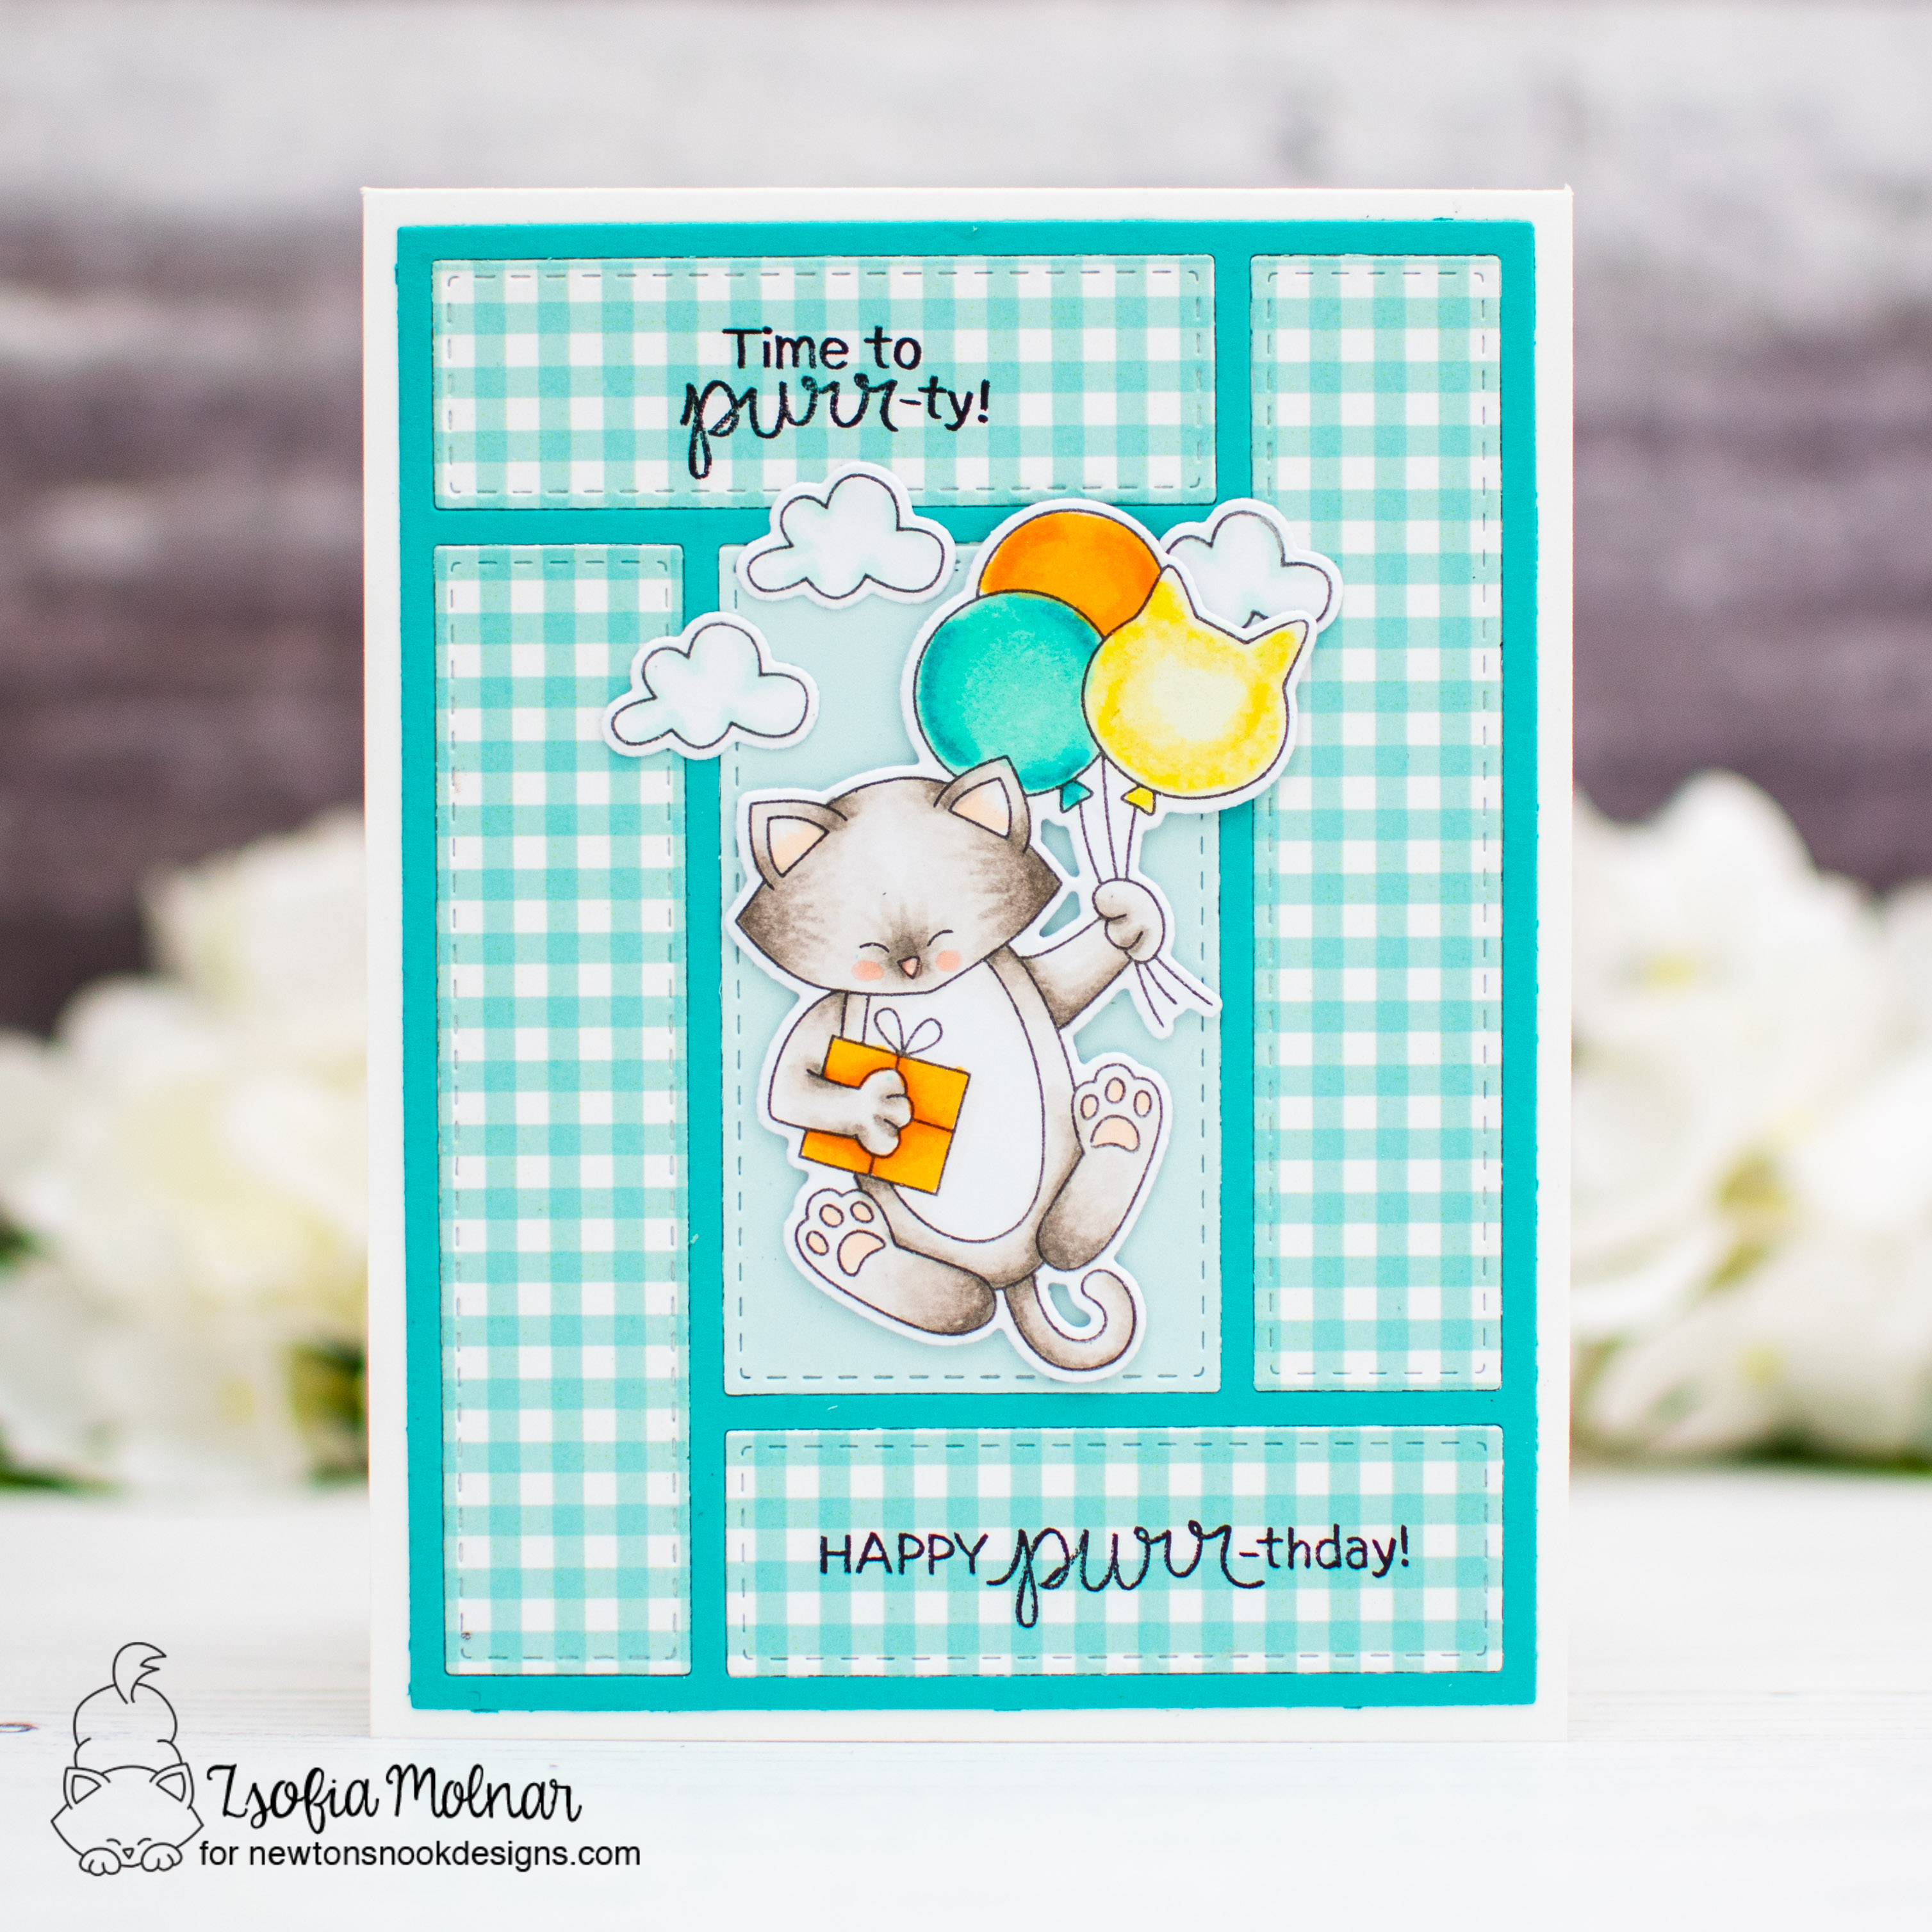
Then I stamped and coloured the Newton’s birthday balloons set with Copic markers and cut them out with their coordinating dies.

Before popping up the image in the middle with 3D foam squares, I stamped 2 sentiments on the horizontal panels in black.

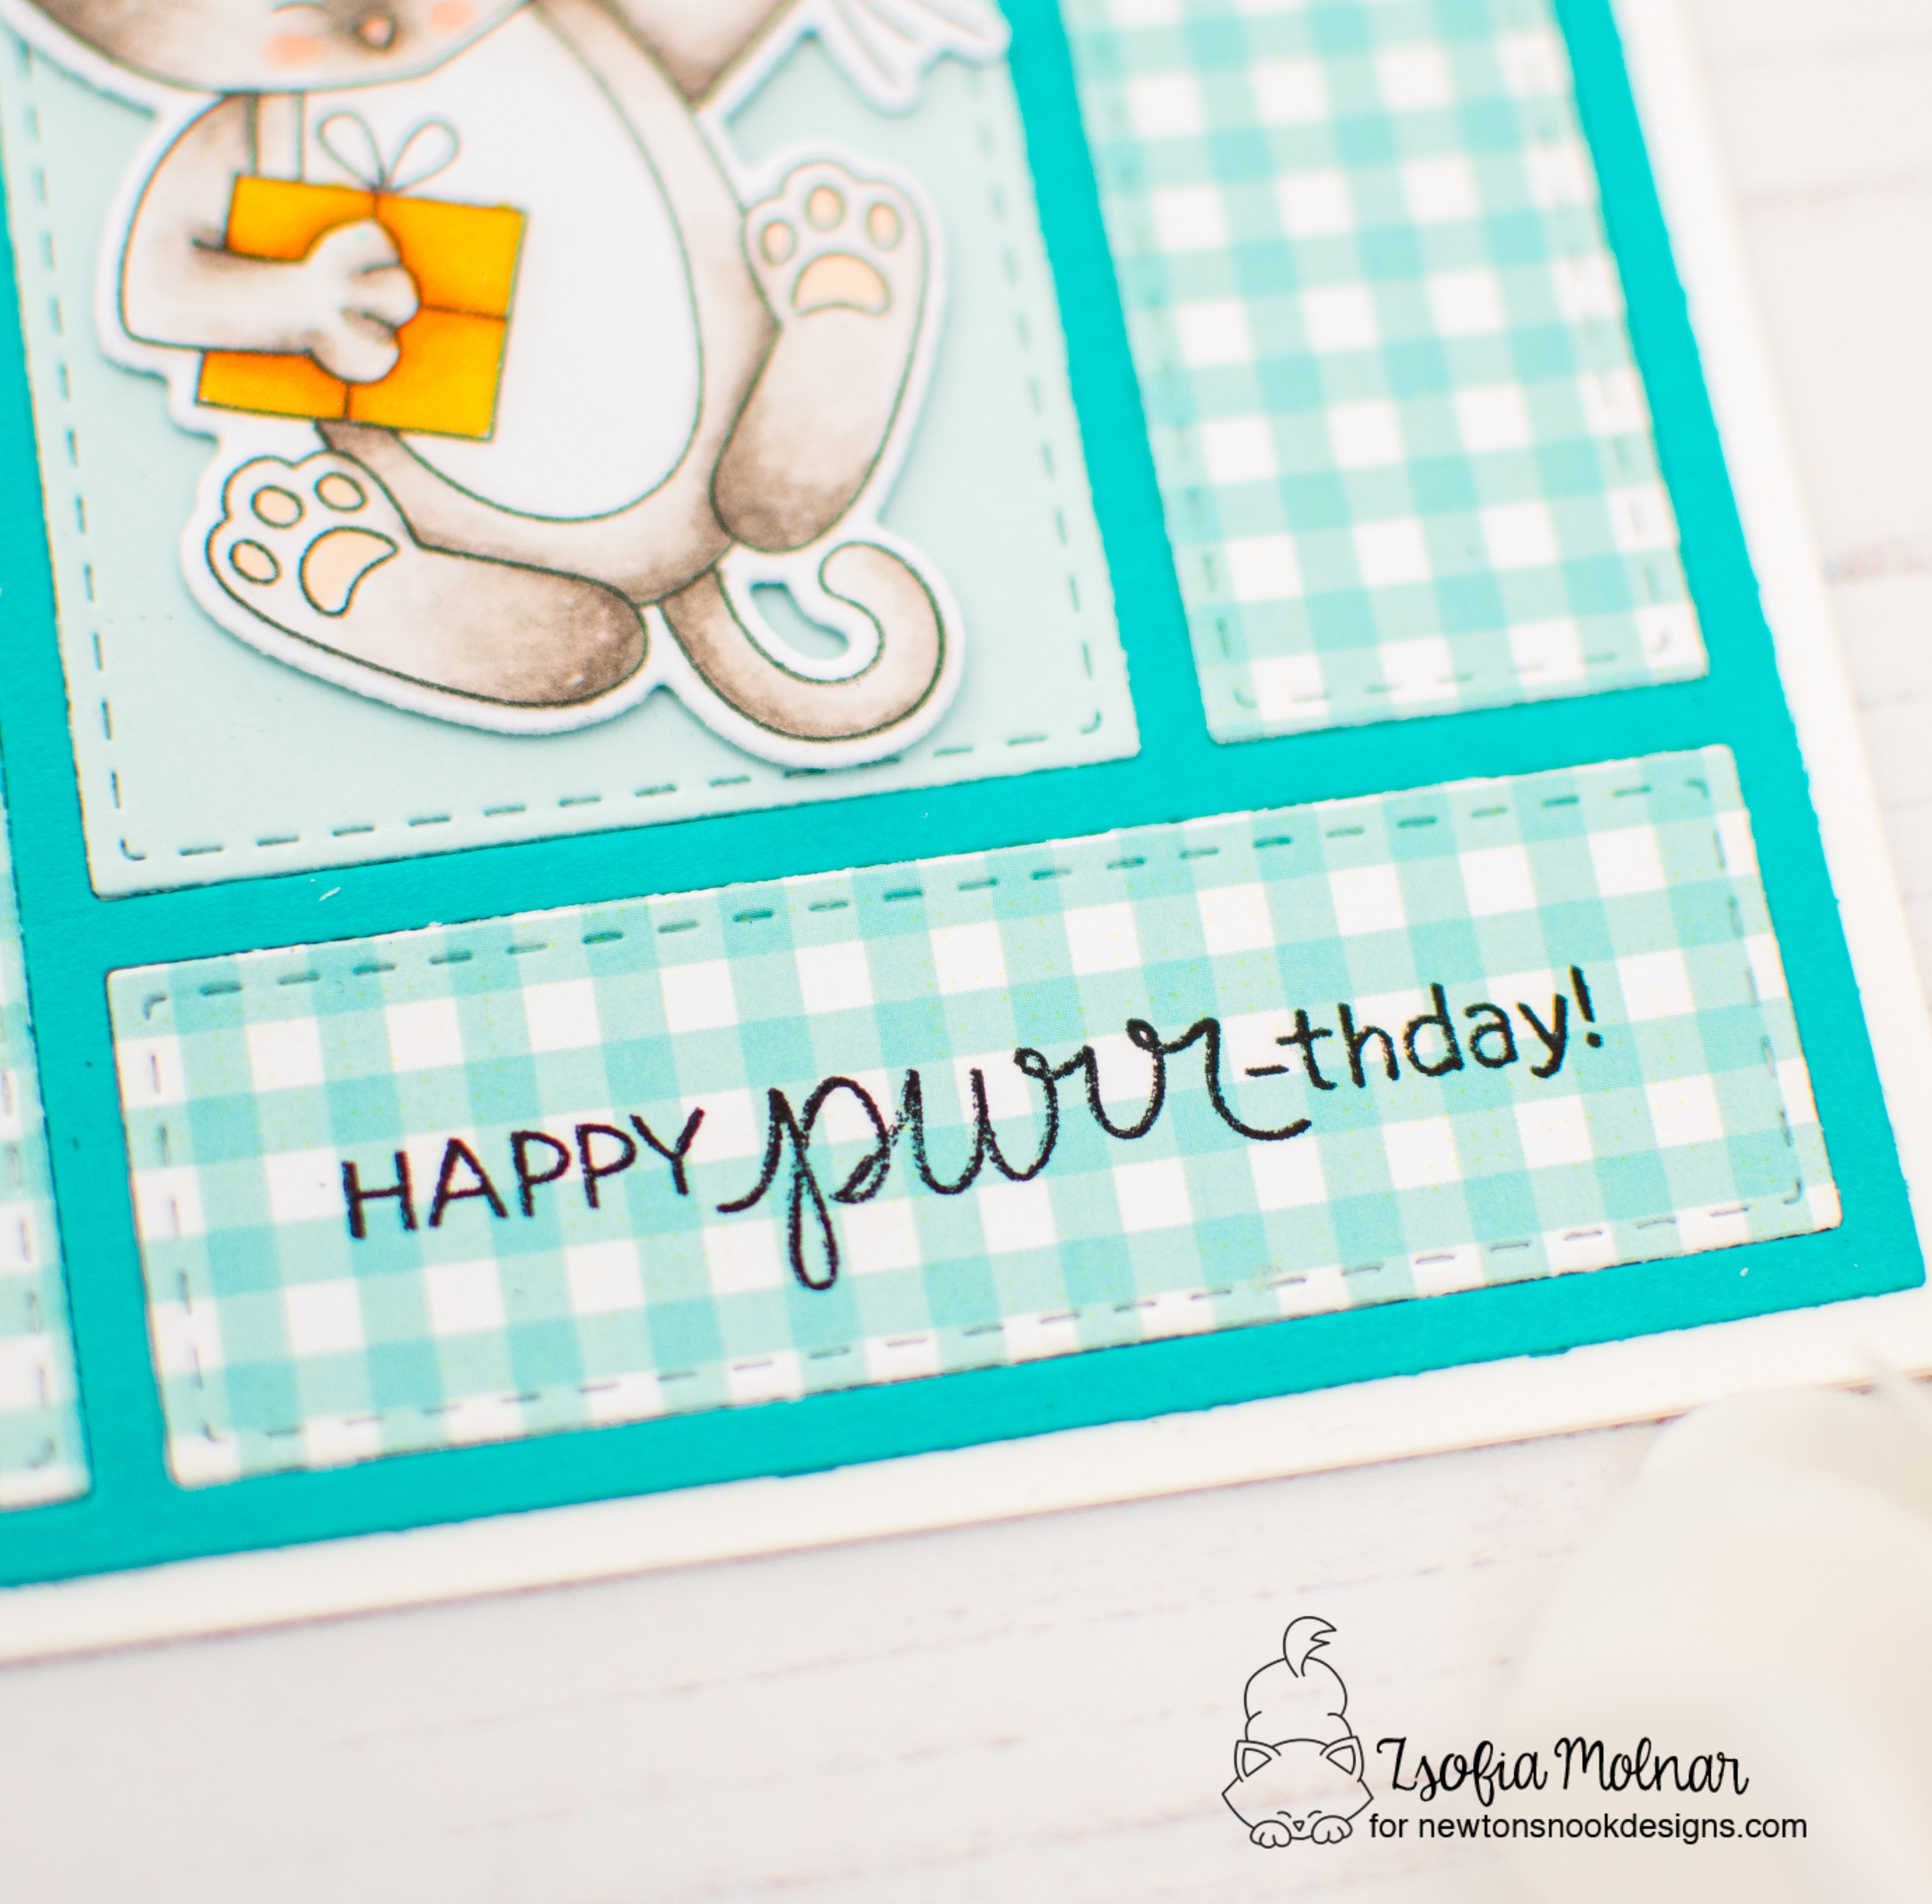
I added a few mini clouds as embellishments, and used a clear shimmer pen on the balloons and present to make them festive.

GIVEAWAY

We will be choosing one lucky winner to win a $25 store credit for Newton’s Nook Designs online shop! The winner will be chosen at random from the collective blog posts featuring our new products this week. For a chance to win, leave comments on the Design Team Member Blog Posts (see list below) from Tuesday March 19 through Thursday March 21. You will not know which blog has been chosen so the more you comment on the better your chances are of winning! You have until Thursday, March 21st at 9 pm ET to comment — winners will be announced on the NND blog on Friday, March 22nd.

Check out all the awesome Design Team Blogs below to enter:

Newton’s Nook Designs

Donna Idlet

Ellen Haxelmans

Larissa Heskett

Samantha Mann

Zsofia Molnar – you are here

Diane Morales

Tatiana Trafimovich

Amanda Wilcox

I hope you enjoyed today’s card and got inspired. See you tomorrow for a fun Instagram hop to celebrate the new release!

Zsofi

Newton’s Nook Designs Back to Basics – Day 2

Hello Everyone,

Welcome back, it is Day 2 of the new release reveals of Newton’s Nook Designs. This month we are featuring fun new die sets, 2 fantastic paper pads and a cute little stamp and die set. All sets were revealed on Monday on the NND blog and will be available for purchase in the store on Friday, 22nd March!

My card today focuses on the Basic Frames die set. I love that big banner, I had to use it on this clean and simple card!

I started with stamping the pretty floral from Dainty Daises, and quickly coloured it with Copic markers. I used the coordinating die to cut it out.

Then I die cut the big banner from a purple dots patterned paper from the new Bright Basics paper set. For the background I chose a light grey cardstock and die cut it with a die from Frames and Tags. I stamped a sentiment on the bottom and popped up the banner with 3D foam tape. I mounted the daisies with 3D foam squares too for extra dimension and added a little twine to the stems.

As a finishing touch I used glossy accents on the flower centers. I love this design with all the stitched details!

GIVEAWAY

We will be choosing one lucky winner to win a $25 store credit for Newton’s Nook Designs online shop! The winner will be chosen at random from the collective blog posts featuring our new products this week. For a chance to win, leave comments on the Design Team Member Blog Posts (see list below) from Tuesday March 19 through Thursday March 21. You will not know which blog has been chosen so the more you comment on the better your chances are of winning! You have until Thursday, March 21st at 9 pm ET to comment — winners will be announced on the NND blog on Friday, March 22nd.

Check out all the awesome Design Team Blogs below to enter:

Newton’s Nook Designs

Donna Idlet

Ellen Haxelmans

Larissa Heskett

Samantha Mann

Zsofia Molnar – you are here

Diane Morales

Tatiana Trafimovich

Amanda Wilcox

I hope you enjoyed today’s card and got inspired. See you tomorrow for another lovely set reveal!

Zsofi

Newton’s Nook Designs Back to Basics – Day 1

Hello Everyone,

I am so happy to be part of the new release reveals of Newton’s Nook Designs! This month we are featuring fun new die sets, 2 fantastic paper pads and a cute little stamp and die set. All sets were revealed yesterday on the NND blog and will be available for purchase in the store on Friday, 22nd March!

For my card today I really wanted to showcase the Newton’s Bright Birthday set, so I stamped and coloured it with Copics, ad cut it out with its coordinating die.

I used the new Frames and Tag die set to create the background for the image: I cut the different dies from coloured cardstock and backed the frame with a piece of patterned paper from the Bright Basics paper pad. I also added a pink mat to it before adhering it to the green backdrop, just because I love layers.

I stamped the sentiment on the patterned paper directly. As the paper has a bit shiny finish and because my regular ink pad is drying out, I used black Staz-on ink for the sentiment. I love how crisp and bright black it turned out!

After adhering the die cut image, I added a bit of glossy accents to the cake and tray, and a bit of clear shimmer to the presents and candles. The sunglasses are so shiny black because I used black glaze pen over it. So cool!

GIVEAWAY

We will be choosing one lucky winner to win a $25 store credit for Newton’s Nook Designs online shop! The winner will be chosen at random from the collective blog posts featuring our new products this week. For a chance to win, leave comments on the Design Team Member Blog Posts (see list below) from Tuesday March 19 through Thursday March 21. You will not know which blog has been chosen so the more you comment on the better your chances are of winning! You have until Thursday, March 21st at 9 pm ET to comment — winners will be announced on the NND blog on Friday, March 22nd.

Check out all the awesome Design Team Blogs below to enter:

Newton’s Nook Designs

Donna Idlet

Ellen Haxelmans

Larissa Heskett

Samantha Mann

Zsofia Molnar

Diane Morales

Tatiana Trafimovich

Amanda Wilcox

I hope you enjoyed today’s card and got inspired. The new dies are amazingly versatile, I cannot wait to show you more cards with them!

See you tomorrow for a new set feature!

Zsofi

Easter Peeps – Newton’s Nook Designs

Hello Everyone,

I am back today with an adorable critter card for Easter using an older favourite stamp from Newton’s Nook Designs. I paired them with a couple of other dies to create this little Easter scene, let me guide you through the process.

First I stamped and coloured the images from Newton’s Peeps using Copic markers. I kept the kitties light grey, to make the bunch of yellow chickens stand out. I used the coordinating dies to cut them all out.

To set the scene I die cut a rounded rectangle from light green cardstock with a die from Frames and Flags. Added grass which I cut with a Land Border die from dark green cardstock and arranged the die cut images. That kitty hiding behind the grass is my favourite, so cheeky!

The sentiment I stamped on a grey Speech Bubble and adhered it to the scene. I love to add a sentiment as part of the design!

For the background I used the Basketweave stencil with brown ink on kraft cardstock and die cut the panel with a die from Framework. It adds a nice touch to the focal panel. As always, I had to use glossy accents on the ribbon and the beaks of the chicks, and I also made there eyes shiny with a black glaze pen.

I hope you liked my card and got inspired to create some cute scenes for Easter.

See you soon,

Zsofi

Pretty Pink Posh March Blog Hop

Hello Everyone,

I am so excited and honored to be part of the Pretty Pink Posh March Blog Hop. It is the last day of the hop so if you have missed the previous days, make sure to check all the fabulous inspiration our team and special guests created! This release is full of Easter and Spring themed stamps, dies, stencils and embellishments!

My project today is a home decor for Easter. I made a framed picture, a small treat in a pot and a matching card. I love to create complex project like his one, it can be a perfect gift too! Lets see them one by one.

PICTURE FRAMED

I cut a piece of teal cardstock which matched the frame I had at home and used the new Easter Words stencil with some pearly texture paste. I did add some colour to the paste with Peacock Feathers and Blueprint Sketch Distress Oxide, to get a tone-on-tone look. As my cardstock was larger than the stencil I needed to continue the pattern by simply shifting the stencil. With this design, it was super easy to line it up again for a seamless result.

While the paste was drying I die cut and assembled a few bunny heads using the Bunny Face Shaker die set. I used liquid glue with a precision tip to add all the tiny details.

I also die cut the Happy Easter sentiment with 2 older die sets: Happy Spring Shadow die set and Easter Wishes die set. I used vellum for the shadow and simple black cardstock for the sentiment itself.

SWEET BUNNY TREAT

For the small treat I painted a tiny pot with pastel aqua acrylic paint, filled it with orange jelly beans and added the bunny face and sentiments on toothpicks to it. So easy to make, yet so pretty! Perfect for the kids!

BUNNY CARD

I really wanted to make a matching card and I was giddy to figure out how well the Layered Bunny Faces stencil matches the Bunny Face Shaker die set! So I applied white pigment ink on teal cardstock with Layer A of the stencil set and dried it with my heat tool before adding the eyes and mouth with black and nose and ears with pink inks. It is so subtle and cute!

When it was dry, I cut it down with a Stitched Torn Rectangle die, adhered it to a white card base and adorned it with the same sentiment.

GIVEAWAY

Leave a comment on each stop of the blog hop and you may be one of the lucky winners! They are giving away 3 $30 gift certificates to random comments (1 winner each day) left before March 13, 2024 at 11:59 PM PST. The winners will be announced on the PPP blog, so be sure to return and see if you are one of them! The last day blog hop list:

Pretty Pink Posh blog 
Amanda Wilcox
Dana Kirby
Annette Allen
Zsofia Molnar – you are here
Jeanne Jachna
Heather Hoffman
Gemma Campbell

I hope you enjoyed my inspiration and will pop in again soon.

See you,

Zsofi

Tulips for Spring – Newton’s Nook Designs

Hello Everyone,

It has been silent on my end for a while, life took over my crafty time but today I have a lovely and fresh tulip card for you to celebrate Spring (Autumn here in Australia). I used supplies from Newton’s Nook Designs.

First I stamped and coloured a bunch of tulip from the Tulips stamp set. I used Copic markers: some colder greens and warm greys with a touch of violet for the flower heads. I cut it out with its coordinating die.

Then I die cut a piece of Distress Watercolour cardstock with the scalloped rectangle die from Frames and Flags holding it at an angle. I did a quick ink blending over the panel with Tumbled Glass and Cracked Pistachio Distress Oxide inks. I wanted some texture to the background so I used the Floral Lace stencil with Lucky Clover and Salty Ocean Distress Oxide inks, fading the colours out towards the top. I added some black and white sprinkles and some water droplets for even more texture.

I added a dark green mat to the background panel (I cut it the same way as I did with the watercolour cardstock). I adhered it to a white, top folding card base and popped up the tulips with 3D foam squares. I stamped a sentiment at a angle from the Daffodils stamp set and as a finishing touch I added a few clear gems.

I hope you enjoyed my card today and will pop in again soon for more inspiration.

See you,

Zsofi