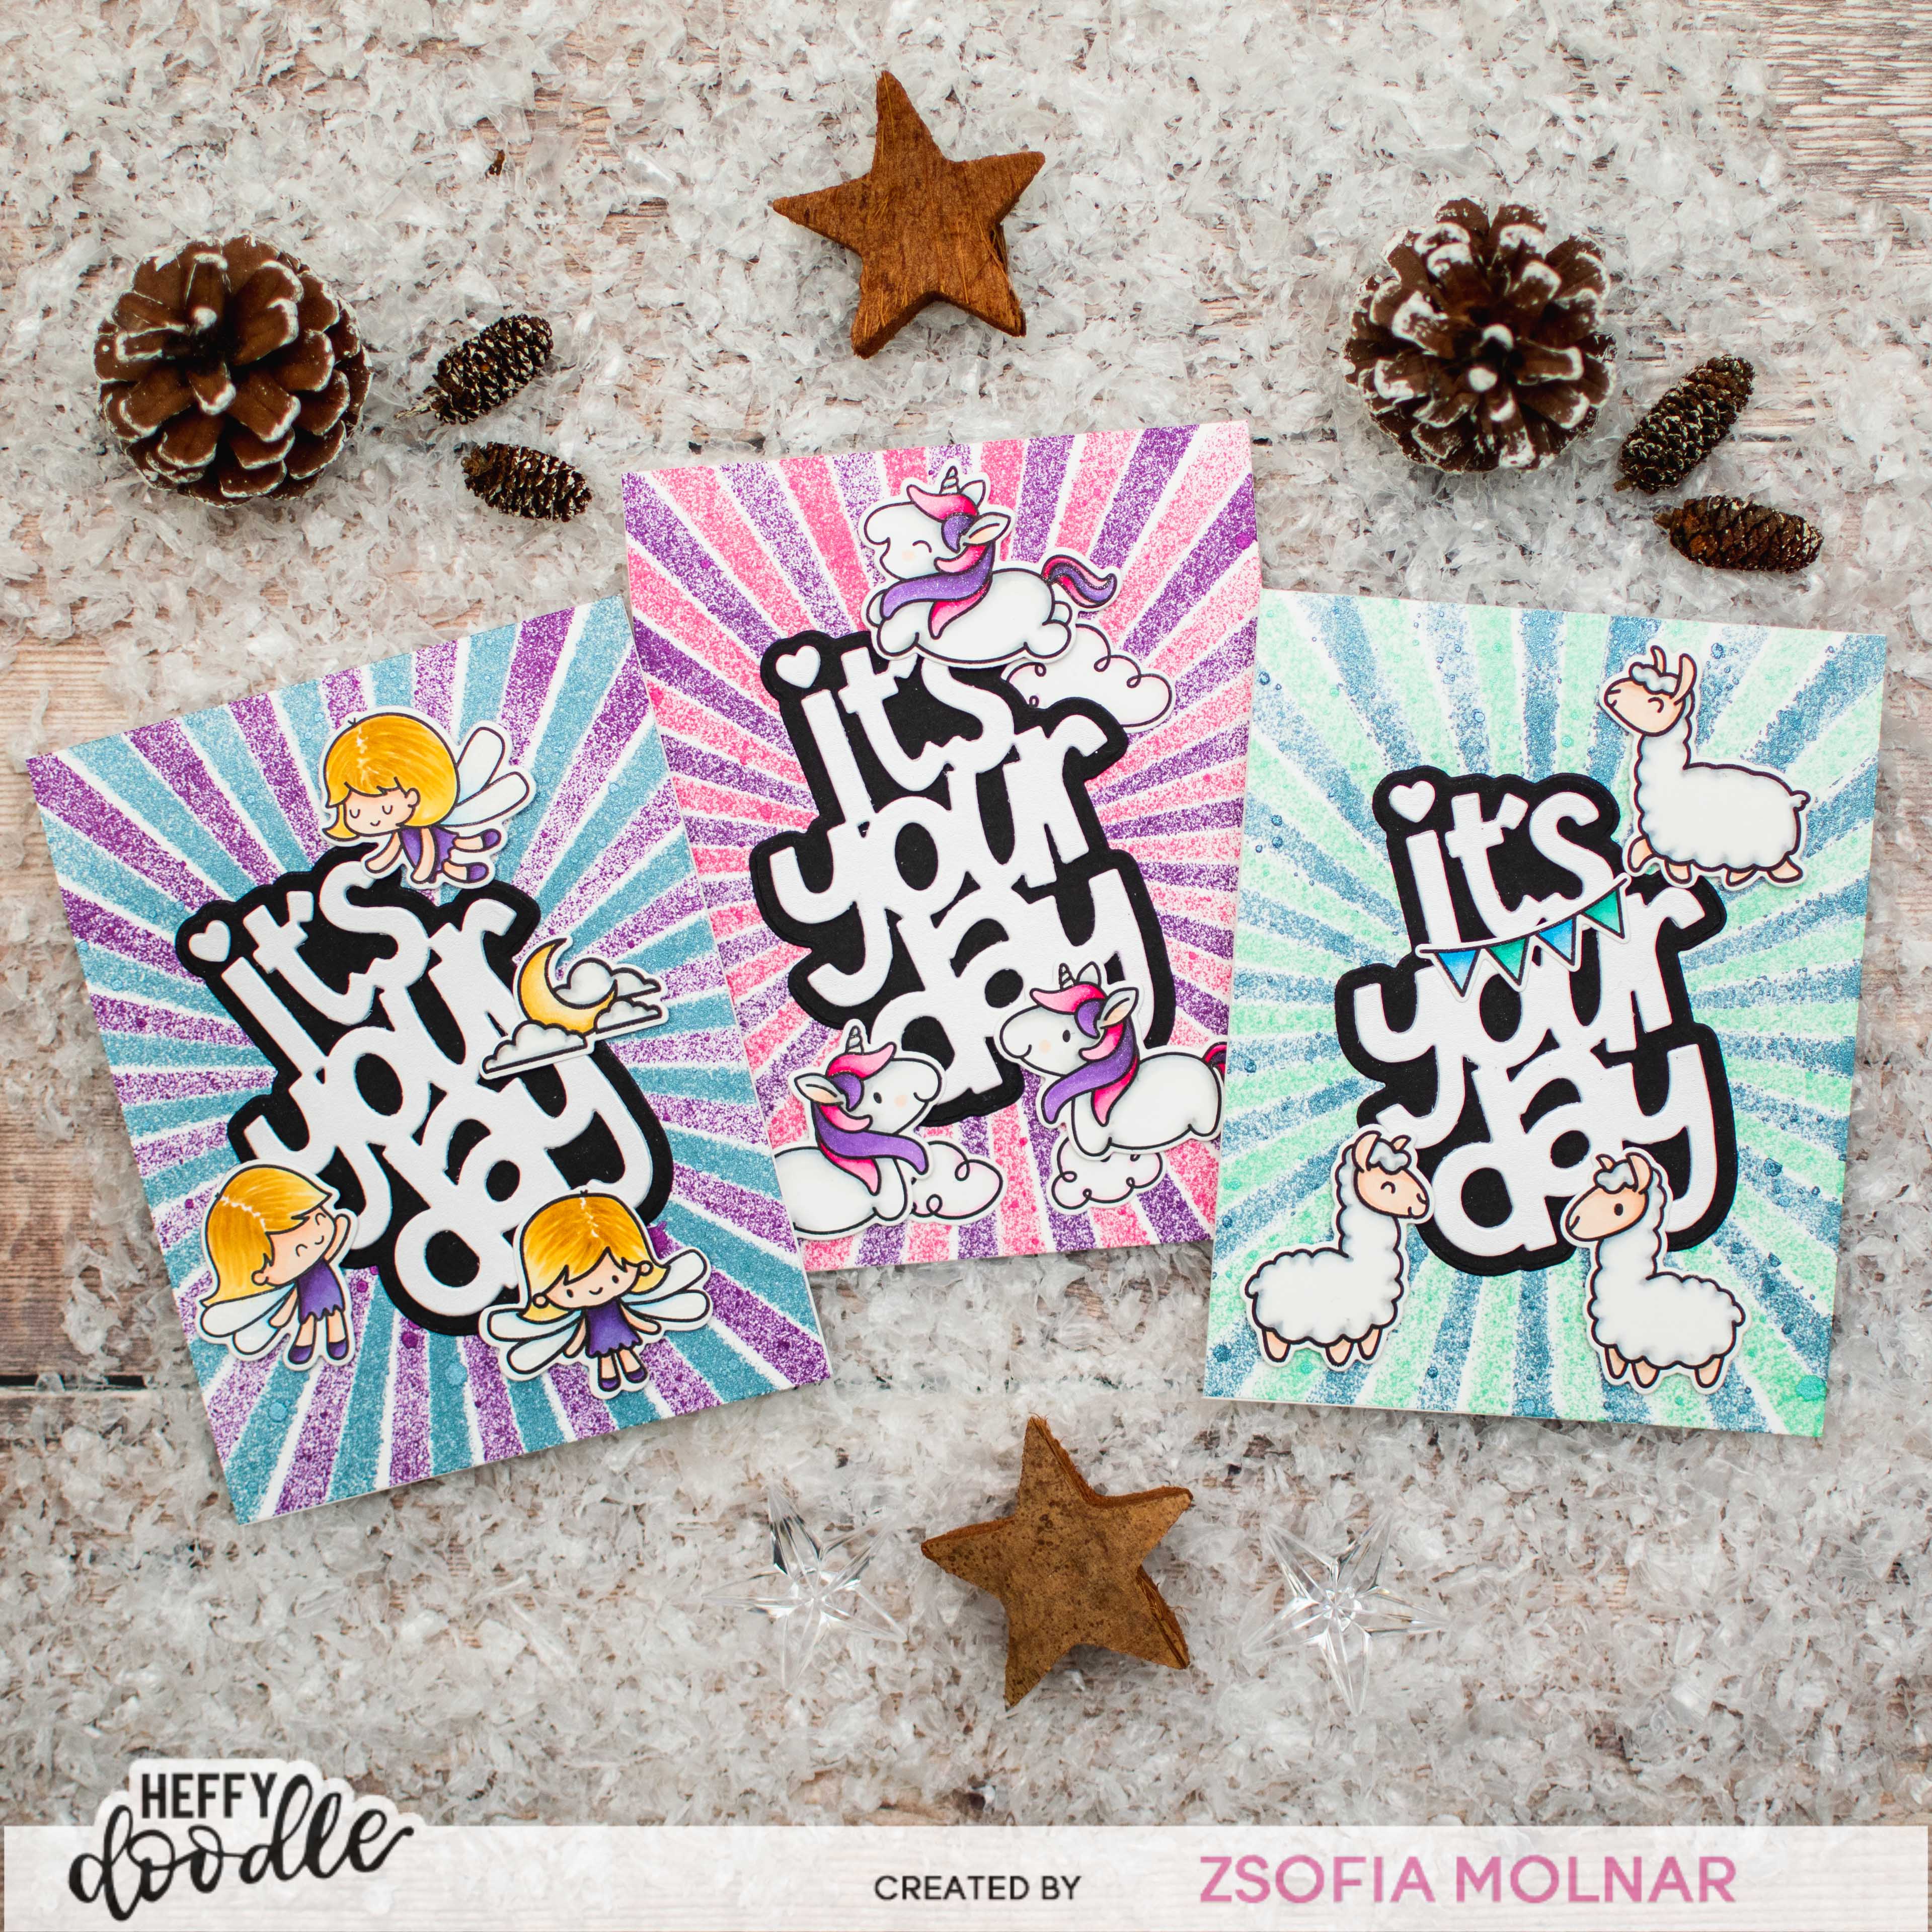
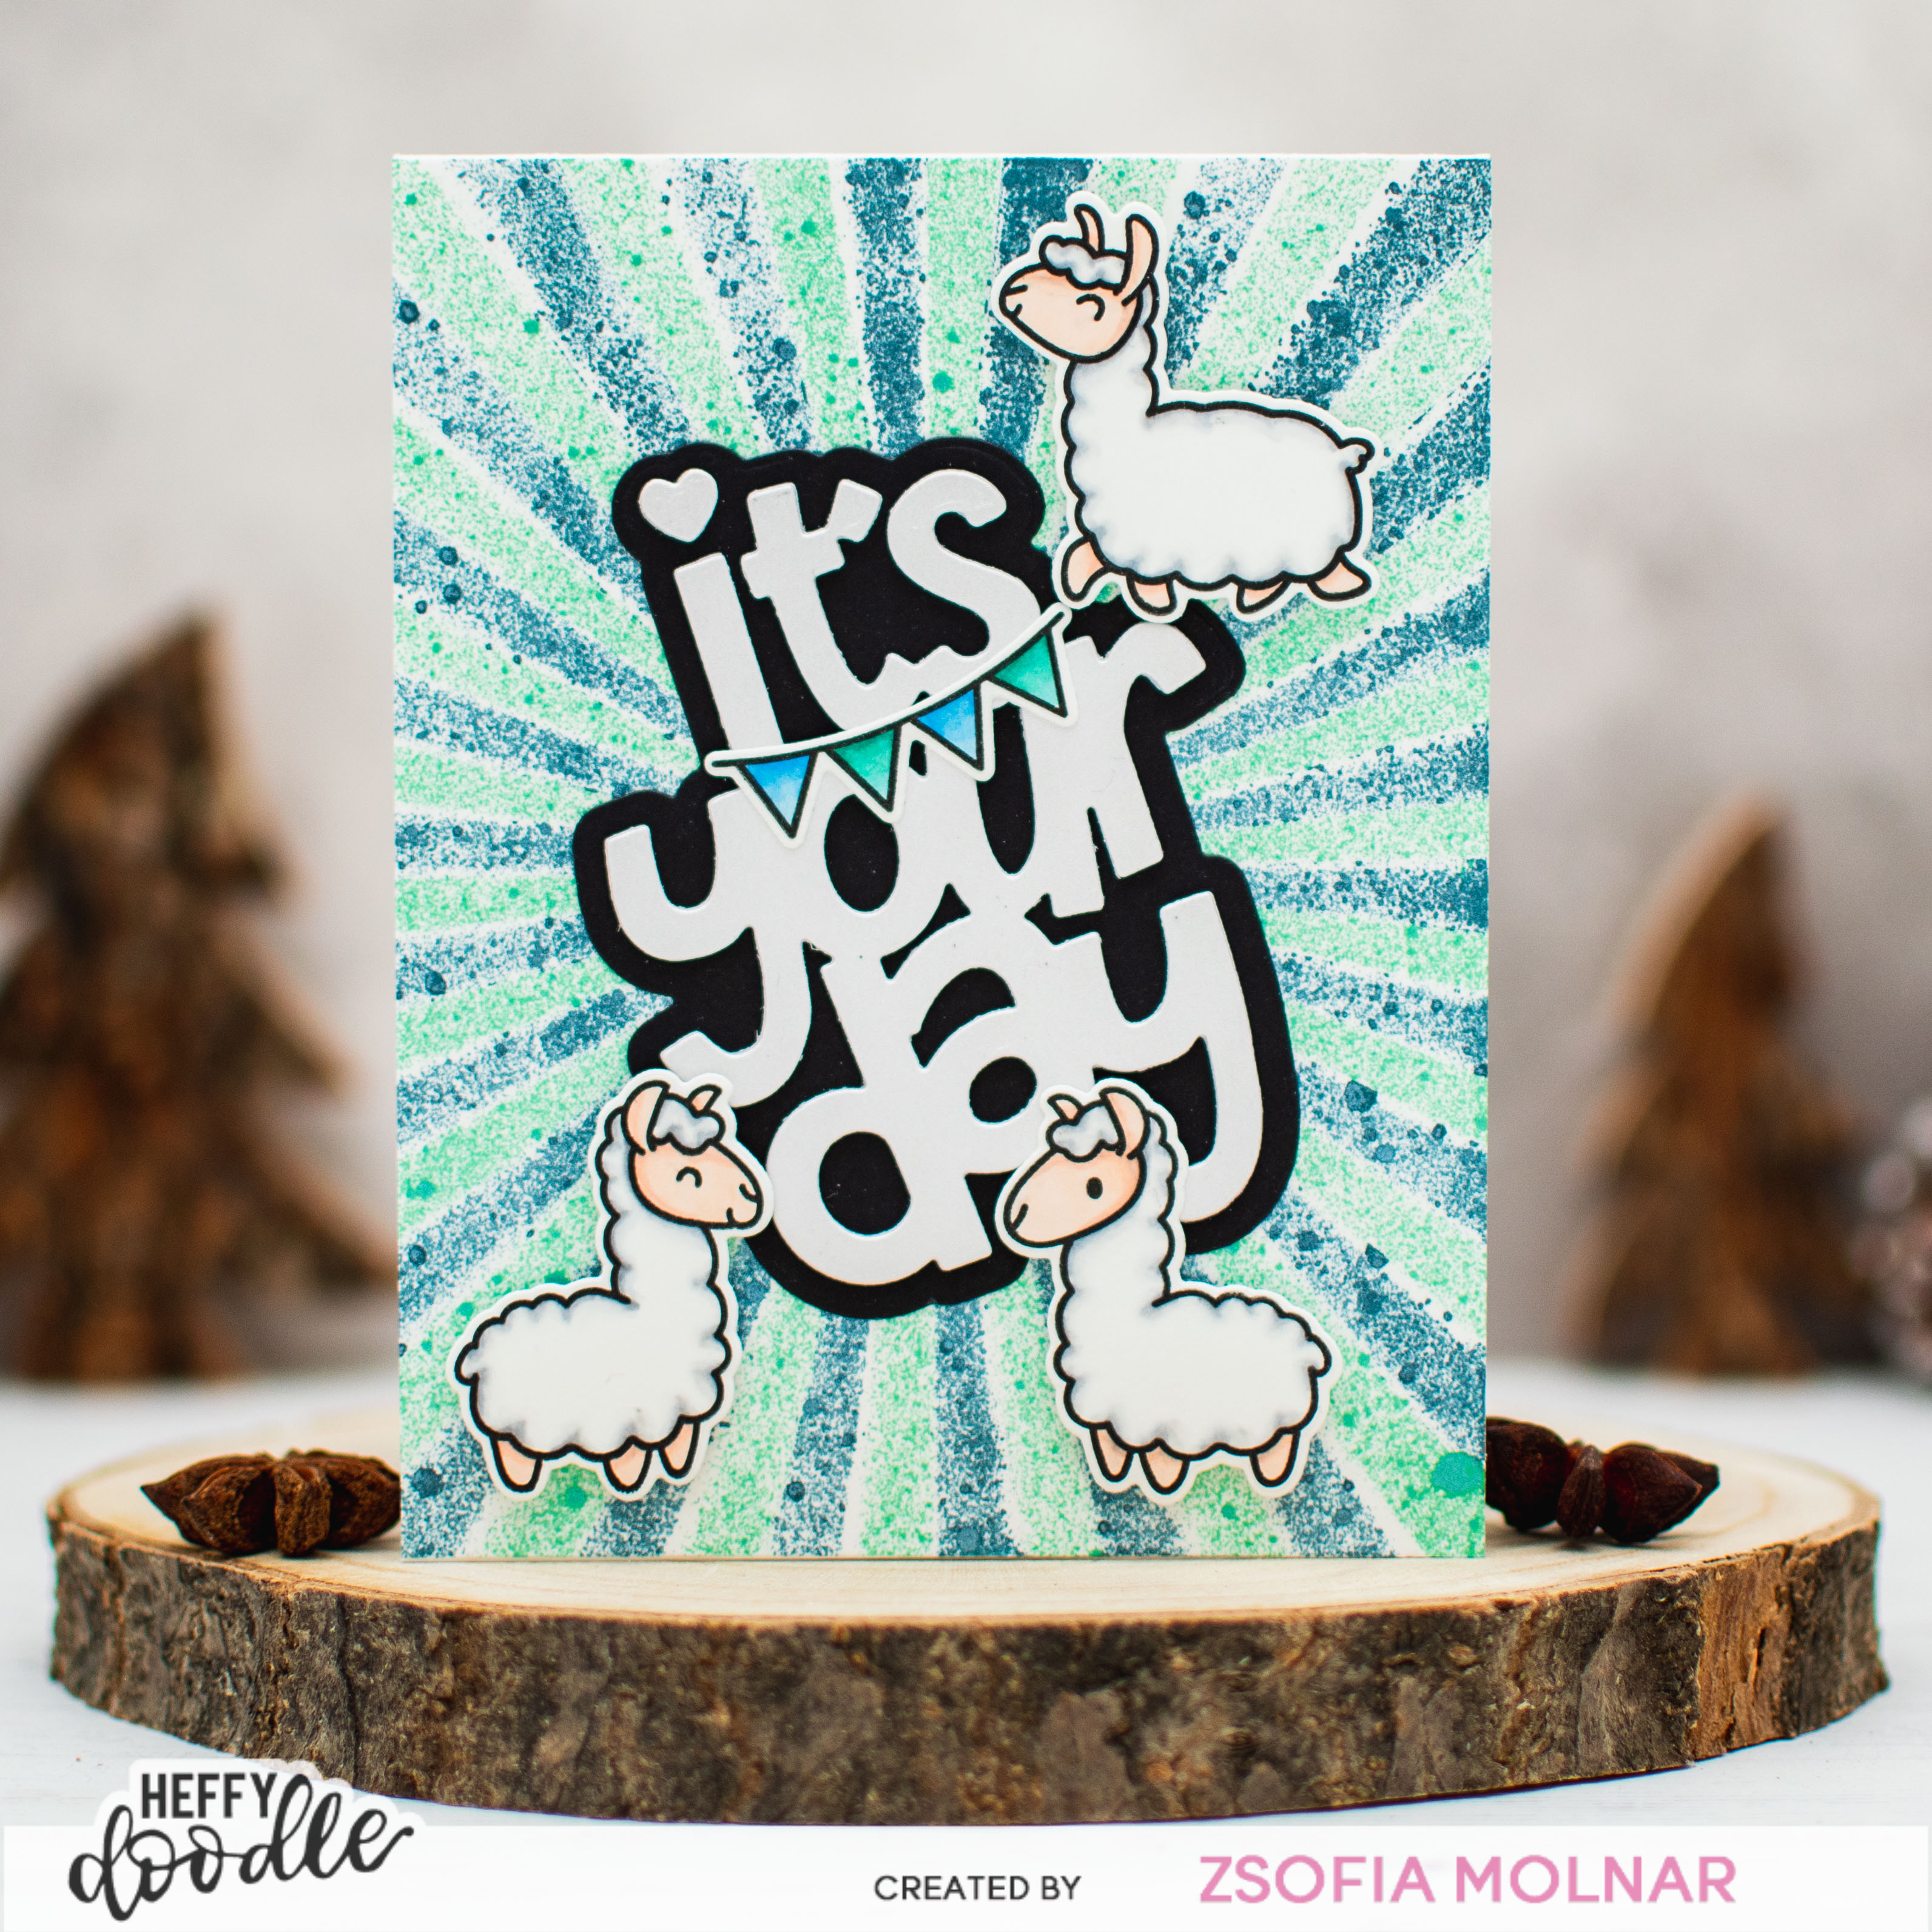
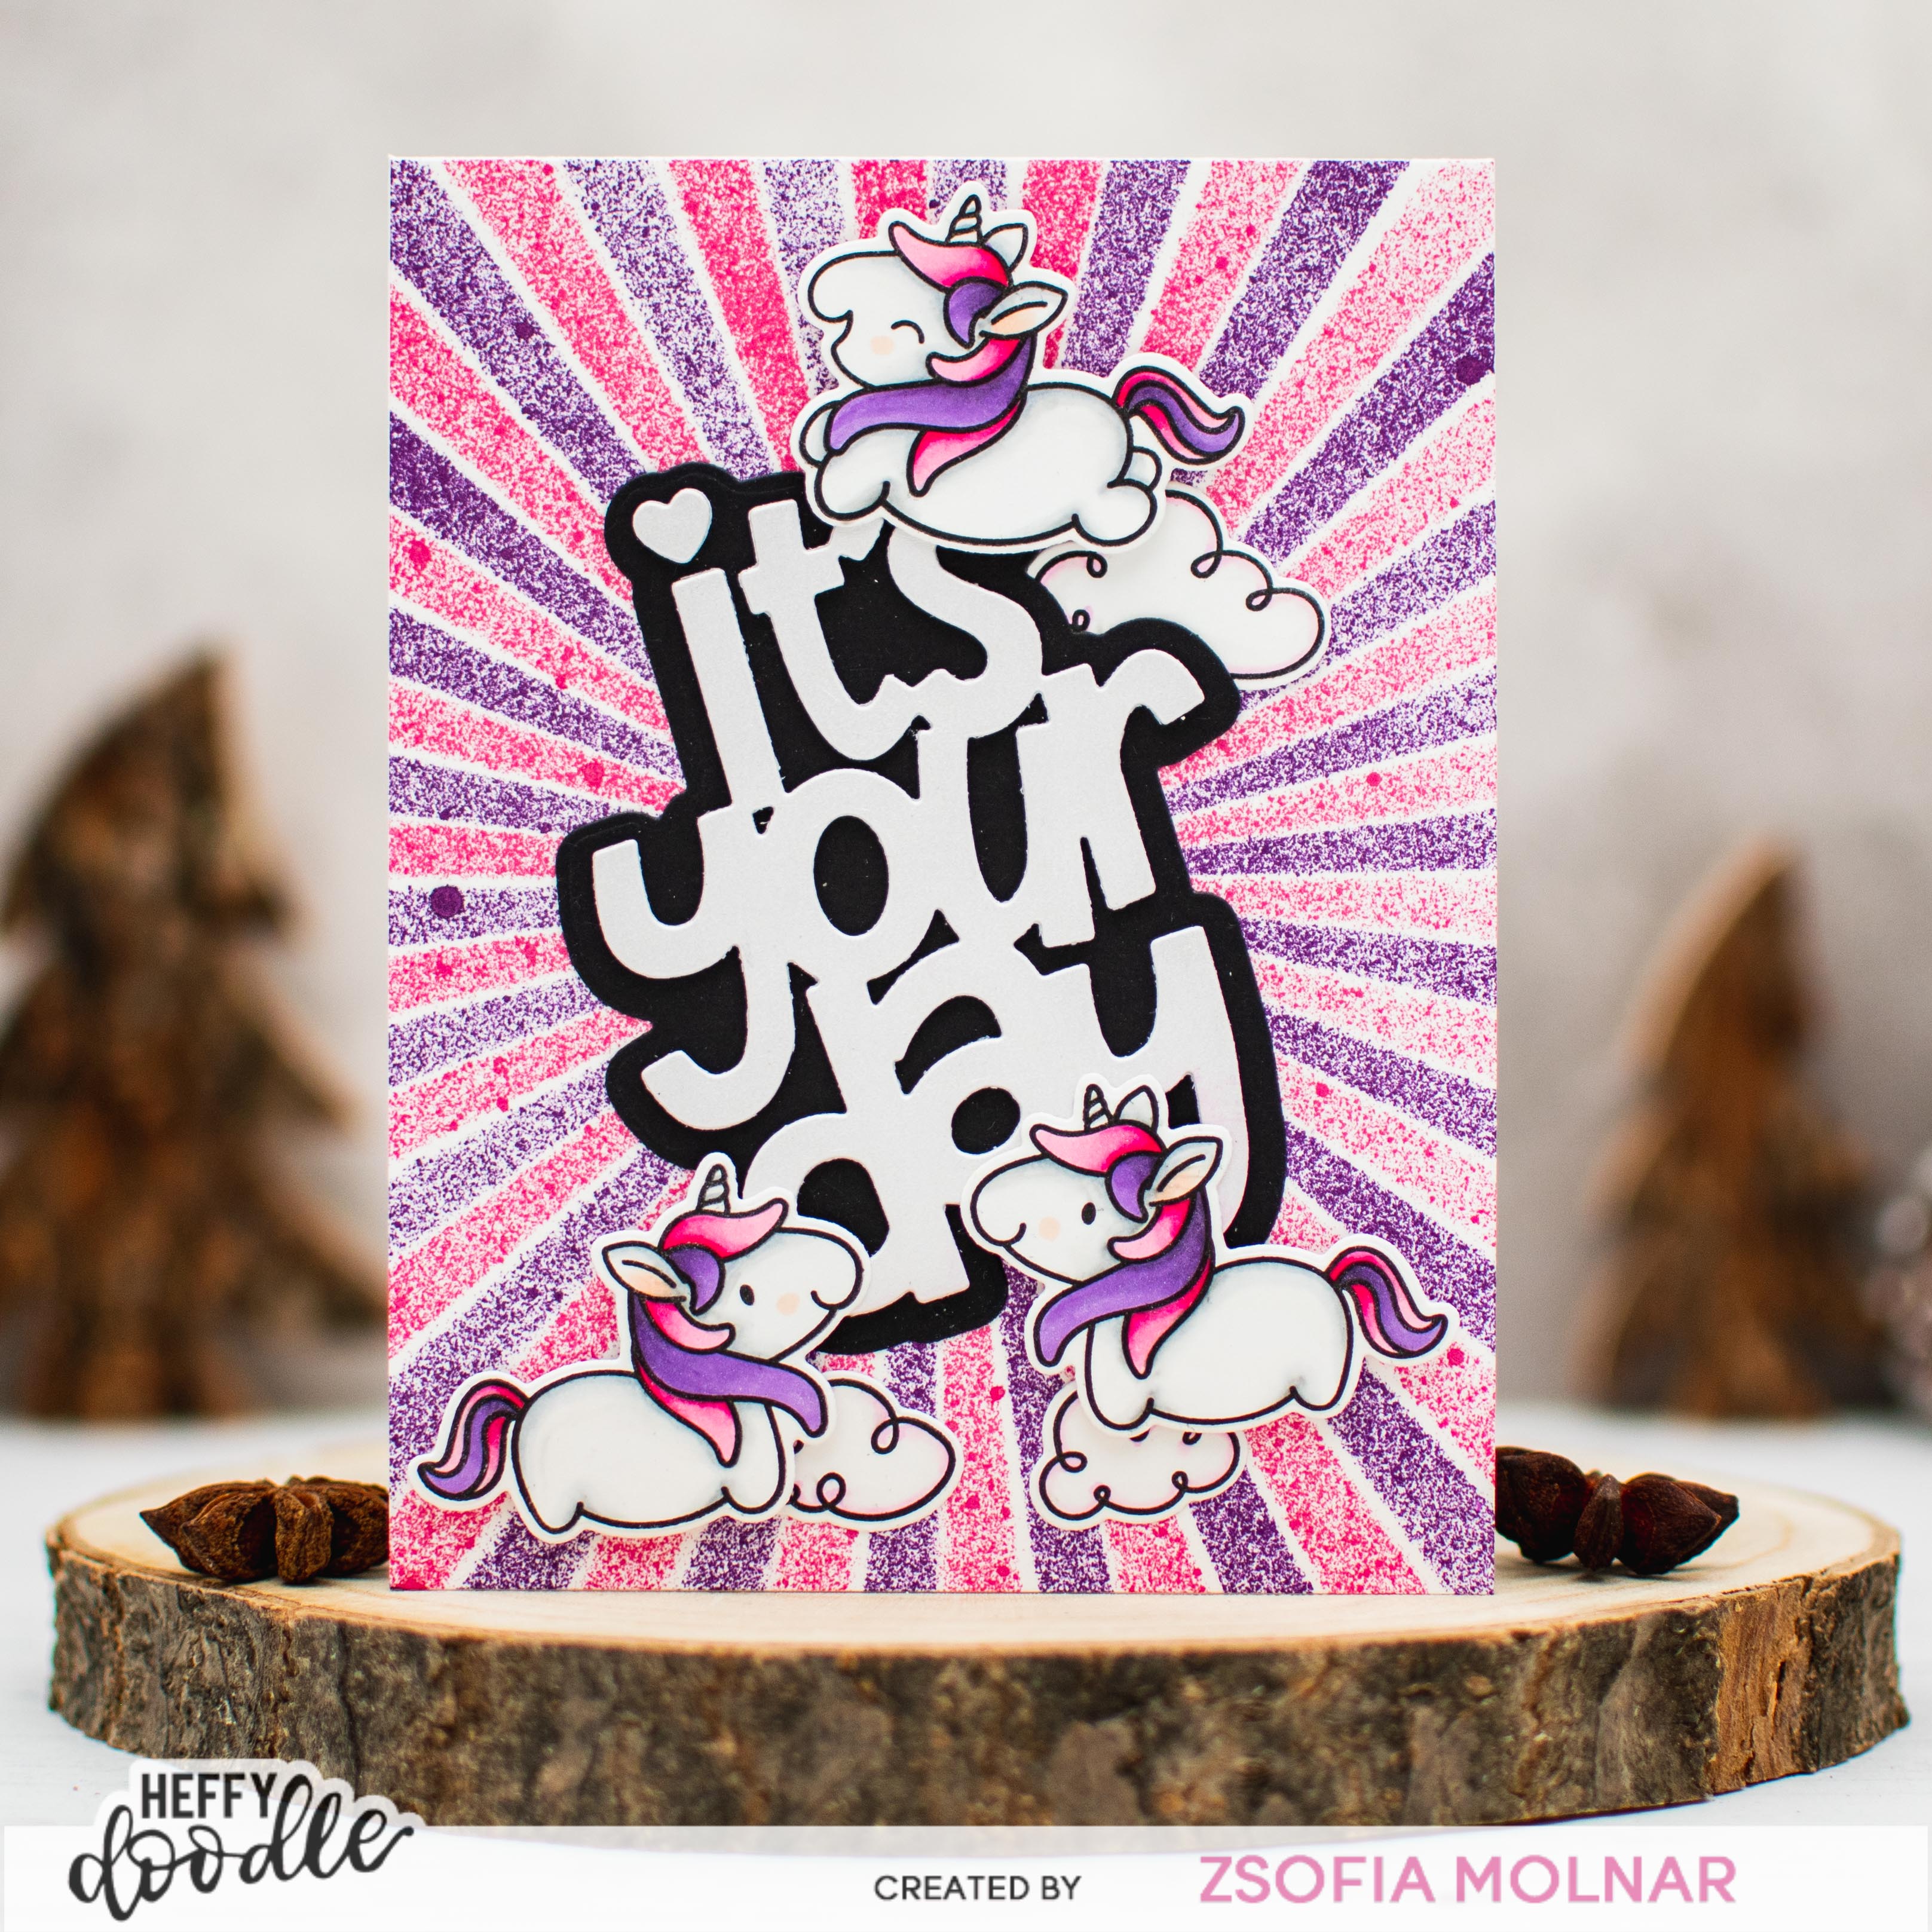
Better Together – Pretty Pink Posh

Hello Everyone,

I have a fun little card to share with you today, which I made with supplies from Pretty Pink Posh. I am totally in love with layering stencils and I enjoy coming up with different colour combos for each, but I had another idea for the Layering Cherries stencil from their latest release. Let me show you!

First I did a quick ink blending on Neenah Solar white cardstock with Worn Lipstick Distress Oxide ink. Then I used the first layer of the Layering Cherries stencil set with Lumberjack Plaid Distress Oxide ink. I love this red colour, my absolute new favourite! I added a tiny bit of Aged Mahogany to the bottom of the cherries. For the stems I used Rustic Wilderness first and then realized that the cherry stems are rather brown, so I went back with Ground Espresso. This way the result is a brownish green, perfect for the pink background! For the leaves layer I used the same green but wanted to lighten them a little, so I went back with Twisted Citron. After removing the last layer I generously spritzed the panel with water from a mini mister and dabbed it off with a paper towel after 30 seconds.

In my head I visualized smiling cherries, so I added little faces to each using the Ghost Friends stamp set. As I had to ink up only the face of each ghost, I used a black Memento marker on the eyes and noses instead of an ink pad. It worked perfectly! I need to try this technique with sentiments too!

For the sentiment I chose the Love Sentiments stamp set, and simply stamped the text in the middle using Versafine Onyx Black ink. I trimmed the panel down tiny and gave it a dark red mat before adhering to a top folding A2 sized card base.

As a finishing touch I used some little white clay hearts from the Valentine’s Day Mix.

I wish you enjoyed this cute design and you will try this technique.

See you soon,

Zsofi

Sweet encouragement – Heffy Doodle

Hello Everyone,

Welcome to another edition of my Perfect Combos series for Heffy Doodle. My kids are super busy with exams at school as they are closing the first term in elementary schools these days. They need all types of encouragement and I thought that the Pencil Heart die is a perfect choice for some little lunch box notes. Let me show you how I made these cuties.

First I die cut the pencils and the shadow die from white cardstock. I used a bunch of alcohol markers to add colours to the pencils. I used my Spectrum Noir Illustrator markers this time: PL4, PL2, HB1, PV1, BP2 for the purple one and TB6, TB3, BT6, BT2, JG3 for the blue version.

I used Heffy Memo Tape to hold the little pieces in place while I was colouring and adhered them to the shadow using a waxy jewel picker and liquid glue.

I found the best sentiment in the Fluffy Puffy Unicorns stamp set, I heat embossed it on black cardstock with white embossing powder and cut it down with a paper trimmer.

To fit in my kids lunchbox, I kept it small and adhered the pencil hearts on a white stitched circle. I wanted a colourful background for my own message so I die cut the same die from coloured cardstock and backed the little notes with them. It is sturdier and looks prettier this way.

I finished them off by adding a few seuins from the Royal Mist and Covesea Sparkle Mixes.

I hope you enjoyed today’s Perfect Combo and will check back later for more inspiration. If you like my cards, please make sure to follow me on Instagram where I also share my happy creations! Thank you!

See you soon,

Zsofi

Newton’s Nook Designs January Release – Day 4

Hello Everyone,

Sadly, it is the final day of the countdowns, but we saved another fun set for you for the last day of the January Release reveals with Newton’s Nook Designs. Never Enough Cats is perfect for any occasions for your cat lover friends.

All new designs will be available on 20th January.

As always I started with stamping and colouring the image with Copic markers: E44, E43, E42, E41, E59, E57, E55, E39, E37, E35, E34, E33, E31, W9, W7, W5, W4, W2, W1, W00, E11, E01, E000, BG57, BG23, BG11. I die cut it with its coordinating die,

While I was at die cutting I also cut a scalloped circle with the Circle Frames die set from patterned paper. I also cut another piece of patterned paper for the background, matted it with red cardstock. I added 3 thin teal striped before popping up the circle and the kitties. I love how the Love and Woofs and Love and Meows papers can be mixed and matched.

For the sentiment I die cut a gray banner with a Banner Trio die and white heat embossed the text on it.

As a finishing touch I used a black glaze pen on the noses.

GIVEAWAY

Would you like to win the “Never Enough Cats” Stamp Set? This stamp set will be given away to ONE lucky winner! Here’s how to win: Comment on the NND blog and Design Team blogs (see list below)! The winner will be chosen at random from the collective reveal posts. Make sure to check out each of their blogs and comment for your chance to win. You will not know which blog has been chosen so the more you comment on the better your chances are of winning! You have until Thursday January 19th at 9pm ET to comment  — winners will be announced on the blog post on Friday, January 20th. 

Check out all the awesome Design Team Blogs below to enter:

Newton’s Nook Designs

Donna Idlet

Ellen Haxelmans

Tina Herbeck

Larissa Heskett

Samantha Mann

Zsofia Molnar – you are here

Maria Russell

Farhana Sarker

Tatiana Trafimovich

Amanda Wilcox

I hope you enjoyed the last day of the reveals and you are ready to shop. All these supplies will be available as of tomorrow!

See you soon,

Zsofi

Newton’s Nook Designs January Release – Day 3

Hello Everyone,

We are halfway through the January Release reveals with Newton’s Nook Designs. Today we are showcasing the adorable Never Enough Dogs stamp/die set.

All new designs will be available on 20th January.

For my card I stamped and coloured the image using Copic markers: E49, E47, E44, E43, E42, E41, E59, E57, E55, E53, E51, E39, E37, E35, W9, W7, W5, W3, W2, W00, E11, E01, E000, YG06, YG23, E18, BG11. I die cut it with its coordinating die,

For the background I chose patterned paper from the Love and Chocolate paper pad and cut it with the scalloped rectangle die from Frames and Flags. The sentiment I stamped on a stitched white banner which I die cut with the Banner Trio dies. I decided to decorate it with some thinner colourful banners which I cut with the A7 Frames and Banners and Frames and Flags die sets. I love dimensional die cuts, it looks so cool!

After popping up the image and banners with 3D foam squares, I decided to add an extra sentiment on a Speech Bubble, it makes it more playful I think.

As a finishing touch I added some little die cut images, used glossy accents on the noses and hearts and emphasized the dogs’ eyes with a black glaze pen.

GIVEAWAY

Would you like to win the “Never Enough Dogs” Stamp Set? This stamp set will be given away to ONE lucky winner! Here’s how to win: Comment on the NND blog and Design Team blogs (see list below)! The winner will be chosen at random from the collective reveal posts. Make sure to check out each of their blogs and comment for your chance to win. You will not know which blog has been chosen so the more you comment on the better your chances are of winning! You have until Thursday January 19th at 9pm ET to comment  — winners will be announced on the blog post on Friday, January 20th. 

Check out all the awesome Design Team Blogs below to enter:

Newton’s Nook Designs

Donna Idlet

Ellen Haxelmans

Tina Herbeck

Larissa Heskett

Samantha Mann

Zsofia Molnar – you are here

Maria Russell

Farhana Sarker

Tatiana Trafimovich

Amanda Wilcox

I hope you enjoyed the third day of the reveals and will pop in tomorrow for the last day!

See you,

Zsofi

Newton’s Nook Desigs January Release – Day 2

Hello Everyone,

Let’s continue the January Release reveals today with Newton’s Nook Designs. On Day 2 we are showcasing the cute Newton’s Heart stamp/die set.

All new designs will be available on 20th January.

For my card I stamped and coloured the kitty using Copic markers: E44, E43, E42, E41, E01, E000, R89, R46, R27, R24. Before die cutting it with its coordinating die, I white heat embossed a sentiment in the middle of the heart. Doesn’t it look pretty?

Then I created the background: I did a quick ink blending on white cardstock with Fired Brick, Abandoned Coral and Saltwater Taffy Distress Oxide inks. Then I placed the Meow stencil over it and went back with the same colours before spritzing it with Tart Cranberry Mica Spray. I love the texture and mess look it got this way! When it was dry, I cut it down to be slightly smaller than an A2 sized card front.

To hold my kitty, I created a tag using the Fancy Edges Tag die set: I cut the base from kraft cardstock, the fancy edge from red and added a white reinforcer. I embellished it with white ribbon and natural twine before popping it up at an angle with 3D foam squares on the background. I used 3D foam squares under the kitten too.

As a finishing touch I used a drop of glossy accent on the nose of the cat.

GIVEAWAY

Would you like to win the “Newton’s Heart” Stamp Set? This stamp set will be given away to ONE lucky winner! Here’s how to win: Comment on the NND blog and Design Team blogs (see list below)! The winner will be chosen at random from the collective reveal posts. Make sure to check out each of their blogs and comment for your chance to win. You will not know which blog has been chosen so the more you comment on the better your chances are of winning! You have until Thursday January 19th at 9pm ET to comment  — winners will be announced on the blog post on Friday, January 20th. 

Check out all the awesome Design Team Blogs below to enter:

Newton’s Nook Designs

Donna Idlet

Ellen Haxelmans

Tina Herbeck

Larissa Heskett

Samantha Mann

Zsofia Molnar – you are here

Maria Russell

Farhana Sarker

Tatiana Trafimovich

Amanda Wilcox

I hope you enjoyed the second day of the reveals and will pop in tomorrow for more fun!

See you,

Zsofi

Newton’s Nook Designs January Release – Day 1

Hello Everyone,

I have such exciting news, we are starting the January Release reveals today with Newton’s Nook Designs. YAY! It is a small but adorable release, with unique designs and new paper pads. On the first day we are showcasing the cute Puppy Hearts stamp and die set.

All new designs will be available on 20th January.

For my card I stamped and coloured the puppy using Copic markers: W9, W7, W5, W3, W1, W0, BG09, BG57, BG23, BG11. Before die cutting it with its coordinating die, I white heat embossed a sentiment in the middle of the heart. I love when I can incorporate the sentiments in the coloured images!

Then I worked on the background: on Audrey Blue cardstock I used the Woof stencil with Gina K Glitz Glitter gel (Turquoise Sea). While it was drying I did some die cutting using the Heart Frames die set and white and light grey cardstock.

When the background was dry, I assembled the card using 3D foam squares under the dog. I added some black and white twine to the top (I know, I use a lot of twine these days, but I cannot help it, I just love it!) As a finishing touch I used a black glaze pen on the eyes and a drop of glossy accents on the noses.

GIVEAWAY

Would you like to win the “Puppy Heart” Stamp Set? This stamp set will be given away to ONE lucky winner! Here’s how to win: Comment on the NND blog and Design Team blogs (see list below)! The winner will be chosen at random from the collective reveal posts. Make sure to check out each of their blogs and comment for your chance to win. You will not know which blog has been chosen so the more you comment on the better your chances are of winning! You have until Thursday January 19th at 9pm ET to comment  — winners will be announced on the blog post on Friday, January 20th. 

Check out all the awesome Design Team Blogs below to enter:

Newton’s Nook Designs

Donna Idlet

Ellen Haxelmans

Tina Herbeck

Larissa Heskett

Samantha Mann

Zsofia Molnar – you are here

Maria Russell

Farhana Sarker

Tatiana Trafimovich

Amanda Wilcox

I hope you enjoyed the first day of the reveals and will pop in tomorrow for more cuteness!

See you,

Zsofi

Pretty Pink Posh January Release IG Hop

Hello Everyone,

I am so excited to be part of the January Instagram Hop with Pretty Pink Posh. Grab a cup of tea or coffee, head over to my INSTGRAM and hop with us.

For my card I used the cute Potted Roses and Heart Critters set together. I love how these sets are designed to coordinate! I stamped the roses 4 times and the cute panda once, coloured them with Copic markers and cut them out with their coordinating dies.

The Copic colours I used are:

  • roses: RV25, RV23, RV21, G46, G14, G12,
  • panda: W9, W7, W4, W1, W00.

Then I die cut a Scalloped Diamond Tag from light grey cardstock and created a frame from the roses. I popped up the panda in the middle with 3D foam squares. I used my Cropadile to add an eyelet to the top and finished it with a black and white twine.

I chose a pretty patterned paper from the Doodlebug Sweet Things paper pad and popped up the tag with 3D foam squares. The sentiment is from the Potted Roses Stamp set: I white heat embossed it on dark grey cardstock and cut it out with its coordinating die. I love when handwritten sentiments have coordinating dies, I would never be able to fussy cut it that neatly.

I decided to add another white embossed sentiment from the same set, just this time I chose pink cardstock.

As a finishing touch I used a few Pink Blush pearls around the tag, emphasized the eyes of the panda with a black glaze pen and added a drop of glossy accents to the nose. So cute, isnt it?

GIVEAWAY

Those who leave a comment on each post participating in the Instagram Hop will have a chance to win a $30 gift card. More details you can find in my IG post. Hope to see you there!

Zsofi

Heffy Doodle – Build Your Stash

Hello Everyone,

Welcome to another edition of my Perfect Combos series for Heffy Doodle. The new year started and I need to build my stash for the upcoming birthdays. So I came up with a simple design which can be altered slightly but helps in mass producing. Let me show you!

First I created a bunch of backgrounds: I used the Simple Sunburst stencil with different Distress Mica Stains. I used 2 colours for each background. I placed a piece of white cardstock in a box with the stencil on it and from like 12 inches, I added a few spritz of colour. I removed the stencil with a tweezer not to smear the ink, cleaned the stencil and rotated it slightly before I applied the second colour of Mica Spray. The colours I used are: Merry Mint, Winter Frost, Fortune Teller and Cocktail Party.

Then I die cut the sentiment: I used the It’s your day Jumbo Sentiment die, cut the shadow from black cardstock, the sentiment itself 2 times from white cardstock and once from white shimmer cardstock. I adhered them on top of each other then on the shadow and popped them up on the stenciled backgrounds at an angle. It makes it so playful!

The next step was to look through my stamps and find critters which work well on the cards. I chose the Llamazing Llamas, Absotoothly awesome, and Fluffy Puffy Unicorns. I chose 3 critter for each card and coloured them with Spectrum Noir Illustrator markers. I cut everything with their coordinating dies.

I used 3D foam squares to pop up the images and used a clear shimmer pen to add some sparkle.

I wish you enjoyed my project today and will pop in again soon,

See you,

Zsofi

Pretty Pink Posh January Release Blog Hop – Day 1

Hello Everyone,

I am thrilled to be part of the Pretty Pink Posh January Release Blog Hop! The new supplies are all available in the shop and we just started the 3 days celebration today! Hop along with us for a fun prize!

For my card I stamped and coloured the images from Potted Roses stamp set using Copic markers. The colours I used are: R89, R37, R35, E57, E99. E15, E13, YG67, YG17, YG03. I used the coordinating dies to cut them all out.

Then I created an elegant tone-on-tone background: I die cut the Pretty Petals background die from white cardstock and adhered it to an A2 sized notecard. I love the texture it gives!

I also die cut the Large Hugs Shadow die from gold glitter cardstock and the shadow piece from black cardstock. It really gives a nice contrast and helps the sentiment to pop out. I also white heat embossed the second part of the sentiment from the Potted Roses stamp set on red cardstock and cut it down to be a tiny strip.

I popped up the roses with 3D foam squares and adhered the sentiments. As a finishing touch I used a clear shimmer pen and added a couple of Sparkling clear gems.

GIVEAWAY

Hop along with us and leave comments on each stop to be eligible to win one of the three $30 gift certificates. Winners will be chosen randomly (one winner each day) from the comments left before January 12, 2023 at 11:59 PM PST. Winners will be announced next week, so be sure to check the Pretty Pink Posh blog to see if you are one of the winners.

Participants on Day 1:

Pretty Pink Posh blog
Caly Person
Raquel Arribas
Melissa Phillips
Davina Cantrell
Kristie Marcotte
Zsofia Molnar
– you are here

Thank you so much for stopping by today and I hope I inspired you! I would love to know which is your favourite product from this release, if you don’t mind sharing it with me.

See you soon,

Zsofi