Coffee Love – Newton’s Nook Designs

Hello Everyone,

I am back today with a colourful and cheerful love card, which I made for my husband who is a true coffee addict. He loves his Turkish coffee in a way that nothing can substitute it. I am not that picky, a good latte or cappuccino will make me happy, mostly if it comes in a cute mug. All products used for this card are from Newton’s Nook Designs.

First I did some hot foiling with the Coffee Beans Hot Foil Plate. I like to use Hammermill white cardstock with these plates and Spellbinders foils. This time I chose a metallic one which has a bit of brownish tone to it. I used the Spellbinders Glimmer Hot Foil system to apply the foil and ink blended over it with Distress Oxide inks: Abandoned Coral, Worn Lipstick and Scattered Straw. I used a die from Framework to die cut it.

Then I stamped the cute mugs from Love Cafe and coloured them with Copic markers. I used the coordinating dies to cut them out.

I also cut a small fancy edge rectangle from black cardstock using a die from Framework to hold the sentiment and a piece of vellum with a die from Frames Squared. I white heat embossed the sentiment on the black piece and popped up the images o the vellum using 3D foam squares.

I adhered the sentiment and vellum with thin 3D foam tape, so it has even more dimension. I mounted it all on a white top folding notecard and added my finishing touches: clear shimmer to the hearts ad some glossy accents.

I hope you enjoyed todays inspiration.

See you soon,

Zsofi

Pretty Pink Posh January Blog Hop – Day 2

Hello Everyone,

Happy New Year to all of you! I am so excited to be part of the new release blog hop for Pretty Pink Posh this month, what a better start of a crafty 2024 than showcasing a gorgeous new release. The January release is all about love and luck, beautiful new stencils, stamps and dies all related to Valentine’s Day and St. Patrick’s Day. Join us for an incredible amount of inspiration!

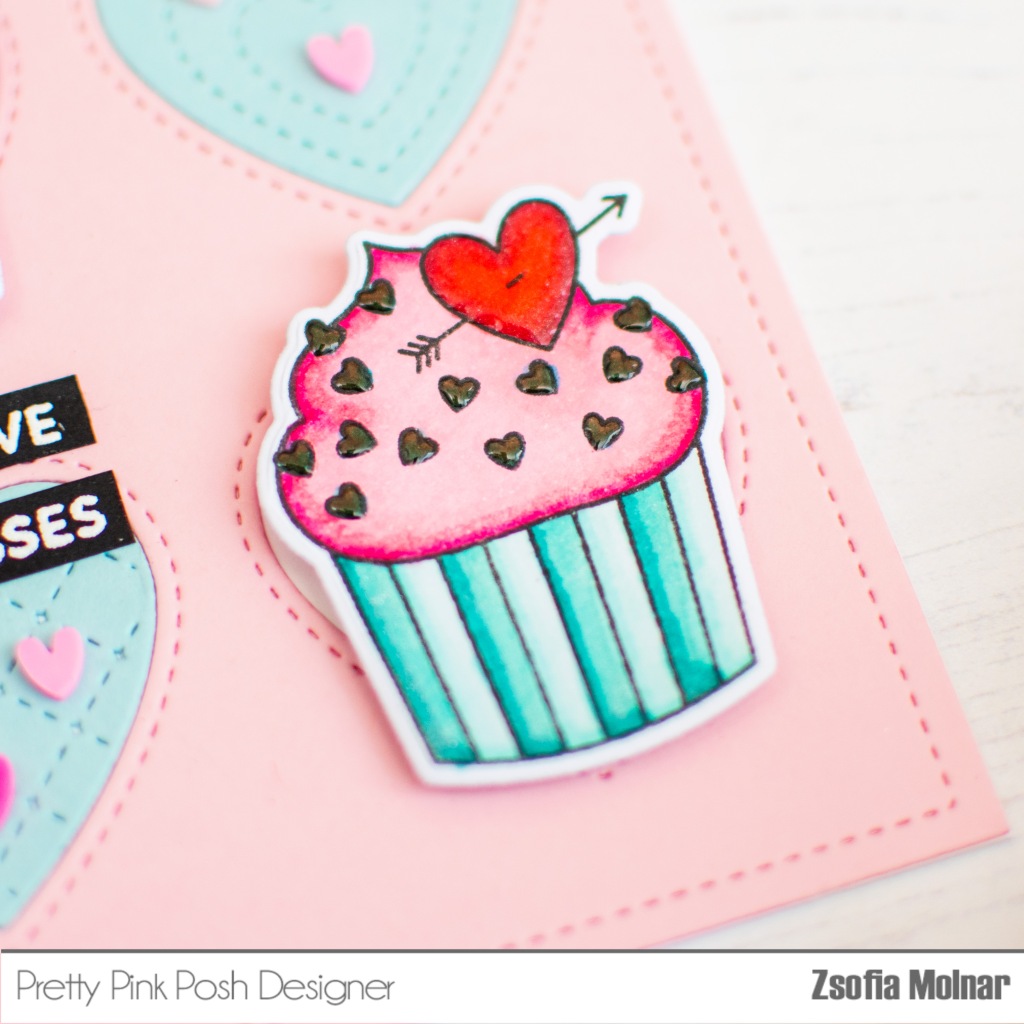
For my card I chose the Valentine Cupcakes set, stamped and coloured 3 of the cute cupcakes using Copic markers. I die cut them with their coordinating dies.

While I was die cutting I also cut the new Heart Cover Plate die twice: once from pink and once from aqua cardstock and paper pieced a beautifully stitched background on a white A2 sized notecard. I popped up the coloured cupcakes with 3D foam squares on every second heart.

For the sentiment I white heat embossed two short ones from the Sentiment Strips: Valentine stamp set on black cardstock and cu them to small strips. I adhered them under the middle cupcake using liquid glue.

As embellishment I adhered a few clay hearts from the Colourful Hearts Clay Confetti mix to the background. I also adorned the cupcakes with clear glitter pen and glossy accents for a shiny, dimensional look.

GIVEAWAY

Make sure that you leave comments on each stop of the hop. Pretty Pink Posh is giving away 3 $30 gift certificates to three random comments (1 winner each day) left before January 11, 2024 at 11:59 PM PST. Winners will be announced next week on the PPP Blog. Here is the Blog Hop list for Day 2:

Pretty Pink Posh blog 
Amy Rysavy
Laura Bassen
Kristie Marcotte
Marine Simon
Lisa Mears
Sindhu Prajay
Dana Kirby
Zsofia Molnar
– you are here

I hope you enjoyed today’s inspiration and will pop in again soon for more cuteness.

See you,

Zsofi

Newton’s Nook Designs May Release – Day 2

Hello Everyone,

It is Day 2 of the May Release reveals at Newton’s Nook Designs. We continue with a super cute set called Succulent Garden which comes with a coordinating die set. There is a new stencil this month called Trailing Leaves.

All new products will be available on 19/05/2023.

For my card I decided to stamp all the succulents on white, Copic friendly cardstock randomly and coloured them with Copic markers. I was really just playing with different greens and combined them with a touch of pink or yellow for a fun look. Then I took my favourite die from Framework to cut the panel down and adhered it to a kraft card base.

I white heat embossed a sentiment on a piece of black cardstock and cut it out with a banner die from Frames and Flags. I used 3D foam squares to pop it up.

As a finishing touch I added a few teeny tiny clear sequins in-between the plants. I love how much a few embellishments add to a card!

GIVEAWAY

Would you like to win the “Succulent Garden” Stamp Set ? This stamp set will be given away to ONE lucky winner! Here’s how to win: comment on the NND blog and Design Team blogs (see list below)! The winner will be chosen at random from the collective reveal posts. Make sure to check out each of their blogs and comment for your chance to win. You will not know which blog has been chosen so the more you comment on the better your chances are of winning! You have until Thursday May 18th at 9pm ET to comment  — winners will be announced on the blog post on Friday, May 19th. 

Check out all the awesome Design Team Blogs below to enter:

Newton’s Nook Designs

Donna Idlet

Ellen Haxelmans

Tina Herbeck

Larissa Heskett

Samantha Mann

Zsofia Molnar – you are here

Maria Russell

Tatiana Trafimovich

Amanda Wilcox

I wish you enjoyed today’s project and will come back tomorrow for more fun!

See you,

Zsofi

Loads of Love – Heffy Doodle

Hello Everyone,

Welcome to another edition of my Perfect Combos series for Heffy Doodle. As it is Valentine’s Day today, I created a fun little farm scene for you mixing ad matching several stamp sets and stencils. Let me guide you through the process.

First I stamped and coloured the images from Farmyard Fun and Udderly Fabulous. I used Spectrum Noir Illustrator markers: GY5, GY3, GY, GY1, DR5, DR2, DR1, DR05, BG7, BG5, BG4, BG2, BG1, FS7, FS6, VB3,VB2, VB1, VB05, EB5, EB2, EB1. I used the coordinating dies to cut everything out.

Then I used the Green Fields stencil on a piece of Neenah Solar White cardstock with Mowed Lawn and Twisted Citron Distress Oxide inks. I used a lighter hand towards the bottom to help the ink fade out. I wanted the sky to be a bit more whimsical than plane clouds so I used the Scribble on my heart stencil with Saltwater Taffy Distress Oxide ink, fading it out towards the edge of the grass. I didn’t do any kind of masking just did not allow the inks to meet. So easy, yet special!

The sentiments are from both stamp sets, white heat embossed on strips of black cardstock. I popped up the images on the background with 3D foam squares, just as the sentiments. The scene building elements I adhered with liquid glue.

As a finishing touch I used a black glaze pen on the eyes of the cow, added white gel pen highlights randomly and used glossy accents on the wheels.

I hope you enjoyed today’s Perfect Combo and will check back later for more inspiration. If you like my cards, please make sure to follow me on Instagram where I also share my happy creations! Thank you!

See you soon,

Zsofi

Better Together – Pretty Pink Posh

Hello Everyone,

I have a fun little card to share with you today, which I made with supplies from Pretty Pink Posh. I am totally in love with layering stencils and I enjoy coming up with different colour combos for each, but I had another idea for the Layering Cherries stencil from their latest release. Let me show you!

First I did a quick ink blending on Neenah Solar white cardstock with Worn Lipstick Distress Oxide ink. Then I used the first layer of the Layering Cherries stencil set with Lumberjack Plaid Distress Oxide ink. I love this red colour, my absolute new favourite! I added a tiny bit of Aged Mahogany to the bottom of the cherries. For the stems I used Rustic Wilderness first and then realized that the cherry stems are rather brown, so I went back with Ground Espresso. This way the result is a brownish green, perfect for the pink background! For the leaves layer I used the same green but wanted to lighten them a little, so I went back with Twisted Citron. After removing the last layer I generously spritzed the panel with water from a mini mister and dabbed it off with a paper towel after 30 seconds.

In my head I visualized smiling cherries, so I added little faces to each using the Ghost Friends stamp set. As I had to ink up only the face of each ghost, I used a black Memento marker on the eyes and noses instead of an ink pad. It worked perfectly! I need to try this technique with sentiments too!

For the sentiment I chose the Love Sentiments stamp set, and simply stamped the text in the middle using Versafine Onyx Black ink. I trimmed the panel down tiny and gave it a dark red mat before adhering to a top folding A2 sized card base.

As a finishing touch I used some little white clay hearts from the Valentine’s Day Mix.

I wish you enjoyed this cute design and you will try this technique.

See you soon,

Zsofi

Newton’s Nook Desigs January Release – Day 2

Hello Everyone,

Let’s continue the January Release reveals today with Newton’s Nook Designs. On Day 2 we are showcasing the cute Newton’s Heart stamp/die set.

All new designs will be available on 20th January.

For my card I stamped and coloured the kitty using Copic markers: E44, E43, E42, E41, E01, E000, R89, R46, R27, R24. Before die cutting it with its coordinating die, I white heat embossed a sentiment in the middle of the heart. Doesn’t it look pretty?

Then I created the background: I did a quick ink blending on white cardstock with Fired Brick, Abandoned Coral and Saltwater Taffy Distress Oxide inks. Then I placed the Meow stencil over it and went back with the same colours before spritzing it with Tart Cranberry Mica Spray. I love the texture and mess look it got this way! When it was dry, I cut it down to be slightly smaller than an A2 sized card front.

To hold my kitty, I created a tag using the Fancy Edges Tag die set: I cut the base from kraft cardstock, the fancy edge from red and added a white reinforcer. I embellished it with white ribbon and natural twine before popping it up at an angle with 3D foam squares on the background. I used 3D foam squares under the kitten too.

As a finishing touch I used a drop of glossy accent on the nose of the cat.

GIVEAWAY

Would you like to win the “Newton’s Heart” Stamp Set? This stamp set will be given away to ONE lucky winner! Here’s how to win: Comment on the NND blog and Design Team blogs (see list below)! The winner will be chosen at random from the collective reveal posts. Make sure to check out each of their blogs and comment for your chance to win. You will not know which blog has been chosen so the more you comment on the better your chances are of winning! You have until Thursday January 19th at 9pm ET to comment  — winners will be announced on the blog post on Friday, January 20th. 

Check out all the awesome Design Team Blogs below to enter:

Newton’s Nook Designs

Donna Idlet

Ellen Haxelmans

Tina Herbeck

Larissa Heskett

Samantha Mann

Zsofia Molnar – you are here

Maria Russell

Farhana Sarker

Tatiana Trafimovich

Amanda Wilcox

I hope you enjoyed the second day of the reveals and will pop in tomorrow for more fun!

See you,

Zsofi

Newton’s Nook Designs January Release – Day 1

Hello Everyone,

I have such exciting news, we are starting the January Release reveals today with Newton’s Nook Designs. YAY! It is a small but adorable release, with unique designs and new paper pads. On the first day we are showcasing the cute Puppy Hearts stamp and die set.

All new designs will be available on 20th January.

For my card I stamped and coloured the puppy using Copic markers: W9, W7, W5, W3, W1, W0, BG09, BG57, BG23, BG11. Before die cutting it with its coordinating die, I white heat embossed a sentiment in the middle of the heart. I love when I can incorporate the sentiments in the coloured images!

Then I worked on the background: on Audrey Blue cardstock I used the Woof stencil with Gina K Glitz Glitter gel (Turquoise Sea). While it was drying I did some die cutting using the Heart Frames die set and white and light grey cardstock.

When the background was dry, I assembled the card using 3D foam squares under the dog. I added some black and white twine to the top (I know, I use a lot of twine these days, but I cannot help it, I just love it!) As a finishing touch I used a black glaze pen on the eyes and a drop of glossy accents on the noses.

GIVEAWAY

Would you like to win the “Puppy Heart” Stamp Set? This stamp set will be given away to ONE lucky winner! Here’s how to win: Comment on the NND blog and Design Team blogs (see list below)! The winner will be chosen at random from the collective reveal posts. Make sure to check out each of their blogs and comment for your chance to win. You will not know which blog has been chosen so the more you comment on the better your chances are of winning! You have until Thursday January 19th at 9pm ET to comment  — winners will be announced on the blog post on Friday, January 20th. 

Check out all the awesome Design Team Blogs below to enter:

Newton’s Nook Designs

Donna Idlet

Ellen Haxelmans

Tina Herbeck

Larissa Heskett

Samantha Mann

Zsofia Molnar – you are here

Maria Russell

Farhana Sarker

Tatiana Trafimovich

Amanda Wilcox

I hope you enjoyed the first day of the reveals and will pop in tomorrow for more cuteness!

See you,

Zsofi

Pretty Pink Posh January Release IG Hop

Hello Everyone,

I am so excited to be part of the January Instagram Hop with Pretty Pink Posh. Grab a cup of tea or coffee, head over to my INSTGRAM and hop with us.

For my card I used the cute Potted Roses and Heart Critters set together. I love how these sets are designed to coordinate! I stamped the roses 4 times and the cute panda once, coloured them with Copic markers and cut them out with their coordinating dies.

The Copic colours I used are:

  • roses: RV25, RV23, RV21, G46, G14, G12,
  • panda: W9, W7, W4, W1, W00.

Then I die cut a Scalloped Diamond Tag from light grey cardstock and created a frame from the roses. I popped up the panda in the middle with 3D foam squares. I used my Cropadile to add an eyelet to the top and finished it with a black and white twine.

I chose a pretty patterned paper from the Doodlebug Sweet Things paper pad and popped up the tag with 3D foam squares. The sentiment is from the Potted Roses Stamp set: I white heat embossed it on dark grey cardstock and cut it out with its coordinating die. I love when handwritten sentiments have coordinating dies, I would never be able to fussy cut it that neatly.

I decided to add another white embossed sentiment from the same set, just this time I chose pink cardstock.

As a finishing touch I used a few Pink Blush pearls around the tag, emphasized the eyes of the panda with a black glaze pen and added a drop of glossy accents to the nose. So cute, isnt it?

GIVEAWAY

Those who leave a comment on each post participating in the Instagram Hop will have a chance to win a $30 gift card. More details you can find in my IG post. Hope to see you there!

Zsofi

Pretty Pink Posh January Release Blog Hop – Day 1

Hello Everyone,

I am thrilled to be part of the Pretty Pink Posh January Release Blog Hop! The new supplies are all available in the shop and we just started the 3 days celebration today! Hop along with us for a fun prize!

For my card I stamped and coloured the images from Potted Roses stamp set using Copic markers. The colours I used are: R89, R37, R35, E57, E99. E15, E13, YG67, YG17, YG03. I used the coordinating dies to cut them all out.

Then I created an elegant tone-on-tone background: I die cut the Pretty Petals background die from white cardstock and adhered it to an A2 sized notecard. I love the texture it gives!

I also die cut the Large Hugs Shadow die from gold glitter cardstock and the shadow piece from black cardstock. It really gives a nice contrast and helps the sentiment to pop out. I also white heat embossed the second part of the sentiment from the Potted Roses stamp set on red cardstock and cut it down to be a tiny strip.

I popped up the roses with 3D foam squares and adhered the sentiments. As a finishing touch I used a clear shimmer pen and added a couple of Sparkling clear gems.

GIVEAWAY

Hop along with us and leave comments on each stop to be eligible to win one of the three $30 gift certificates. Winners will be chosen randomly (one winner each day) from the comments left before January 12, 2023 at 11:59 PM PST. Winners will be announced next week, so be sure to check the Pretty Pink Posh blog to see if you are one of the winners.

Participants on Day 1:

Pretty Pink Posh blog
Caly Person
Raquel Arribas
Melissa Phillips
Davina Cantrell
Kristie Marcotte
Zsofia Molnar
– you are here

Thank you so much for stopping by today and I hope I inspired you! I would love to know which is your favourite product from this release, if you don’t mind sharing it with me.

See you soon,

Zsofi

Heffy Doodle – New Release Day 2

Hello Everyone,

If you are looking for the Newton’s Nook Designs April Release Day 1 post, click here.

I am back today with some more exciting news: Heffy Doodle is also having a new release soon! Pre-orders open on 20/04 and the new release will go live a week later on the 27/04! For all details please visit the Heffy blog.

For my card today I used the fabulous Go Wild Frame dies, cut it from two shades of green cardstock and layered them on top of each other tiny offset. I also added a bit of shading with Lucky Clover Distress Oxide ink and a blending brush.

I stamped and coloured the images from the Two by Two Safari animals set using Spectrum Noir Illustrator markers. The full list of colours: BG8, BG7, BG6, BG5, BG4, BG2, BG1, FS7, FS4, CT3, CT1, OR3, OR2, OR1. I used the coordinating dies to cut them all out.

On a white A2 sized card base I did some light ink blending with Salty Ocean Distress Oxide ink and added some water droplets and diluted blue ink splatters. When it was dry I adhered the frame and placed the rhinos and toucans on my scene.

I stamped a sentiment on the sky and white heat embossed another one on a thin black cardstock strip from the Wild at heart sentiment set which coordinate perfectly the wild animals in this release.

As a finishing touch I used glossy accents on the beaks, horns and also on the little heart I used as embellishment.

I hope you liked my card and will pop in again tomorrow for more!

See you,

Zsofi