Today I am sharing a simple last minute card idea for Mother’s Day mixing the new release with older favourites from Pretty Pink Posh.
First I die cut the stitched flower from the Stacked Squares die set from a bunch of cardstock scraps. I used 3 shades in each colour family: pink, yellow and green.
Then I die cut a white A2 sized white card front with a gorgeous die from Scallop Border 2 die set. I adhered 5 flowers on each securing them with liquid glue.
Next I chose matching patterned papers for each colour from the Floral graph rainbow petite prints paper pad from Doodlebug. I cut a 2 inch strip and adhered on the bottom of each notecard. I also added a thin strip of coloured cardstock on the top of the notecards before mounting the decorative focal panels on with 3D foam squares.
I am thrilled to be part of an epic 3 days blog hop celebrating the new release of Pretty Pink Posh. It is full of crafty supplies for special occasions: baby, wedding, graduation. But of course the versatility is endless as you may see if you hop with us! It is the last day of the hop so if you have missed the previous days, make sure to check all the fabulous inspiration our team and special guests created!
For my card I decided to go with the wedding theme. I don’t make many wedding cards but I can easily imagine recreating this as a wedding invitation too, just by changing the sentiment to You are invited.
I started with a piece of Bristol Smooth cardstock and the Fancy Lattice stencil. I used Tsukineko Delicata Golden Glitz ink and a blending brush to create a beautiful pattern. I heat set it with a heat gun and die cut it with an Eyelet Rectangle die.
Then I die cut the Happily Ever After Shadow dies from gold glitter cardstock and the shadow part from vellum and adhered them together. I used liquid adhesive to pop it up on the background panel, that is the best for intricate die cuts.
Next I die cut the two connected hearts from the Valentine Mug Addition die set twice and stuck them together. Then I dipped them in clear ink and covered them with gold embossing powder. I heat embossed them with the help of a tweezer and repeated the ink-powder-heat embossing process once more. I got a really smooth, gold embellishment this way. I secured it in place with liquid glue and my card was ready. I love the 3 different types of gold on one card, it it really festive and precious.
GIVEAWAY
Hop along with us and leave comments on each stop. We are giving away 3 $30 gift certificates to three random comments (1 winner each day) left before May 15, 2024 at 11:59 PM PST. Winners will be announced next week on the Pretty Pink Posh Blog, so be sure to visit and see if you are one of the winners.
I hope you like my card and got inspired. If you like my cards, make sure to follow me on Instagram, where I share even more card projects. Thanks for stopping by and see you soon,
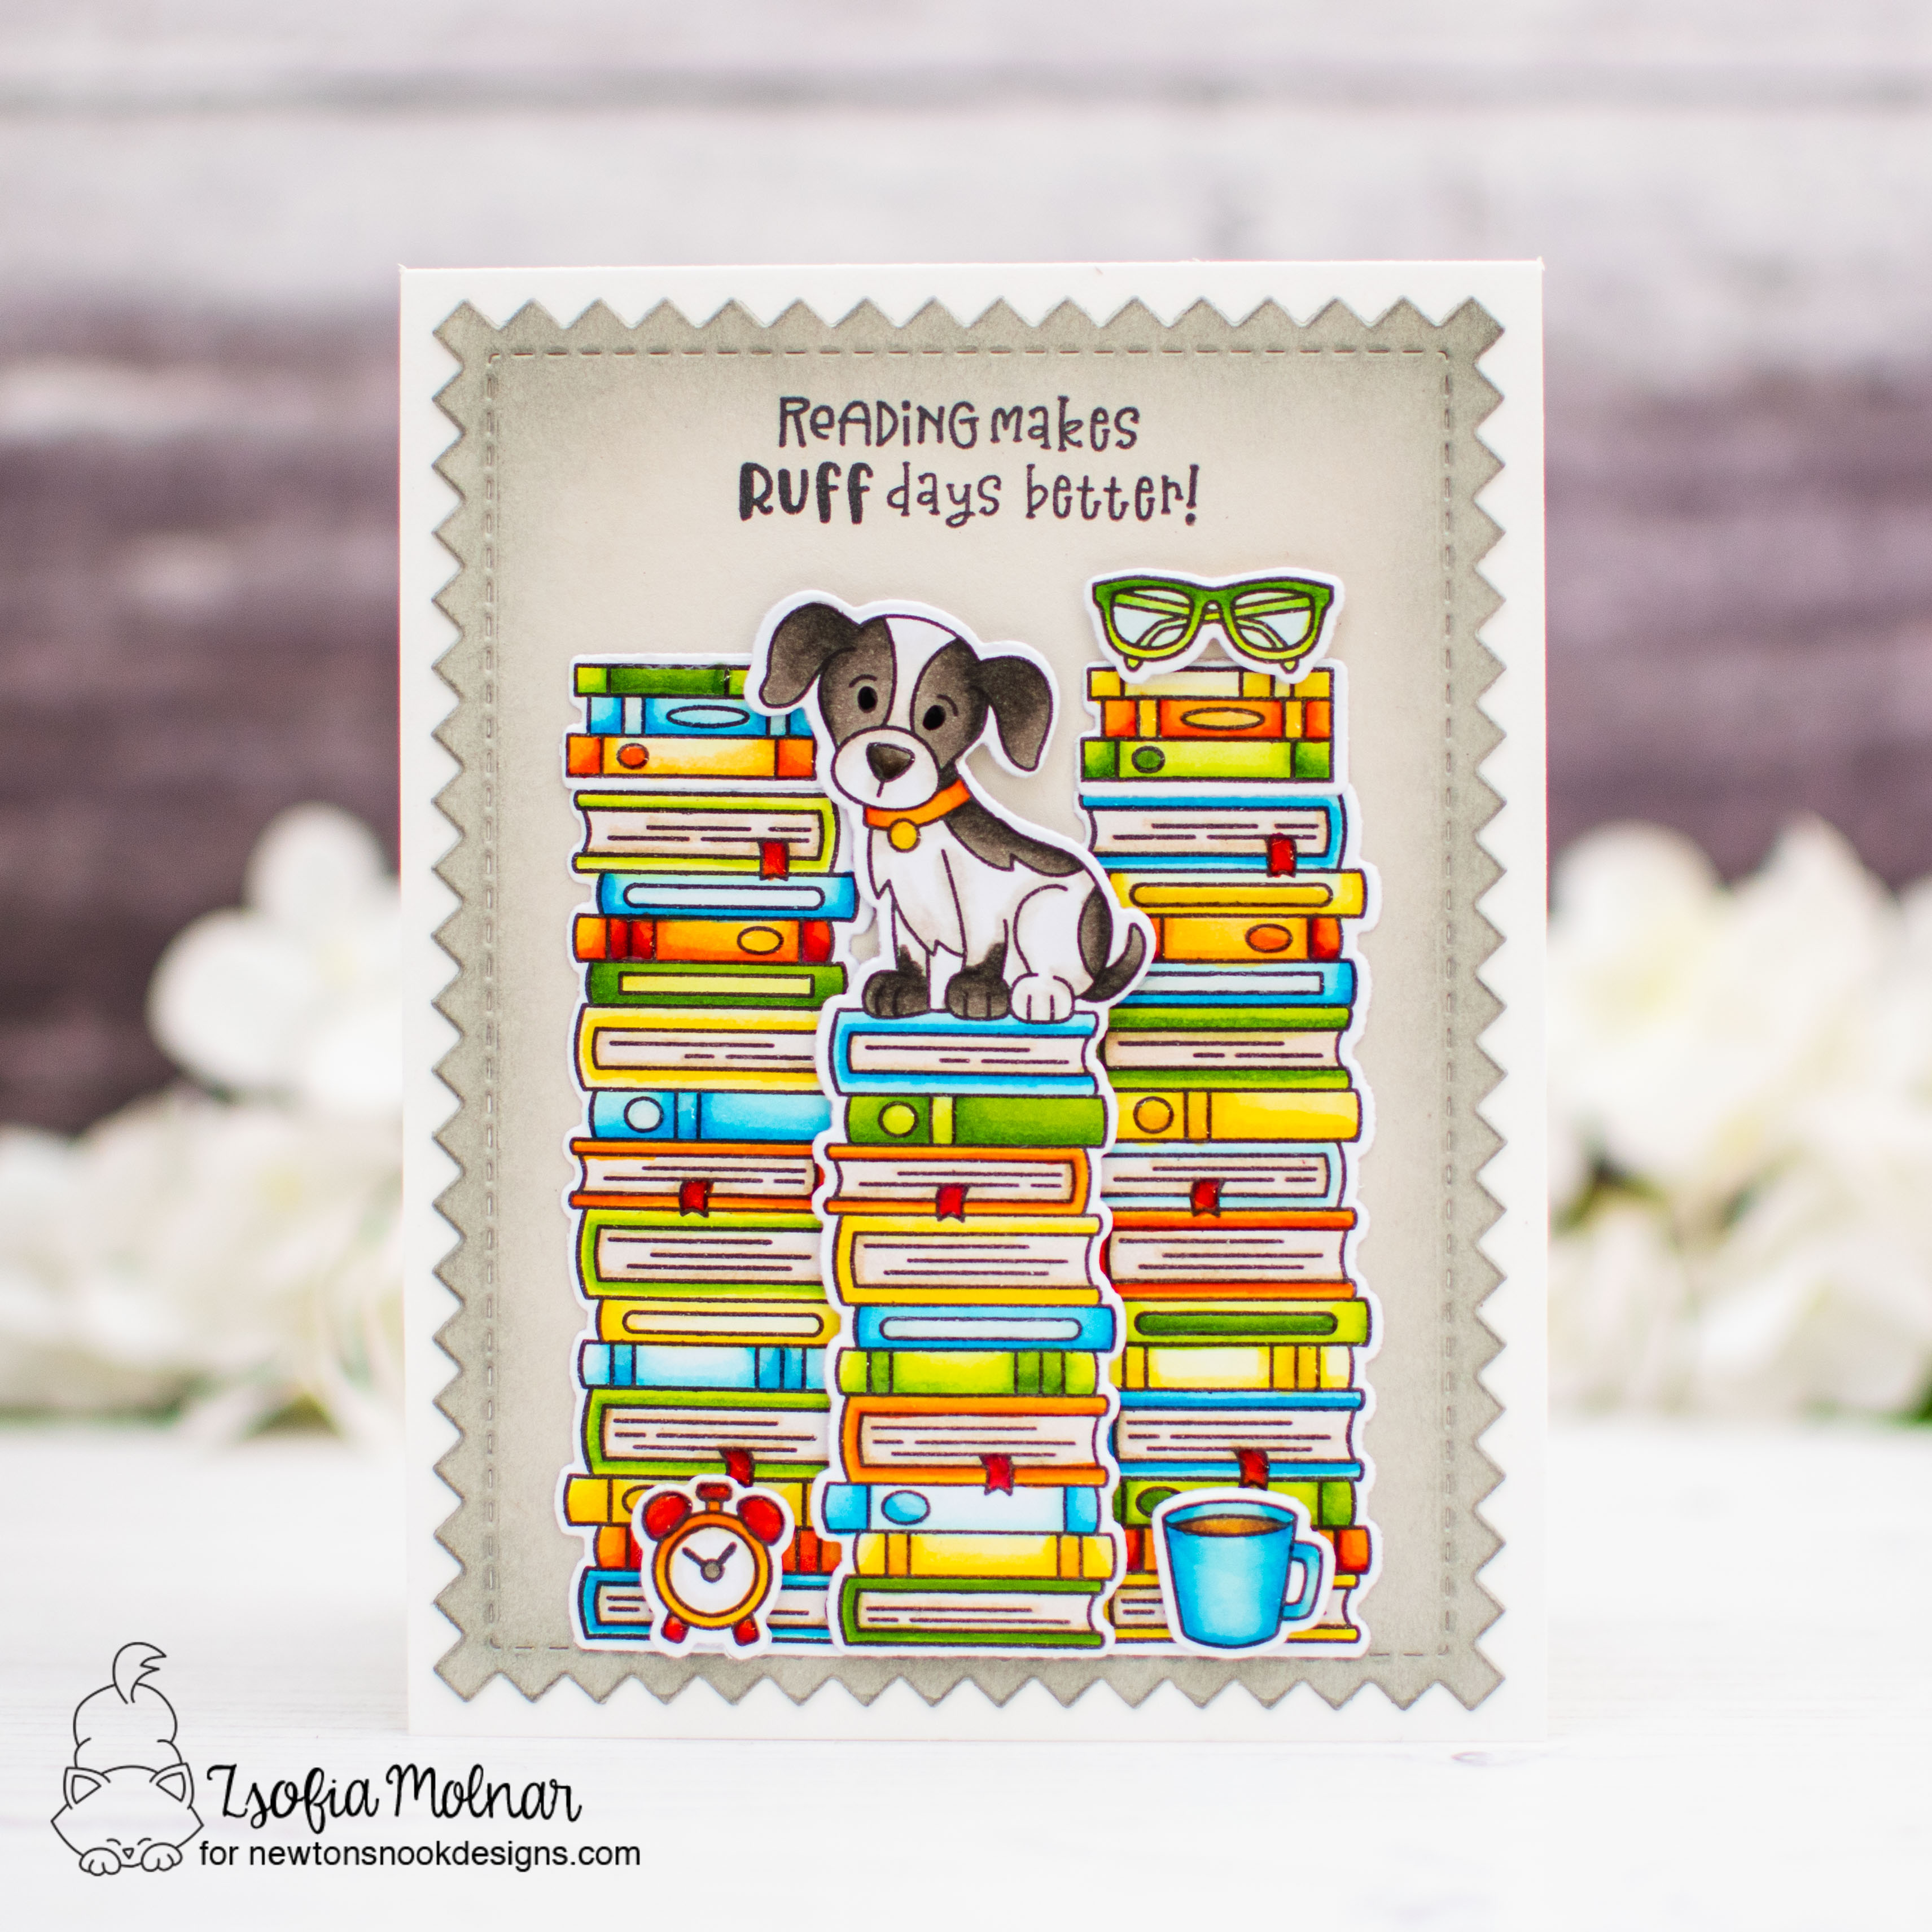
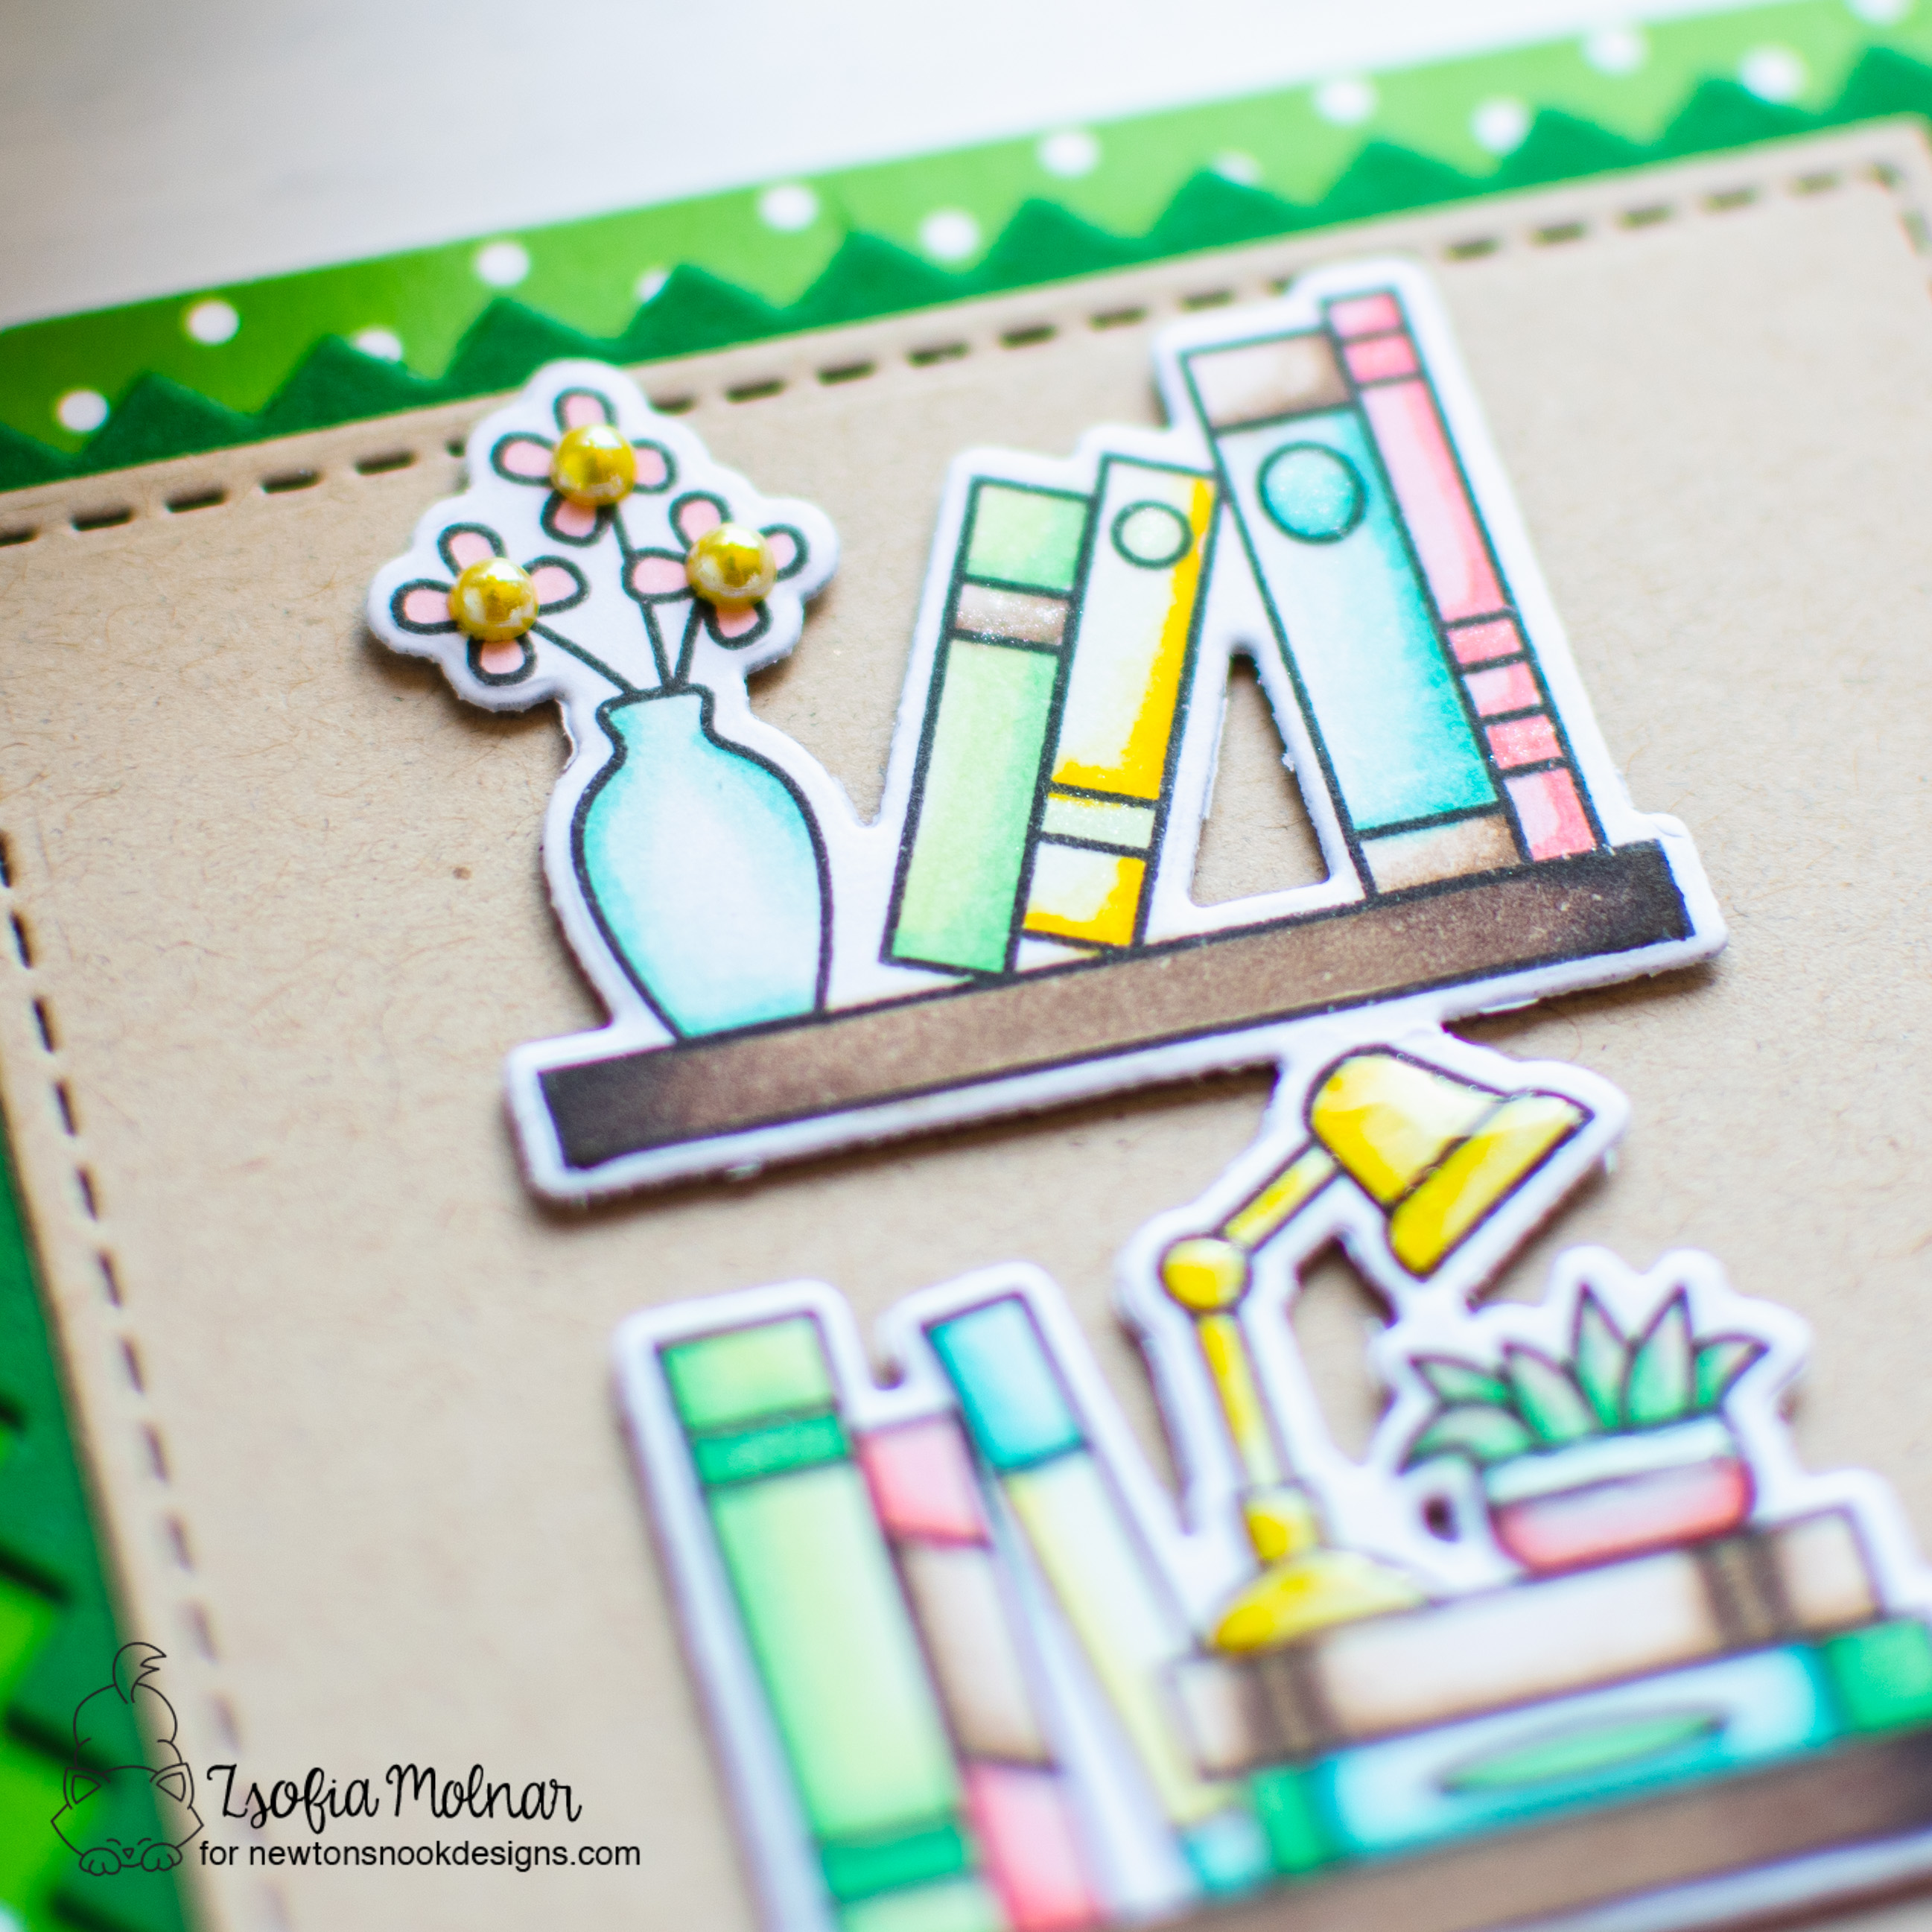
I am back today with a lovely little card, which is a tribute to my love for books. I mixed the new Never Enough Books stamp set and an older cute on from Newton’s Nook Designs, let me guide you through the process.
Then I die cut a piece of light grey cardstock with a die from Frames and Tags set. Then I used a bit of grey ink to add shading to the edges.
I simply stamped a sentiment on the top of the panel and arranged the books and accessories as on the picture. For some I used 3D foam squares, to get a dimensional scene.
As a finishing touch I added clear shimmer to some of the books and emphasized some details with glossy accents. The shine in the eyes of the puppy I achieved with a black glaze pen.
I hope you enjoyed today’s inspiration and will come back soon for more!
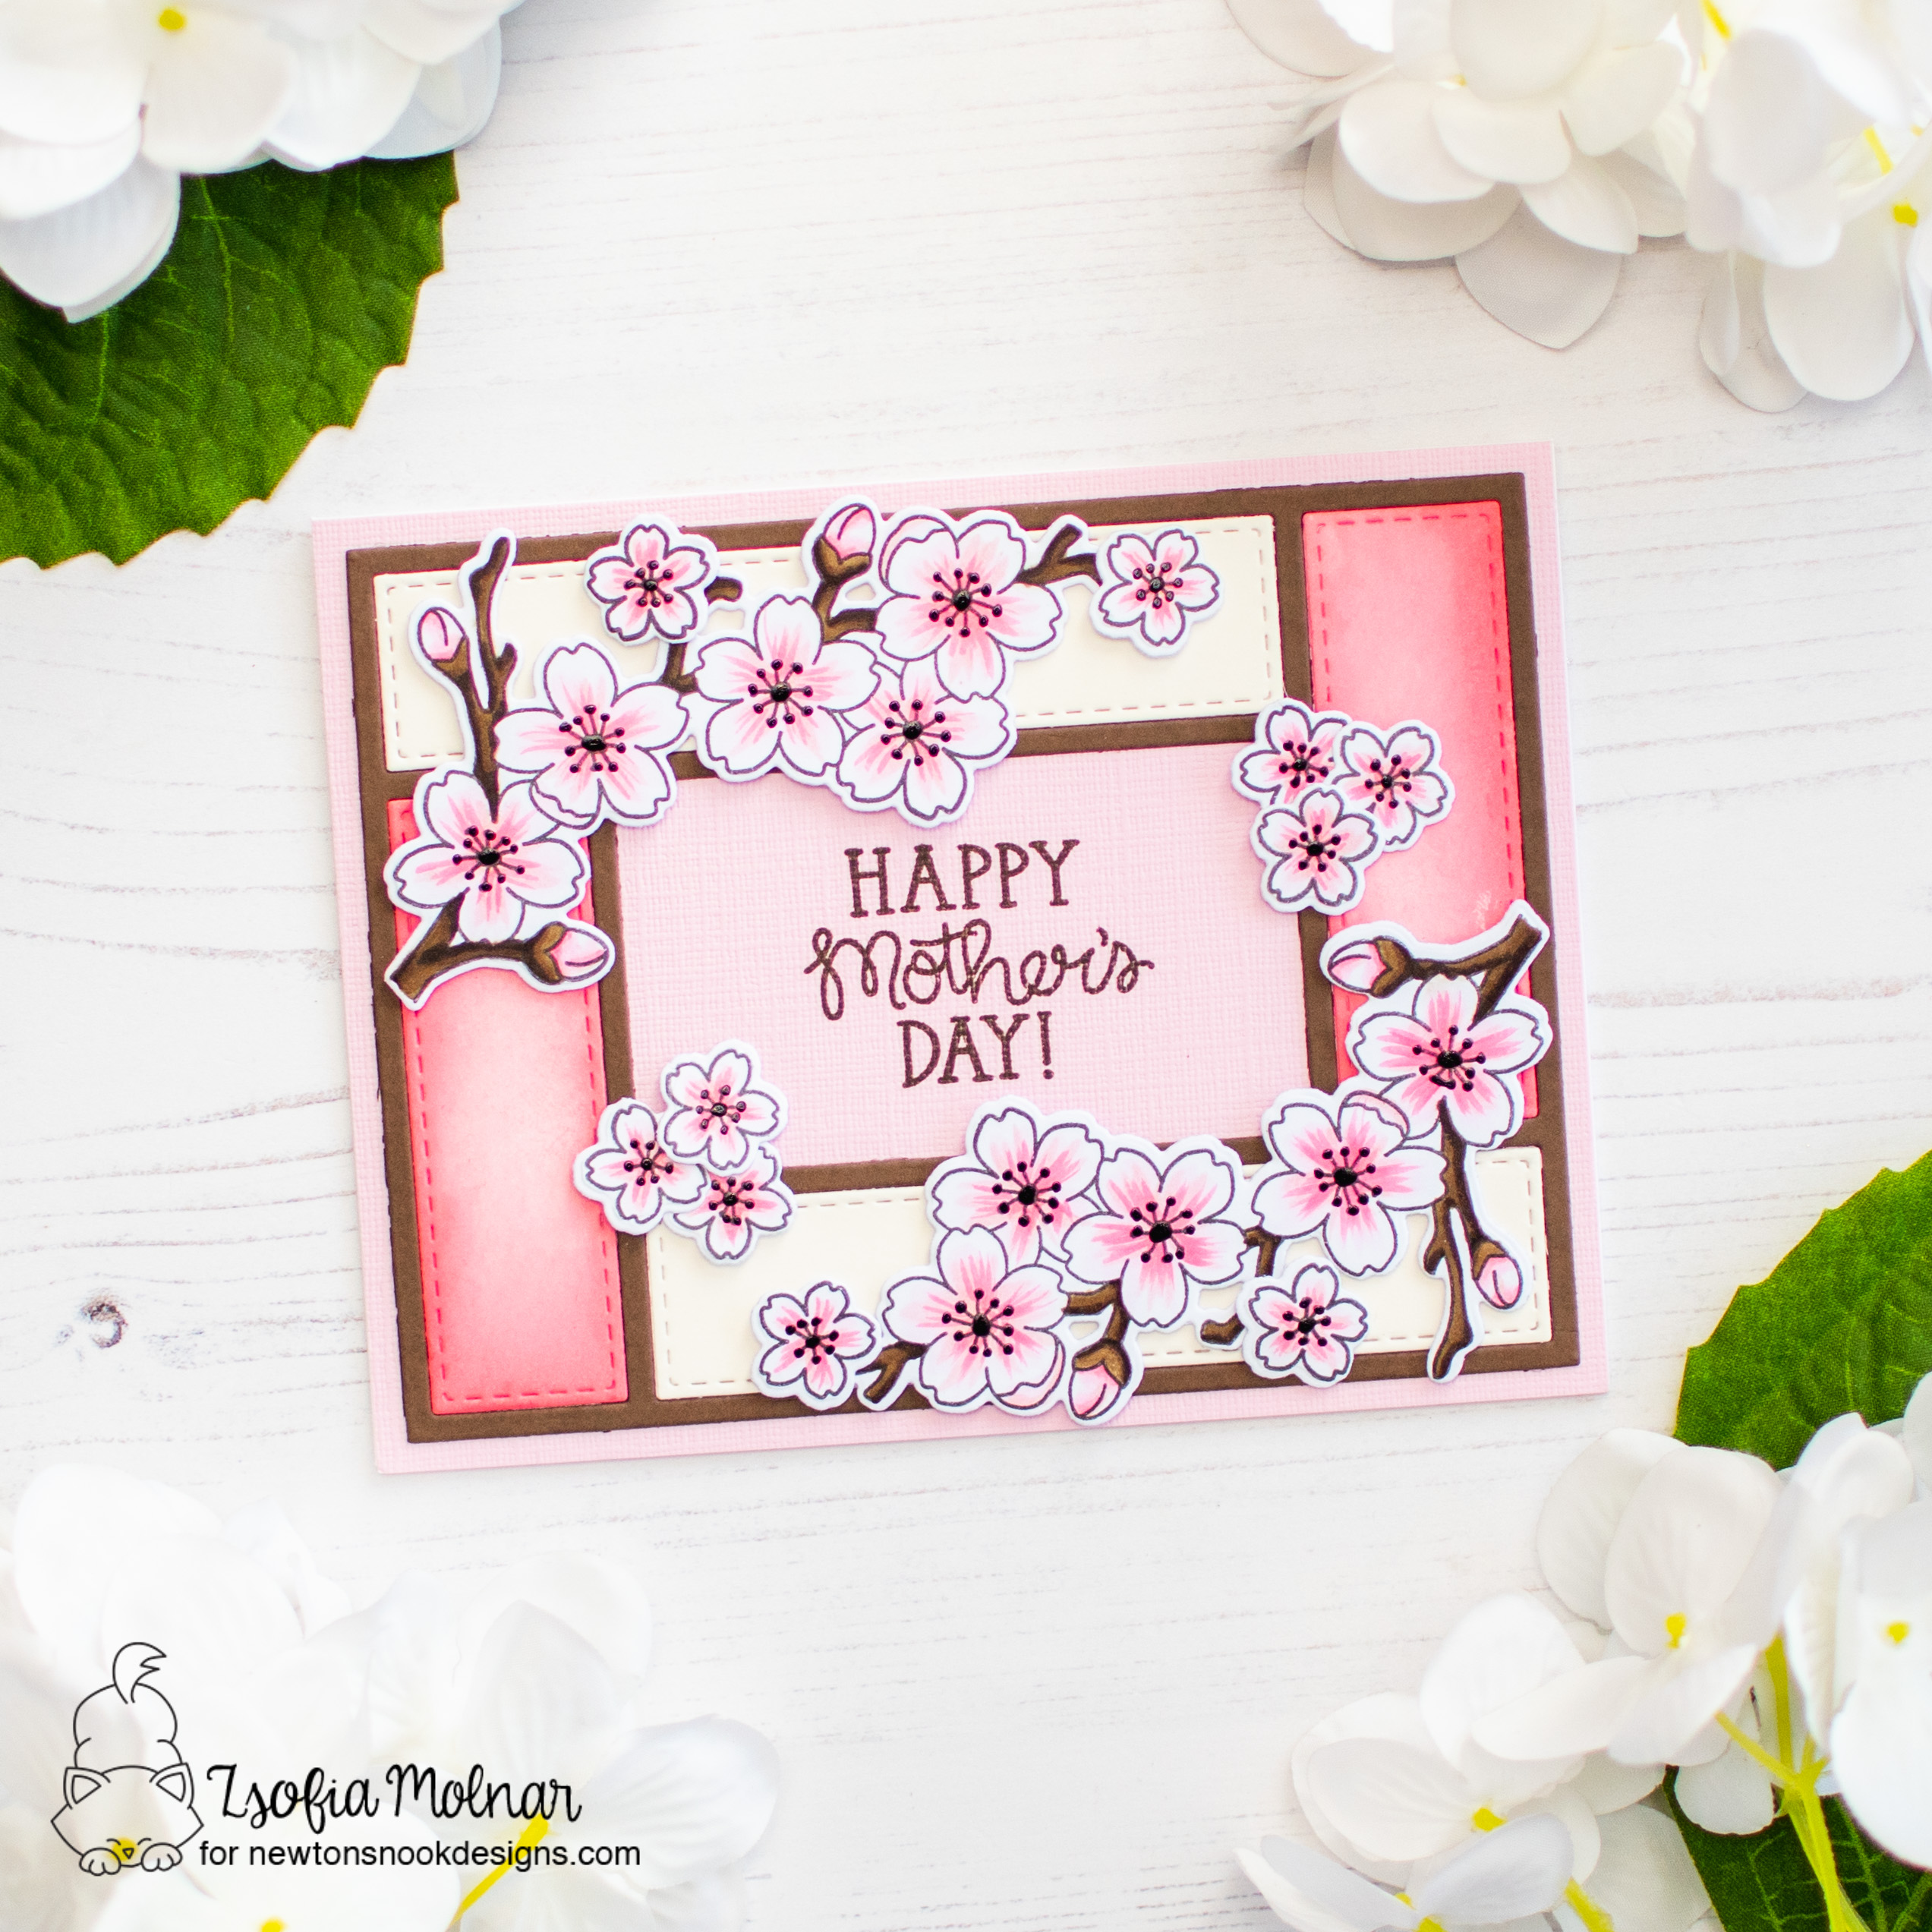
I created a card and bookmark set, a perfect gift for Mother’s Day. I started with stamping and colouring a bunch of flowers all at once as I had no idea how much I will need in the end. I used light pink Copic markers and added a bit darker strokes in the middle of each flower. I used the coordinating dies to cut them all out.
To build the background for the card I die cut the A2 Card Layout die from brown and cream cardstock and also cut a 4,25*5,5 inches piece of textured pink cardstock to be the mat. I adhered on it the brown frame first and paper pieced the 2 long cream rectangles. On the smaller rectangles I did some quick ink blending with Abandoned Coral Distress Oxide ink making sure that the edges are darker than the middle of the rectangles.
I adhered the cherry blossom branches using 3D foam squares and a couple of more little flowers too. I stamped the sentiment in the middle from the Best Mom Oval stamp set with brown ink.
As a finishing touch I used a black glaze pen on the middle of each flower.
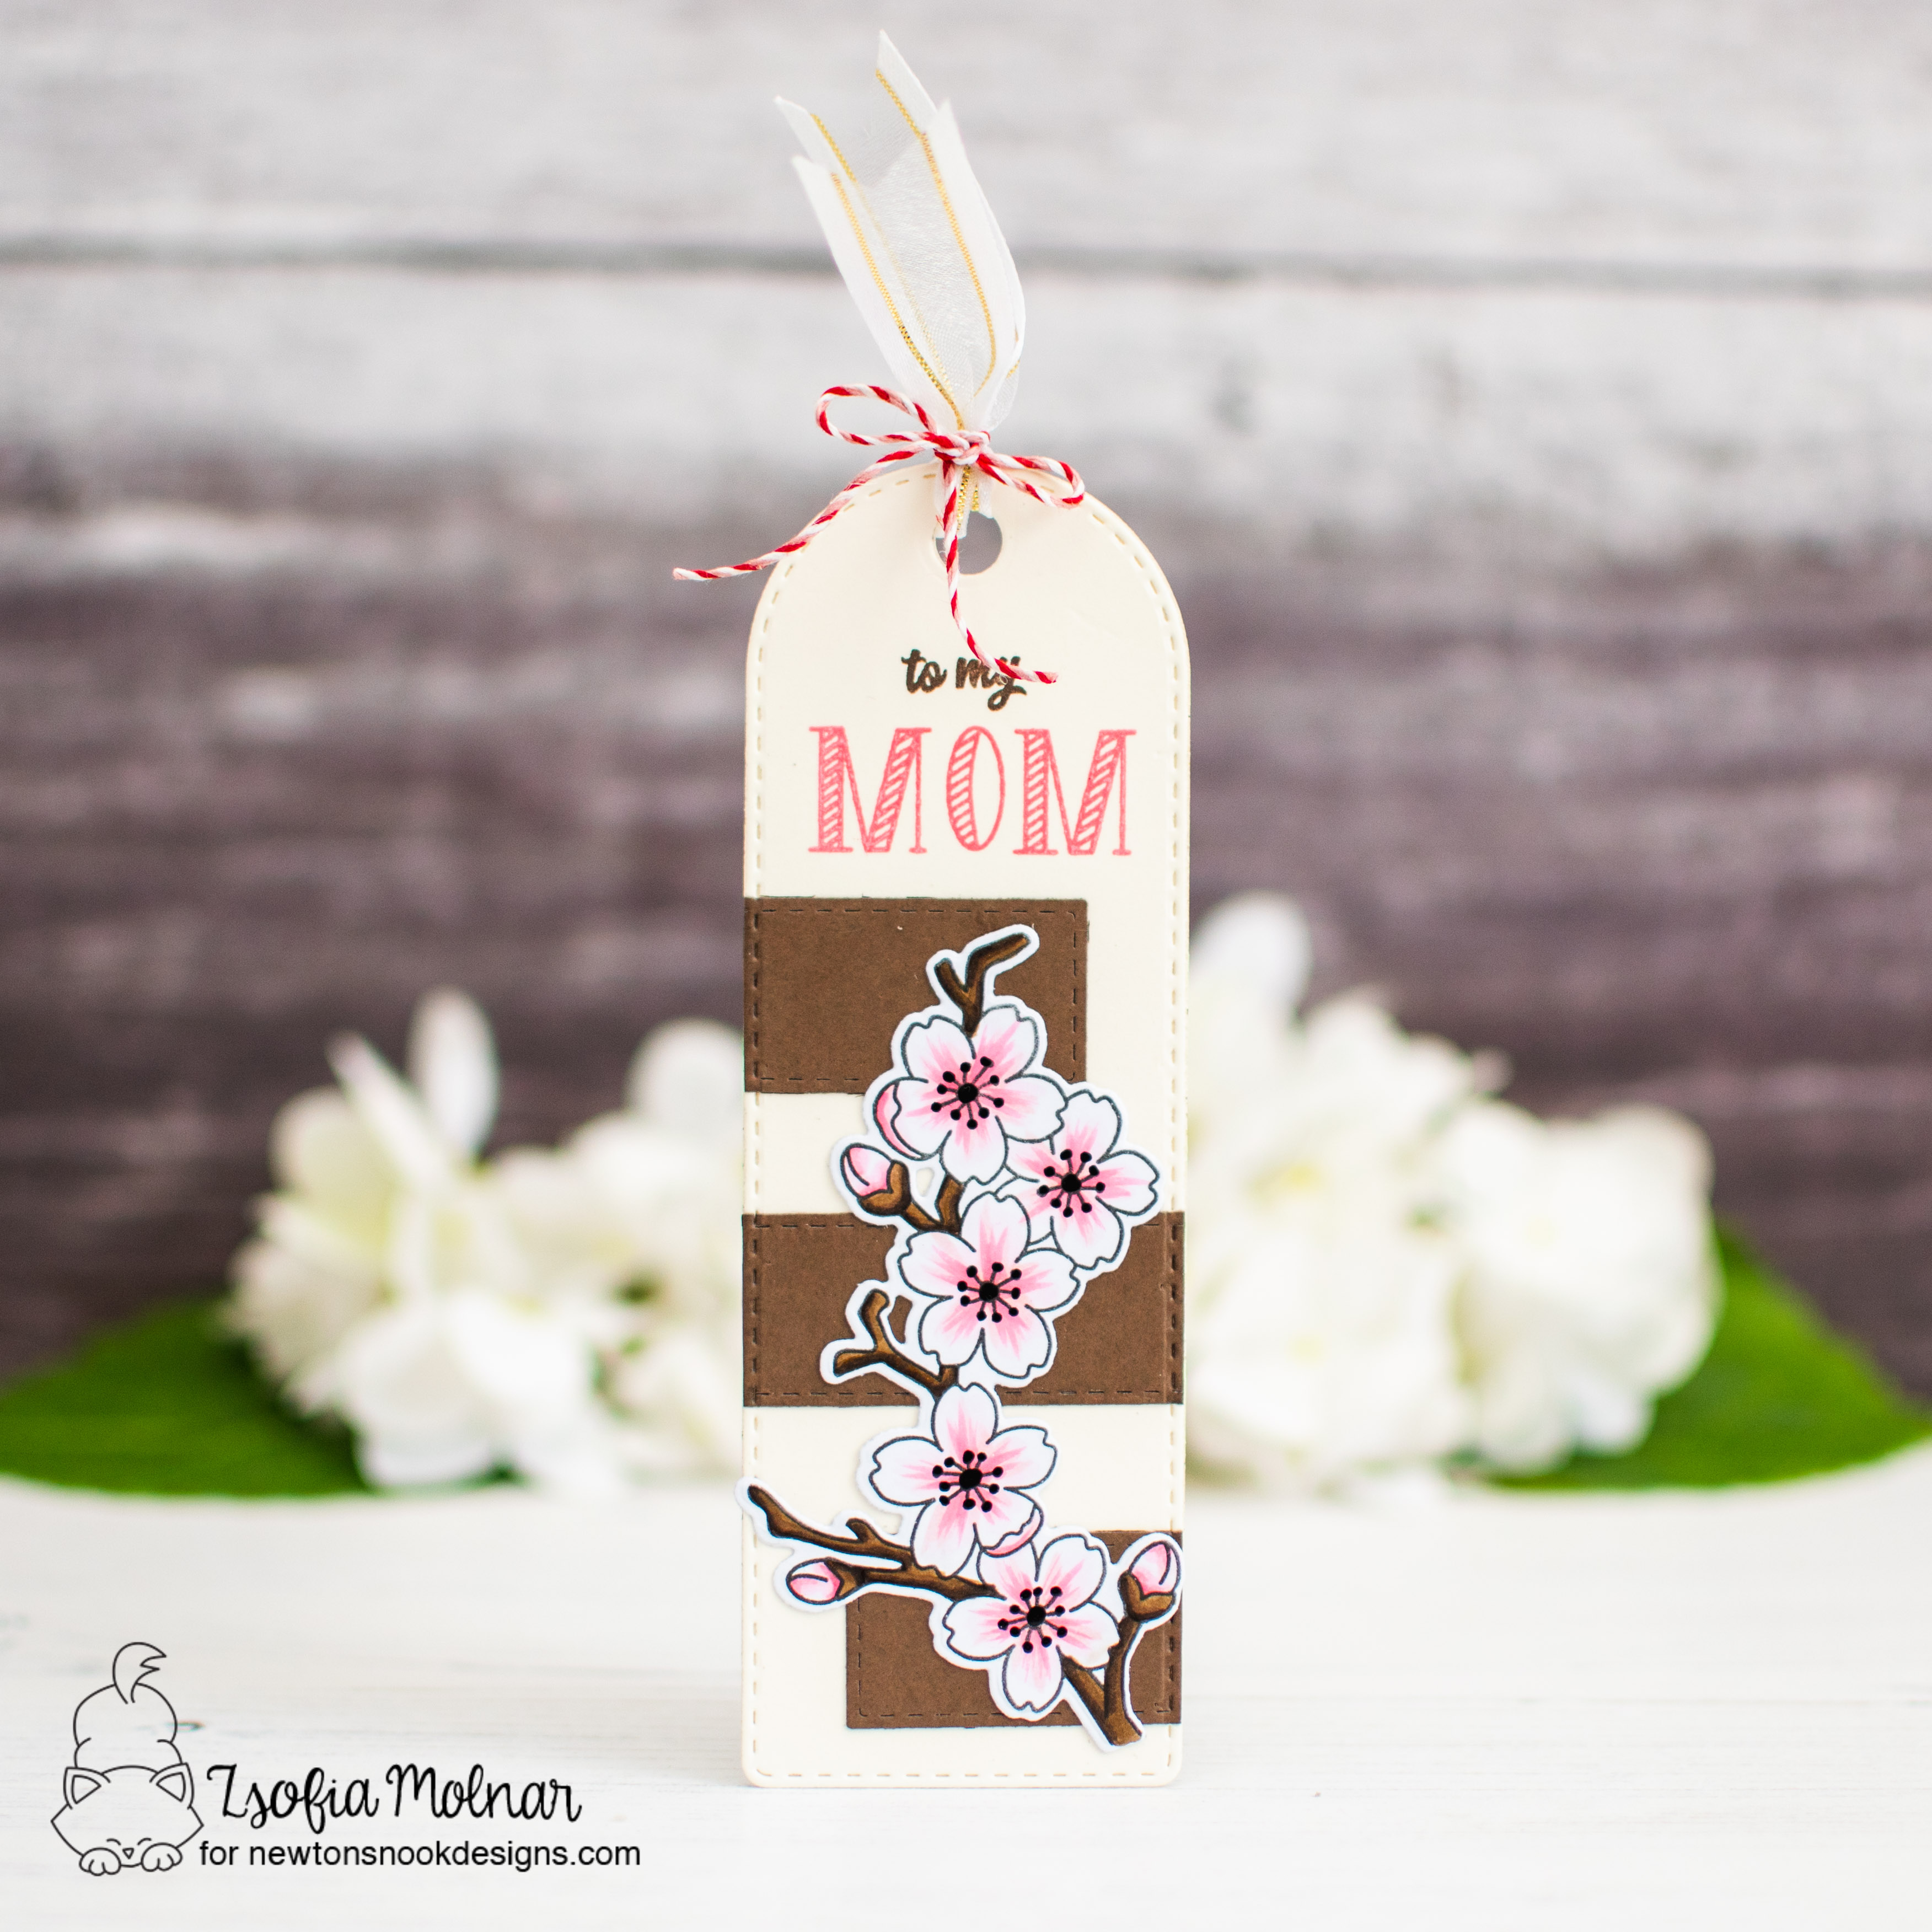
For the bookmark I used the new Bookmark II die set to cut the base from cream cardstock. I like my bookmarks sturdy so I always make them double layer. In this way the stitching is pretty on both sides of the bookmark.
I adhered a few leftover brown rectangles randomly on the cream background before adhering a cherry blossom branch.
I used a pretty Gina K Designs ribbon and some Candy Cane twine to embellish the top.
GIVEAWAY
Enter to Win a $25 Prize! We will be choosing two lucky winners to win a $25 store credit for Newton’s Nook Designs online shop! The winners will be chosen at random from the collective blog posts featuring our new products this week. For a chance to win, leave comments on the Design Team Member Blog Posts (see list below) from Monday April 15 through Thursday April 18. You will not know which blog has been chosen so the more you comment on the better your chances are of winning! You have until Thursday, April 18th at 9 pm ET to comment — winners will be announced on the NND blog on Friday, April 19th.
Check out all the awesome Design Team Blogs below to enter:
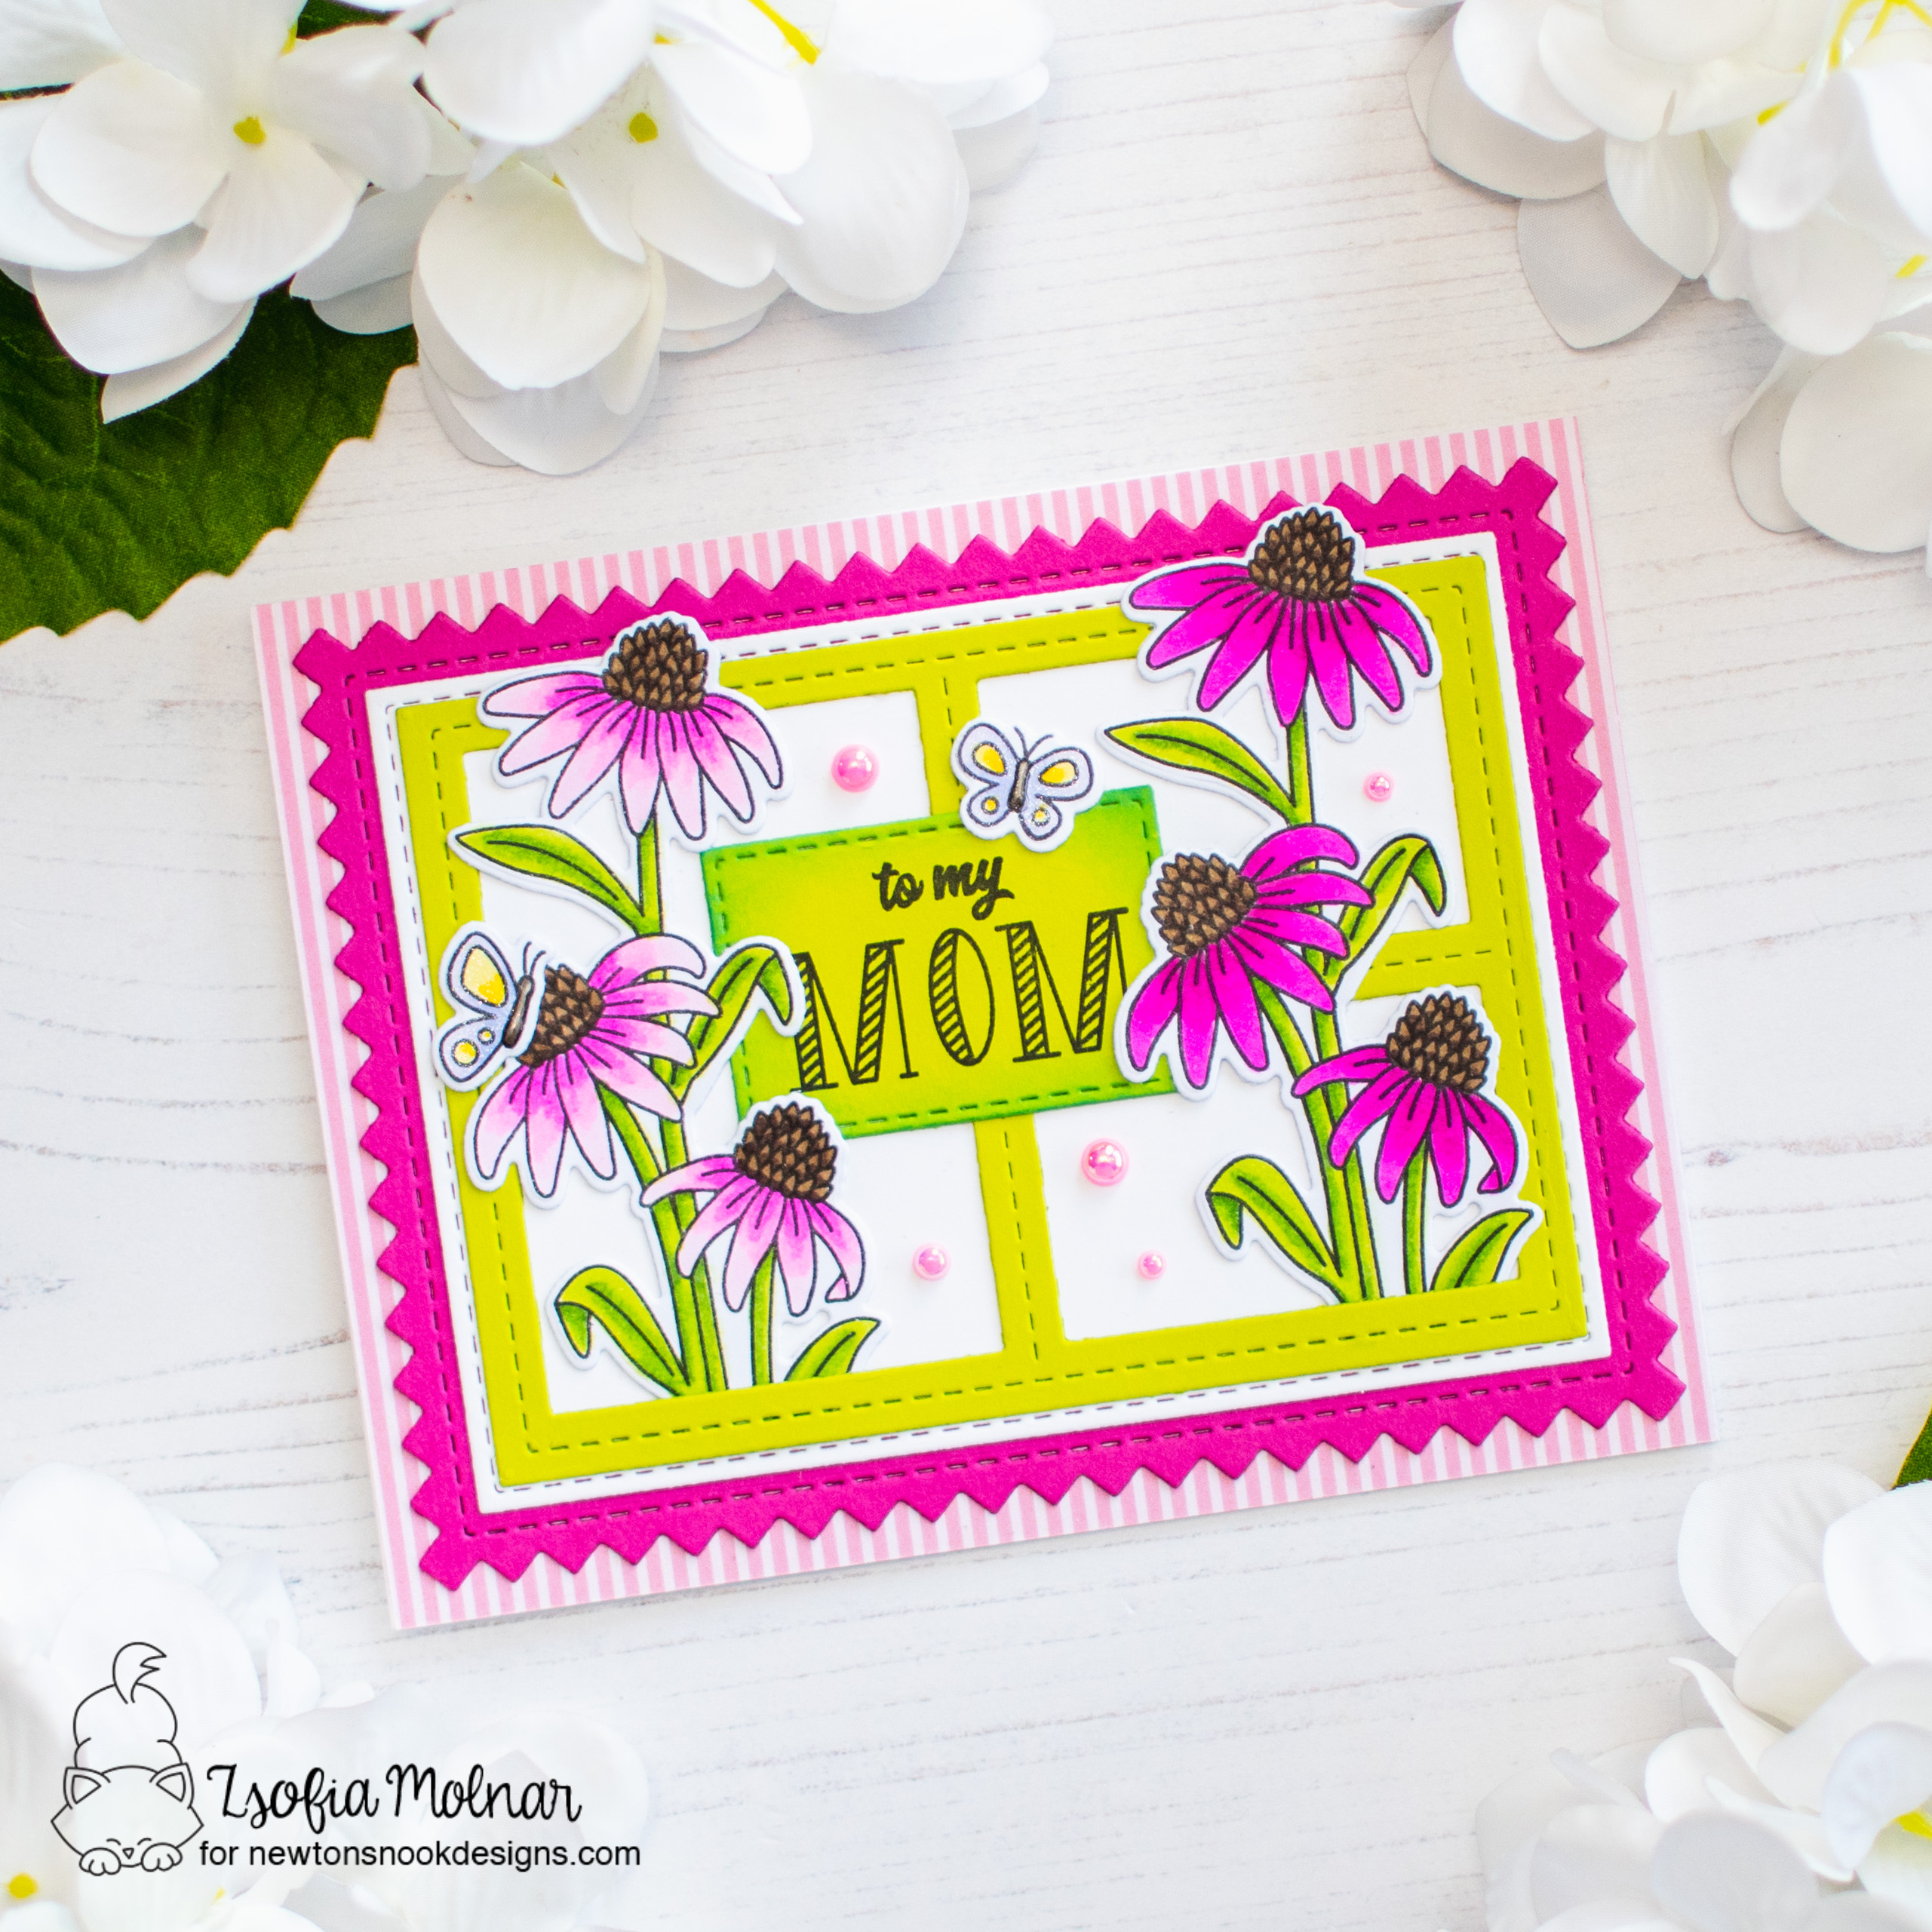
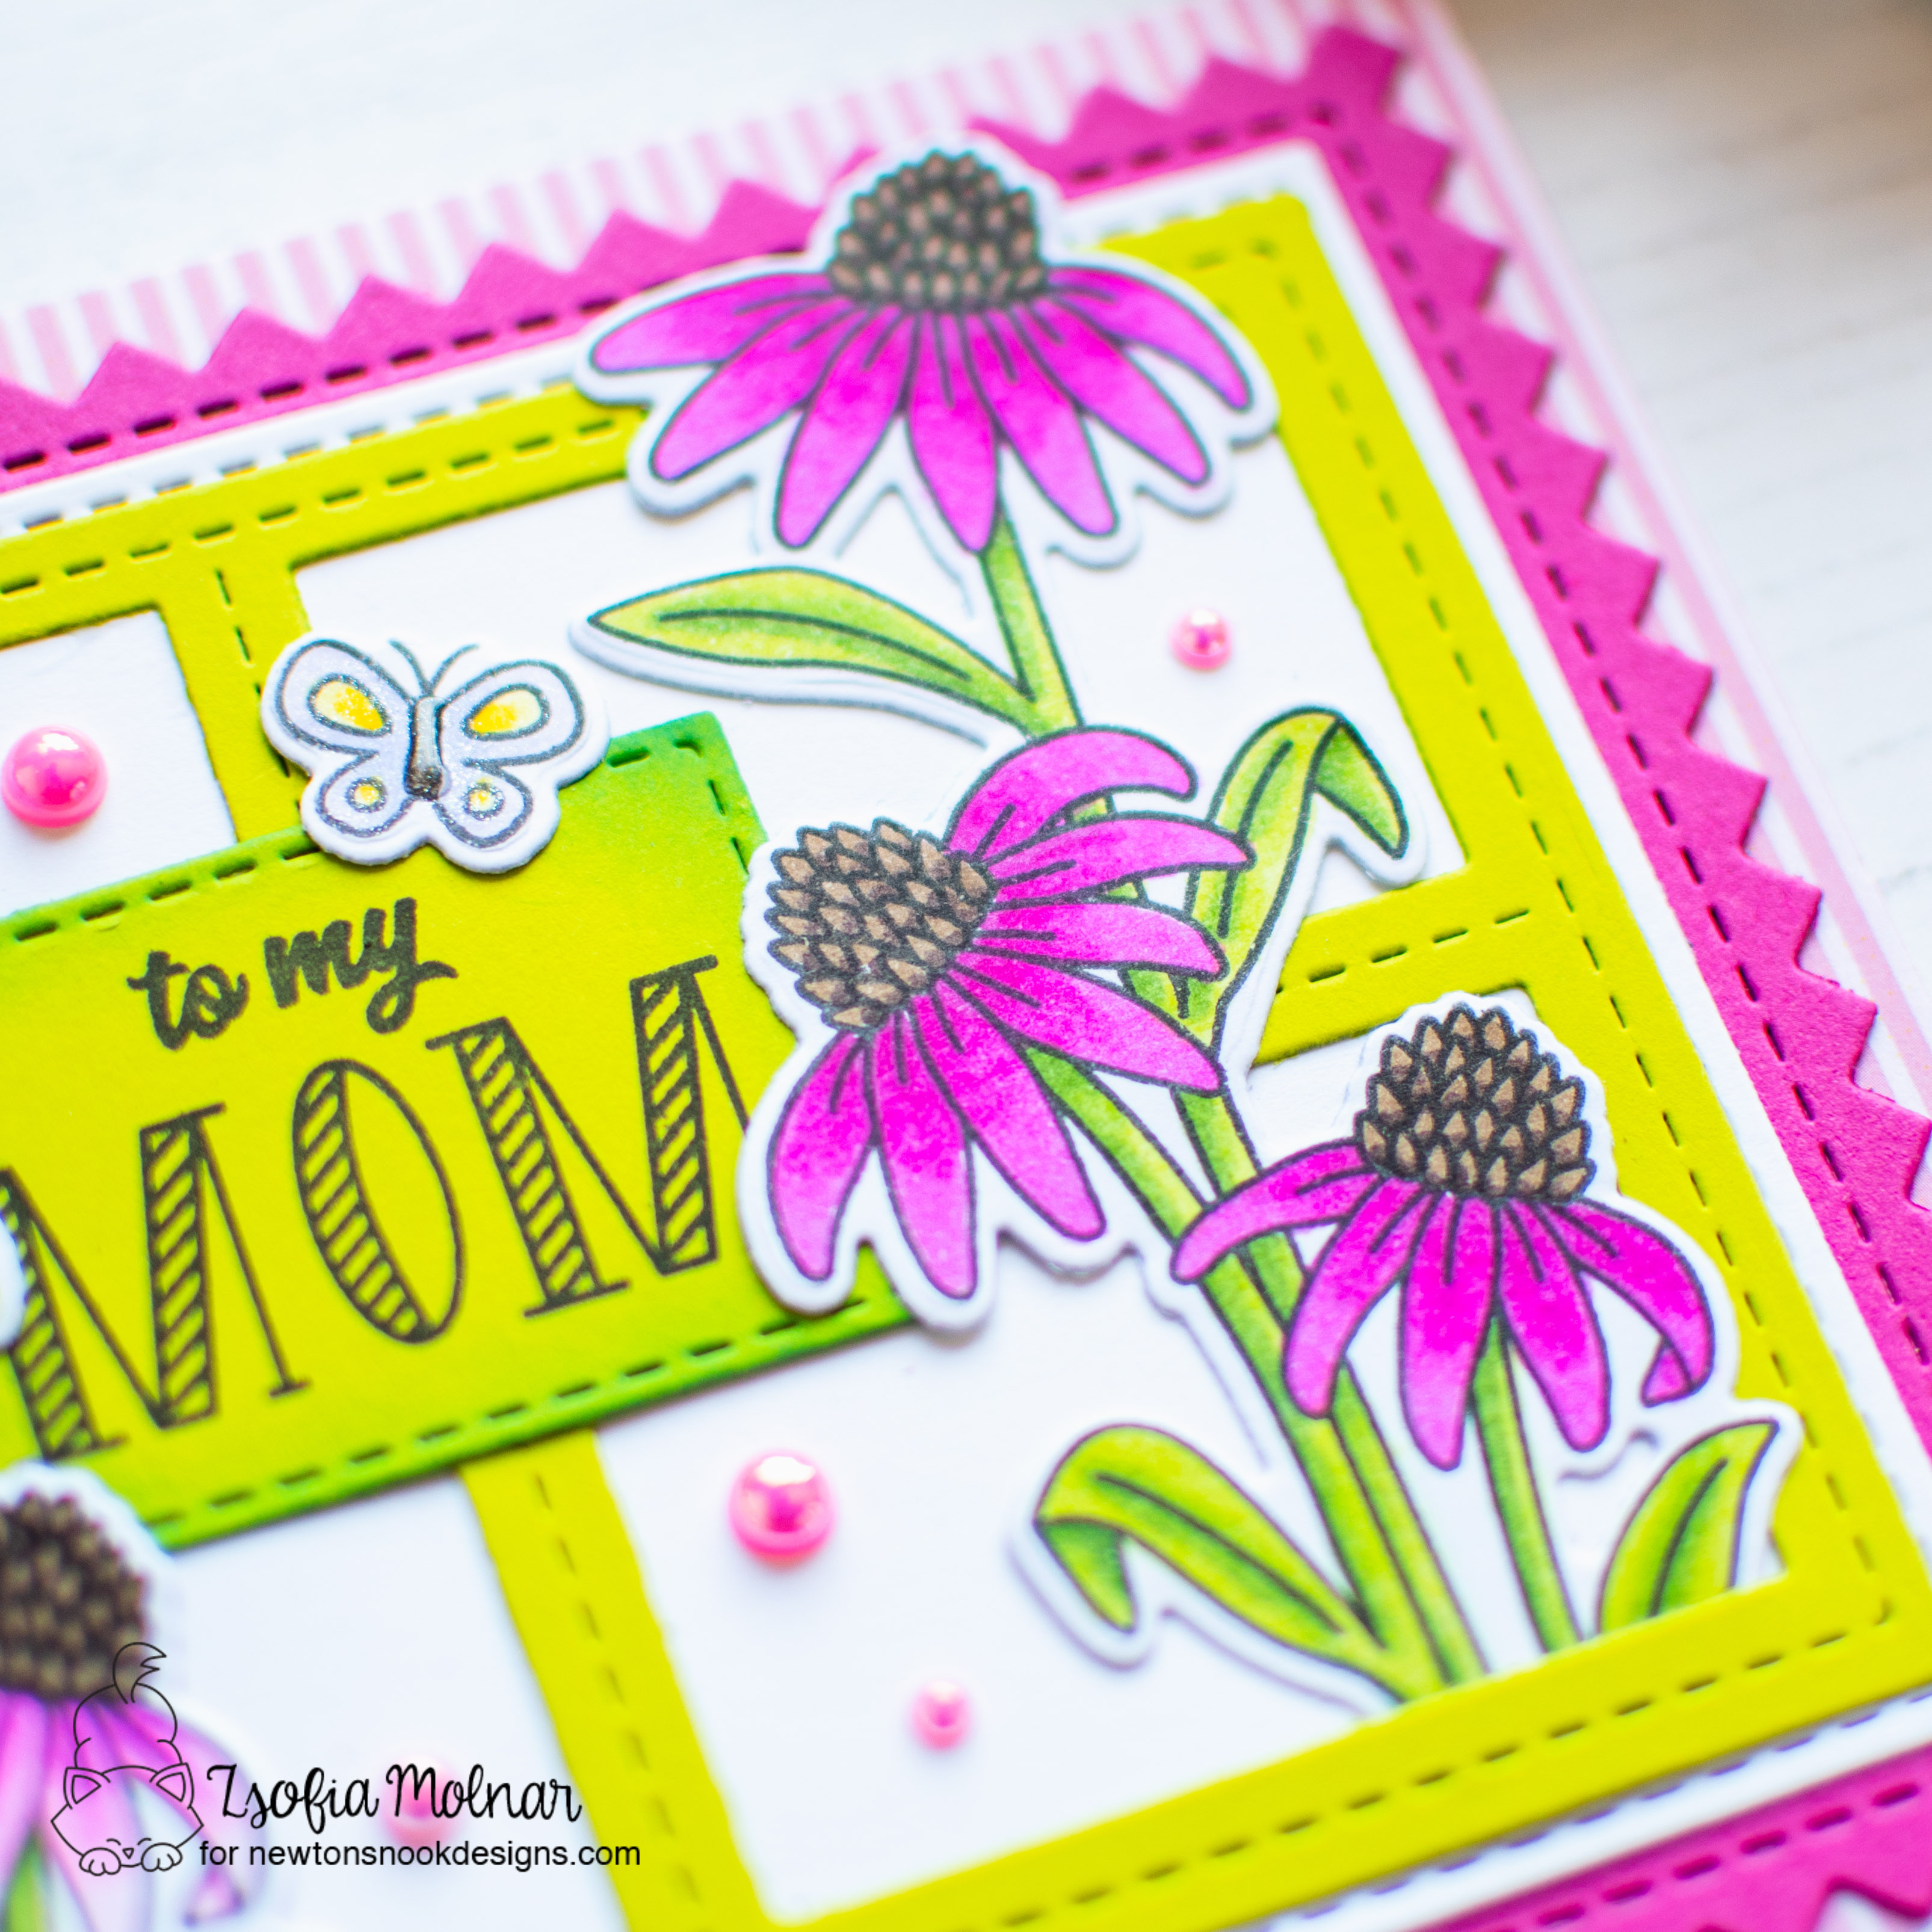
It is day 2 of the Newton’s Nook Designs April Release reveals ad we are going florals today with the Floral Delights stamp and die set. I love the size of these flowers and all the colour variation we can use for both the daisies and echinacea.
All new designs will be available on 19/04/2024.
CARD 1
I started with stamping and colouring the echinacea twice using Copic markers. I used pink shades but made them slightly different. I used the coordinating dies to cut them out.
Then I die cut some coloured cardstock with the Frames and Tags dies and also added an in between white layer using the Basic Frames die set. I assembled the focal panel and inserted the flowers between the layers.
I used one of the leftover green rectangles to hold the sentiment, which I stamped from the Best Mom Oval stamp set. I added a little shading to the edges using Mowed Law Distress Oxide ink. I adhered it in place and embellished it with a cute butterfly.
For the background I chose a pretty striped patterned paper from the Pastel Basics paper pad. As a finishing touch I added a few pink pearls (Pretty Pink Posh)
CARD 2
As always I stamped, coloured and die cut a daisy and a few bees, I used Copic markers for the colouring. I love that the coordinating dies cut the little holes in between the flowers! I tied a little bow on the stems and adhered them to a strip of grey cardstock.
I white heat embossed a sentiment on the bottom of the panel and used the Frames and Tags die set to cut a decorative edge from yellow cardstock to decorate it. It looks awesome in real life!
For the background I chose a green striped paper from the Pastel Basics paper pad. As a finishing touch I scattered a few yellow confetti (Pretty Pink Posh).
I also used a clear shimmer pen on the wings of the bees and added glossy accents to the middle of the flowers.
GIVEAWAY
Enter to Win a $25 Prize! We will be choosing two lucky winners to win a $25 store credit for Newton’s Nook Designs online shop! The winners will be chosen at random from the collective blog posts featuring our new products this week. For a chance to win, leave comments on the Design Team Member Blog Posts (see list below) from Monday April 15 through Thursday April 18. You will not know which blog has been chosen so the more you comment on the better your chances are of winning! You have until Thursday, April 18th at 9 pm ET to comment — winners will be announced on the NND blog on Friday, April 19th.
Check out all the awesome Design Team Blogs below to enter:
For my card I stamped and coloured all the images from the stamp set using Copic markers. I used pastel colours, 2-3 shades of each colour family. I cut them all out with their coordinating dies.
Then I die cut a kraft banner using the Basic Frames die set and popped up the shelves in the middle with 3D foam squares. I also die cut a dark green zig zag rectangle using the Frames and Tags die set, adhered the banner on the left side and popped up the stack of books on the other side.
I white heat embossed a sentiment on the bottom of the panel and used the remaining images to make the scene complete.
As a finishing touch I used a clear shimmer pen and glossy accents to emphasize some of the details. I also added some tiny pearls to the middle of the flowers.
GIVEAWAY
Enter to Win a $25 Prize! We will be choosing two lucky winners to win a $25 store credit for Newton’s Nook Designs online shop! The winners will be chosen at random from the collective blog posts featuring our new products this week. For a chance to win, leave comments on the Design Team Member Blog Posts (see list below) from Monday April 15 through Thursday April 18. You will not know which blog has been chosen so the more you comment on the better your chances are of winning! You have until Thursday, April 18th at 9 pm ET to comment — winners will be announced on the NND blog on Friday, April 19th.
Check out all the awesome Design Team Blogs below to enter:
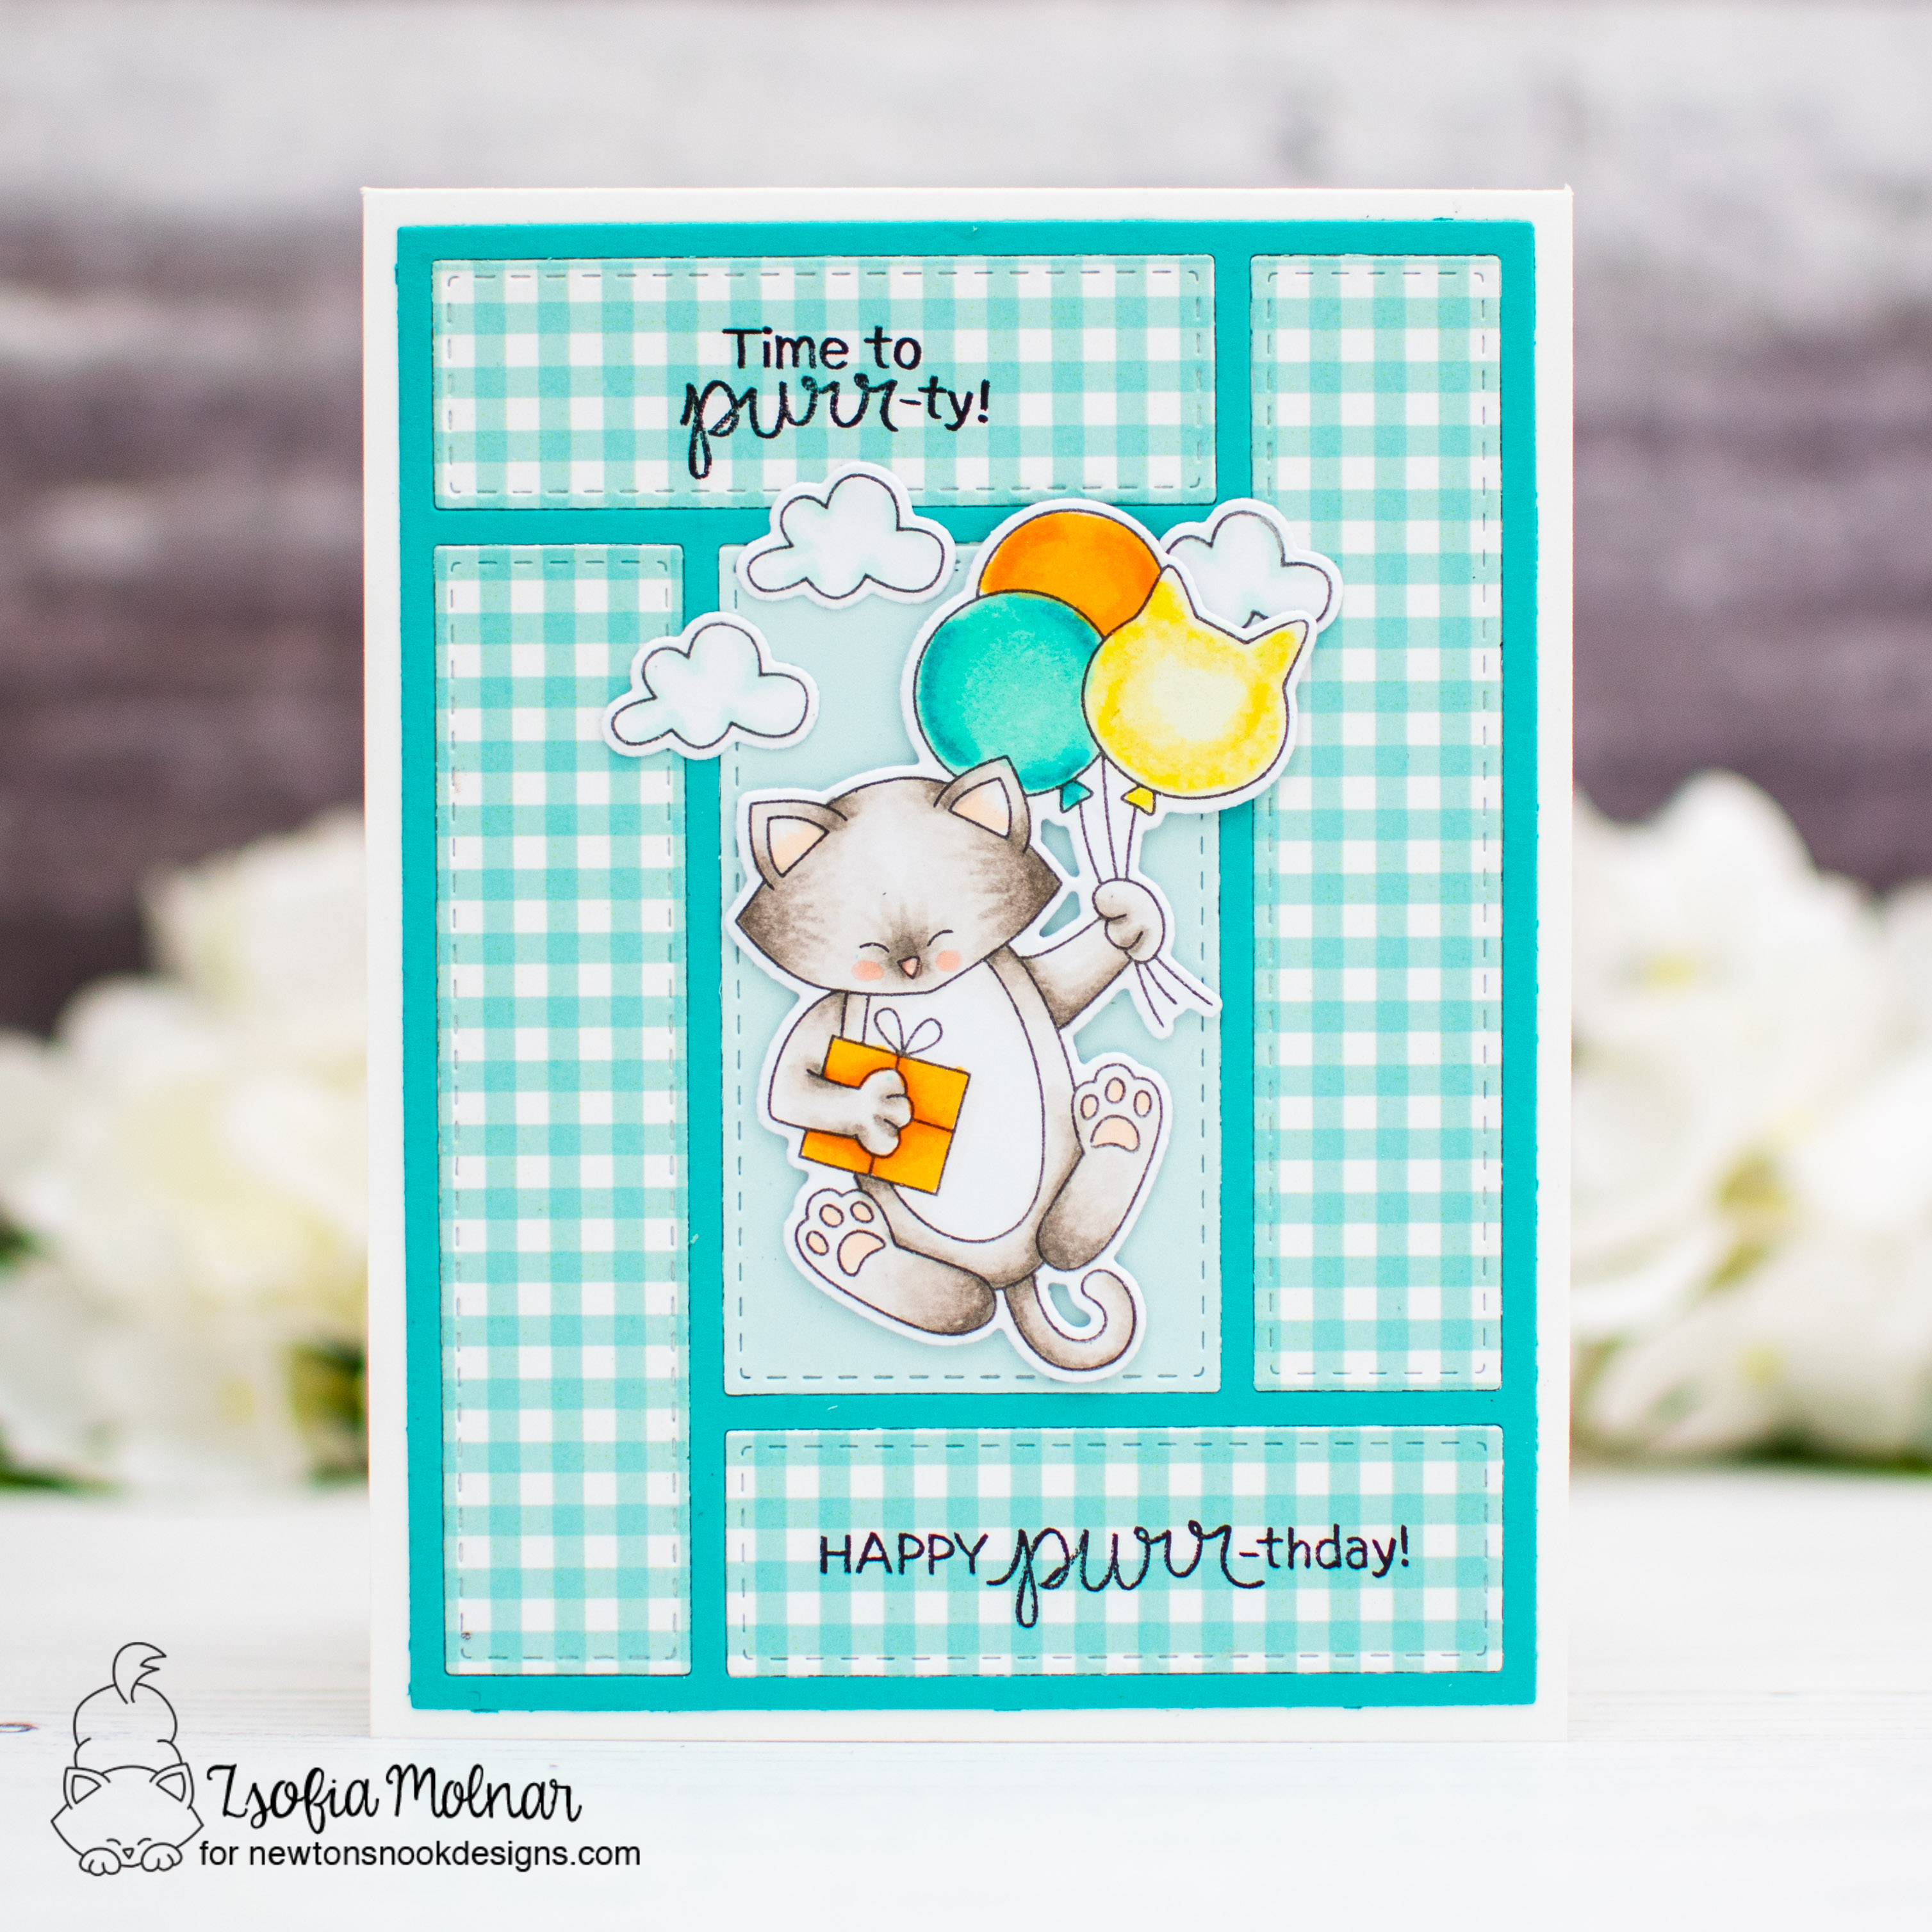
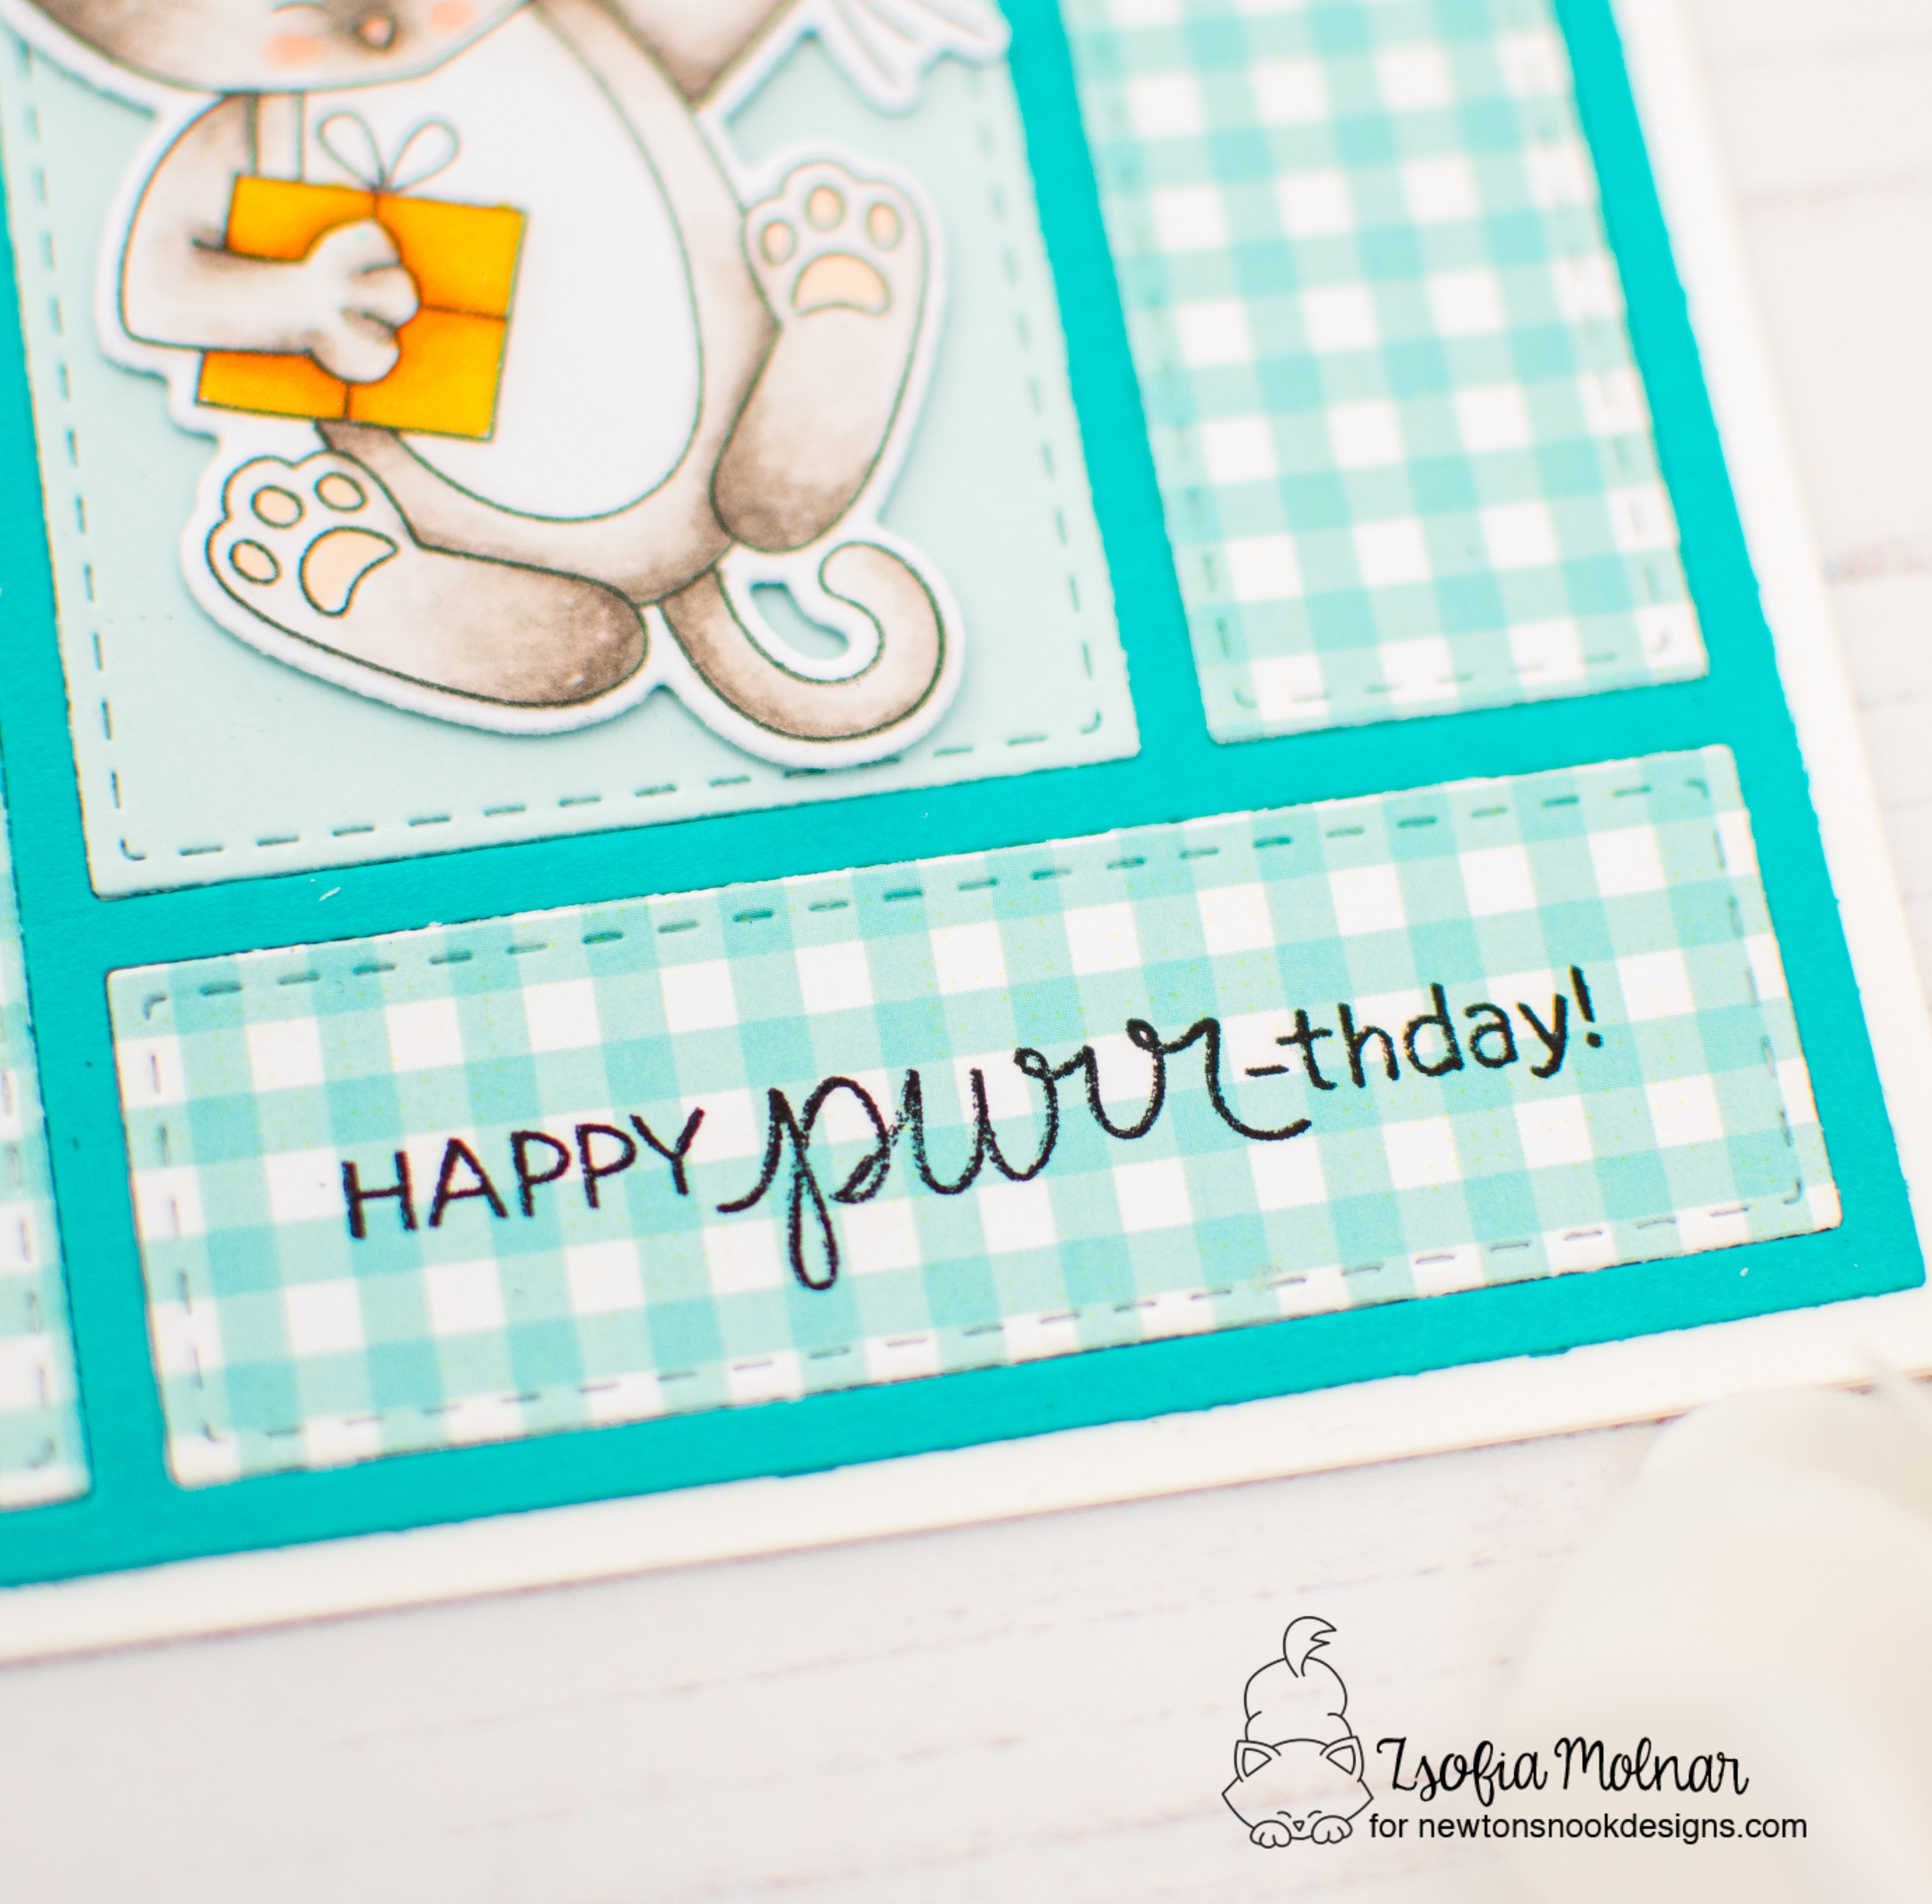
It is my turn on the Newton’s Nook Designs blog and as I am living in rural Australia now, my card for today was heavily inspired by the nature surrounding us. We see a lot of cows everywhere we go. So this cutie was born in my head, let me guide you through the process.
Then I die cut a black banner with the new Basic Frames die set and added a bit of white pigment ink on the edges. I stamped a sentiment on a white Speech Bubble and assembled the scene on the banner.
For the background I chose a pretty gingham paper from the Bright Basics paper pad and cut it out with a die from Frames and Tags. Before mounting the focal panel on the background, I wrapped a natural twine around it and tied it in a little bow. I used 3D foam squares to adhere the images and embellished the scene with a few confetti from Pretty Pink Posh.
As a finishing touch I added an extra sentiment from the Birthday Essentials stamp set and used a clear shimmer pen on the balloons.
I hope you enjoyed my card and you will pop in again soon for more inspiration.
It is the last day of the Back to Basics release reveals, but I must admit that this die is my favourite: it is called A2 card layout die set and It is gorgeous! I love all the paper piecing options it gives, plus the stitching details always have my heart.
I started with cutting the die one from patterned paper from the Pastel Basics paper pad, once from peacock cardstock and the middle part from a matching light blue scrap. I paper pieced them on an A2 sized white notecard.
Before popping up the image in the middle with 3D foam squares, I stamped 2 sentiments on the horizontal panels in black.
I added a few mini clouds as embellishments, and used a clear shimmer pen on the balloons and present to make them festive.
GIVEAWAY
We will be choosing one lucky winner to win a $25 store credit for Newton’s Nook Designs online shop! The winner will be chosen at random from the collective blog posts featuring our new products this week. For a chance to win, leave comments on the Design Team Member Blog Posts (see list below) from Tuesday March 19 through Thursday March 21. You will not know which blog has been chosen so the more you comment on the better your chances are of winning! You have until Thursday, March 21st at 9 pm ET to comment — winners will be announced on the NND blog on Friday, March 22nd.
Check out all the awesome Design Team Blogs below to enter:
Welcome back, it is Day 2 of the new release reveals of Newton’s Nook Designs. This month we are featuring fun new die sets, 2 fantastic paper pads and a cute little stamp and die set. All sets were revealed on Monday on the NND blog and will be available for purchase in the store on Friday, 22nd March!
My card today focuses on the Basic Frames die set. I love that big banner, I had to use it on this clean and simple card!
I started with stamping the pretty floral from Dainty Daises, and quickly coloured it with Copic markers. I used the coordinating die to cut it out.
Then I die cut the big banner from a purple dots patterned paper from the new Bright Basics paper set. For the background I chose a light grey cardstock and die cut it with a die from Frames and Tags. I stamped a sentiment on the bottom and popped up the banner with 3D foam tape. I mounted the daisies with 3D foam squares too for extra dimension and added a little twine to the stems.
As a finishing touch I used glossy accents on the flower centers. I love this design with all the stitched details!
GIVEAWAY
We will be choosing one lucky winner to win a $25 store credit for Newton’s Nook Designs online shop! The winner will be chosen at random from the collective blog posts featuring our new products this week. For a chance to win, leave comments on the Design Team Member Blog Posts (see list below) from Tuesday March 19 through Thursday March 21. You will not know which blog has been chosen so the more you comment on the better your chances are of winning! You have until Thursday, March 21st at 9 pm ET to comment — winners will be announced on the NND blog on Friday, March 22nd.
Check out all the awesome Design Team Blogs below to enter:
I am so happy to be part of the new release reveals of Newton’s Nook Designs! This month we are featuring fun new die sets, 2 fantastic paper pads and a cute little stamp and die set. All sets were revealed yesterday on the NND blog and will be available for purchase in the store on Friday, 22nd March!
I used the new Frames and Tag die set to create the background for the image: I cut the different dies from coloured cardstock and backed the frame with a piece of patterned paper from the Bright Basics paper pad. I also added a pink mat to it before adhering it to the green backdrop, just because I love layers.
I stamped the sentiment on the patterned paper directly. As the paper has a bit shiny finish and because my regular ink pad is drying out, I used black Staz-on ink for the sentiment. I love how crisp and bright black it turned out!
After adhering the die cut image, I added a bit of glossy accents to the cake and tray, and a bit of clear shimmer to the presents and candles. The sunglasses are so shiny black because I used black glaze pen over it. So cool!
GIVEAWAY
We will be choosing one lucky winner to win a $25 store credit for Newton’s Nook Designs online shop! The winner will be chosen at random from the collective blog posts featuring our new products this week. For a chance to win, leave comments on the Design Team Member Blog Posts (see list below) from Tuesday March 19 through Thursday March 21. You will not know which blog has been chosen so the more you comment on the better your chances are of winning! You have until Thursday, March 21st at 9 pm ET to comment — winners will be announced on the NND blog on Friday, March 22nd.
Check out all the awesome Design Team Blogs below to enter: