I have a fun little card to share with you today, which I made with supplies from Pretty Pink Posh. I am totally in love with layering stencils and I enjoy coming up with different colour combos for each, but I had another idea for the Layering Cherries stencil from their latest release. Let me show you!
First I did a quick ink blending on Neenah Solar white cardstock with Worn Lipstick Distress Oxide ink. Then I used the first layer of the Layering Cherries stencil set with Lumberjack Plaid Distress Oxide ink. I love this red colour, my absolute new favourite! I added a tiny bit of Aged Mahogany to the bottom of the cherries. For the stems I used Rustic Wilderness first and then realized that the cherry stems are rather brown, so I went back with Ground Espresso. This way the result is a brownish green, perfect for the pink background! For the leaves layer I used the same green but wanted to lighten them a little, so I went back with Twisted Citron. After removing the last layer I generously spritzed the panel with water from a mini mister and dabbed it off with a paper towel after 30 seconds.
In my head I visualized smiling cherries, so I added little faces to each using the Ghost Friends stamp set. As I had to ink up only the face of each ghost, I used a black Memento marker on the eyes and noses instead of an ink pad. It worked perfectly! I need to try this technique with sentiments too!
For the sentiment I chose the Love Sentiments stamp set, and simply stamped the text in the middle using Versafine Onyx Black ink. I trimmed the panel down tiny and gave it a dark red mat before adhering to a top folding A2 sized card base.
As a finishing touch I used some little white clay hearts from the Valentine’s Day Mix.
I wish you enjoyed this cute design and you will try this technique.
All new designs will be available on 20th January.
For my card I stamped and coloured the kitty using Copic markers: E44, E43, E42, E41, E01, E000, R89, R46, R27, R24. Before die cutting it with its coordinating die, I white heat embossed a sentiment in the middle of the heart. Doesn’t it look pretty?
Then I created the background: I did a quick ink blending on white cardstock with Fired Brick, Abandoned Coral and Saltwater Taffy Distress Oxide inks. Then I placed the Meow stencil over it and went back with the same colours before spritzing it with Tart Cranberry Mica Spray. I love the texture and mess look it got this way! When it was dry, I cut it down to be slightly smaller than an A2 sized card front.
To hold my kitty, I created a tag using the Fancy Edges Tag die set: I cut the base from kraft cardstock, the fancy edge from red and added a white reinforcer. I embellished it with white ribbon and natural twine before popping it up at an angle with 3D foam squares on the background. I used 3D foam squares under the kitten too.
As a finishing touch I used a drop of glossy accent on the nose of the cat.
GIVEAWAY
Would you like to win the “Newton’s Heart” Stamp Set? This stamp set will be given away to ONE lucky winner!Here’s how to win: Comment on the NND blog and Design Team blogs (see list below)! The winner will be chosen at random from the collective reveal posts. Make sure to check out each of their blogs and comment for your chance to win. You will not know which blog has been chosen so the more you comment on the better your chances are of winning! You have until Thursday January 19th at 9pm ET to comment — winners will be announced on the blog post on Friday, January 20th.
Check out all the awesome Design Team Blogs below to enter:
For my card I used the cute Potted Roses and Heart Critters set together. I love how these sets are designed to coordinate! I stamped the roses 4 times and the cute panda once, coloured them with Copic markers and cut them out with their coordinating dies.
The Copic colours I used are:
roses: RV25, RV23, RV21, G46, G14, G12,
panda: W9, W7, W4, W1, W00.
Then I die cut a Scalloped Diamond Tag from light grey cardstock and created a frame from the roses. I popped up the panda in the middle with 3D foam squares. I used my Cropadile to add an eyelet to the top and finished it with a black and white twine.
I chose a pretty patterned paper from the Doodlebug Sweet Things paper pad and popped up the tag with 3D foam squares. The sentiment is from the Potted Roses Stamp set: I white heat embossed it on dark grey cardstock and cut it out with its coordinating die. I love when handwritten sentiments have coordinating dies, I would never be able to fussy cut it that neatly.
I decided to add another white embossed sentiment from the same set, just this time I chose pink cardstock.
As a finishing touch I used a few Pink Blush pearls around the tag, emphasized the eyes of the panda with a black glaze pen and added a drop of glossy accents to the nose. So cute, isnt it?
GIVEAWAY
Those who leave a comment on each post participating in the Instagram Hop will have a chance to win a $30 gift card. More details you can find in my IG post. Hope to see you there!
It is Valentine’s Day and I am back with a cute love card made with the latest release from Lawn Fawn. It is definitely ready to steal your hearts 🙂
First I coloured the skunks rom the Lawn Fawn Scent with Love and Scent with Love Add-on stamp sets using Spectrum Noir Illustrator markers: CG4, CG2, CG1, YG3, MG5, PP5, PP4, PP2, BG10, BG8, BG6, BG2, BG1, BG05. I used the coordinating dies to cut everything out.
For the background I used patterned paper from the Watercolour Wishes Rainbow paper pad and die cut it with the Quilted Heart Backdrop Landscape die. I backed it with white glitter cardstock.
The sentiment is cut with the Giant Be My Valentine die from Raspberry cardstock 3 times and stacked them on top of each other.
When I adhered the sentiment, I embellished it with roses. I popped up the 2 skunks holding gifts above it using 3D foam squares.
As a finishing touch I used a clear shimmer pen on the heart shaped box and the paper holding the bouquet of roses. I added glossy accents to the ribbons ad emphasized the noses and eyes of the skunks with a black glaze pen.
I wish you enjoyed today’s inspiration and will pop in again soon.
Welcome to another Valentine edition of my Perfect Combos series for Heffy Doodle, a cute forest scene. For me expressing love is a regular thing, I love to create little notes to my loved ones, This little woodland scene can easily be altered to fit any occasion. Let me guide you through the process.
First I stamped and coloured the images from the Deer to me stamp set and used the coordinating dies to cut them out. I used my Spectrum Noir Illustrator markers, only brown shades this time: deers and mushrooms: TN9, EB6, EB5, EB3, EB2, EB1, TN2, TN1 trunk: EB7, MB4, MB3, MB1, MB05.
While I was die cutting, I cut all the elements I needed for the background scene: I used the Tree-mendous Peekaboo Tree die set to cut the trunk from craft cardstock and the canopy from Wintergreen cardstock. I added stitching details to the trunk with the Woodgrain Texture die. I used the Grassy Lass Border dies to cut grass from Kiwi Crush cardstock. I used Distress Oxide inks to add some shading to them and also some diluted ink splatters for a textured look. It is an easy way to add depth to the die cuts.
On a white card base I added a little Tumbled Glass Distress Oxide ink with a blending brush, just gently and spritzed it with water. I used a paper towel to dab it off after 20 seconds. That is the easiest way to get a pretty sky. I assembled the scene: I cut the treetrunk in half and adhered it to the card base, covered the bottom with the grass and the top with the canopy. Then I stamped a sentiment in between the trees from the Deer to me set.
I popped up the deers, trunk and mushrooms with 3D foam squares and added a die cut I love you sentiment to the canopy: the shadow I cut from kraft cardstock and the words from Cornflower cardstock 3 times and stuck them on top of each other.
I used little pink hearts as embellishments which I cut with the Whole Lotta Hearts set. As a finishing touch I added white gel pen dots to the deers and used a black glaze pen on their hooves and noses. I also added glossy accents to the mushrooms and hearts.
I wish you enjoyed my card today and share with us in our Facebook group if I inspired you. Follow me on Instagram if you like my cards, your support means so much to me! Thank you!
I am so excited to be part of the 8th Annual Sweet Treats Blog Hop organised by Newton’s Nook Designs! Our Design Team brings you a lot of sweet inspiration, just in time for Valentine’s Day. Make sure you scroll down to the bottom of this post to see the whole list and hop along and comment for a chance to win!
My project was heavily inspired by my kids: I wanted to create something which is easy to hide in their lunch boxes to make their day sweet. For all little treats I used the Love Bots stamp anddie set from the latest release.
I coloured them with Spectrum Noir Illustrator markers, restricting the colours to cool greys with a little pink: CG9, CG7, CG5, CG3, CG1, MG5, MG3, MG1.
For the Goodie bag I usedLawn Fawn Goodie Bag die and pink cardstock. I put some salty sticks and lollypop in those, but you can use it for any little treat.
For the little envelope I used the Lawn Fawn Small Stitched Envelope die set and light grey cardstock. I embellished it with a stitched heart from the NND Heart Frames die set. I used one of the robots with a matching sentiment on the insert, I can still right my personalized message on the back.
The little treatbox is made from pink cardstock with the Reverse Confetti Goodie Box die. I used a stitched circle from NND Frames Squares on it to hold my little robo-cat. It is closing with a stitched heart on the top and has the perfect size to hide some bonbons inside. Yummy.
The bigger treat box is also created with a Lawn Fawn die called Fancy box. I put some candy in it, but it would also look lovely with some nuts or small chocolate inside.
I used pink hearts from the Love Bots stamp set as embellishments wherever I could. I also emphasized some details on the coloured images with a black glaze pen and glossy accents.
Sweet Treats SALE!
As an extra treat to you, we are celebrating with a SALE! Use code TREAT to receive 15% off your order this weekend! Now through Sunday, February 6th at www.newtonsnookdesigns.com
Giveaway
Enter to Win! Sweet Treats Blog Hop Prizes! We will be choosing two lucky winners to win a $25 store credit for Newton’s Nook Designs online shop! To enter, just leave comments on the Design Team Member and Guest blogs (see list below)! Two winners will be chosen at random from the collective blogs in the bloghop. Make sure to check out each of their blogs and comment for your chance to win. You will not know which blog has been chosen so the more you comment on the better your chances are of winning! You have until Sunday, February 5th at 9 pm EST to comment — winners will be announced on the NND blog on Monday, February 7th.
Check out all the awesome Design Team Blogs below to enter:
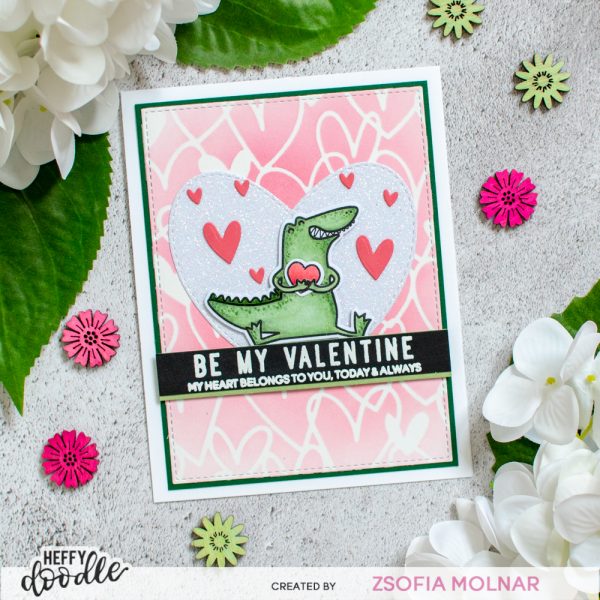
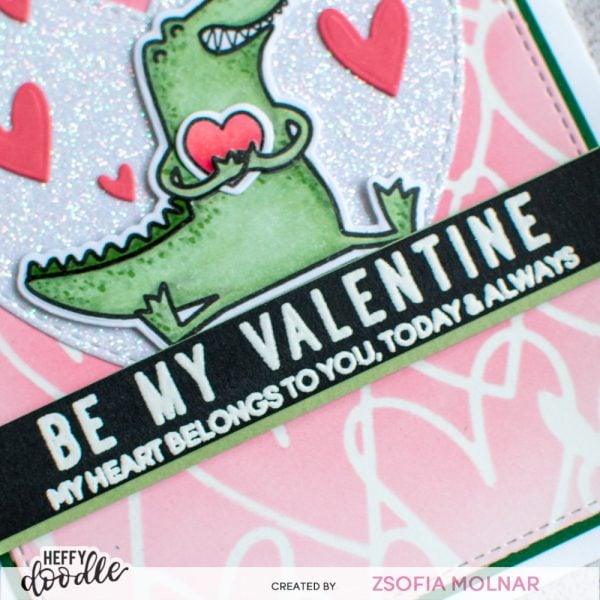
It is Zsofi here, welcome to another edition of my Perfect Combos series for Heffy Doodle. As it is gonna be Valentine’s Day this weekend, I have got you a cheerful love card. I chose to feature some older sets: my favourite croc had to show some love through a bunch of dies and the prettiest heart stencil ever. Let me guide you through the process.
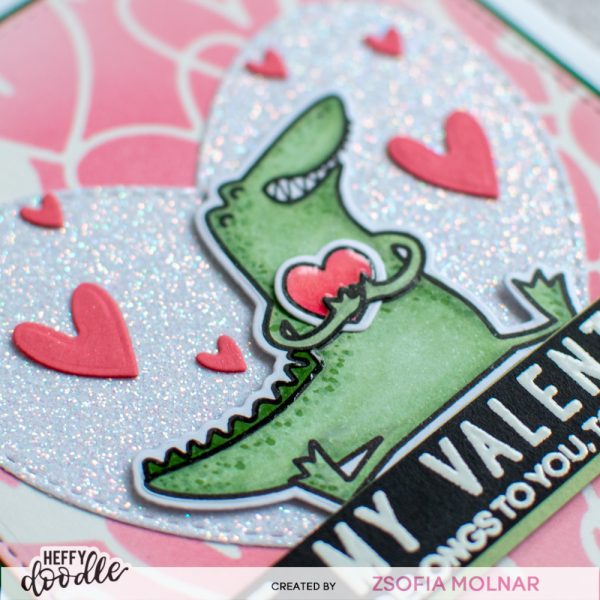
First I stamped the croc ad heart from the Happy Snappy Crocs using my Copics and cut them out with their coordinating dies. It cuts around the arms so it was easy to tuck that heart right where it belongs!
I cut a Stitched rectangle from Bristol Smooth cardstock and secured the Scribble on my heart stencil with a bit of Pixie Spray. Then I added Spun Sugar and Picked Raspberry Distress Oxide inks for a fun pattern with a blending brush. I matted the panel with a dark green rectangle before mounting it on a white A2 sized card base.
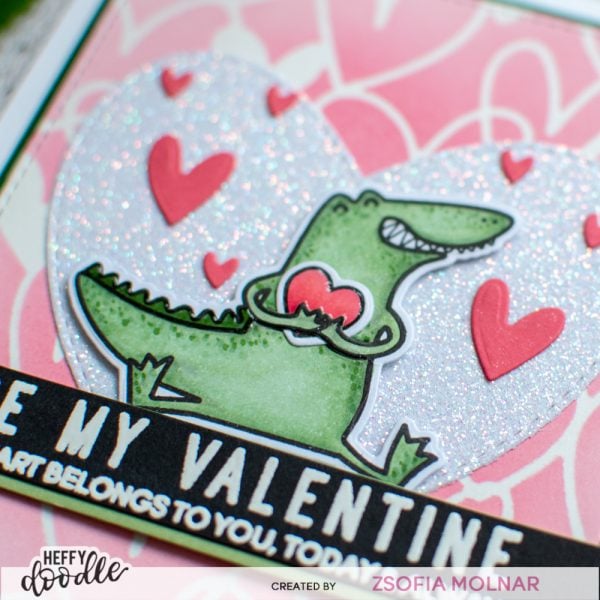
I die cut a stitched heart from white glitter cardstock ad a bnch of little hearts from pink cardstock using the Whole lotta hearts die set. I love how the shape of the little hearts match with the stencil! Match made in Heaven!
For the sentiment I chose the Special Day Sentiment Duos set and white heat embossed on a black strip. I added a bit of green layer under it for the colour balance and popped it up together with the croc using 3D foam squares. I scattered the die cut hearts and finished this card with adding glossy accents to the heart my croc is holding. I love the shimmer and shine, it makes any card special.
I hope you enjoyed today’s Perfect Combo and will check back later for more inspiration. If you like my cards, please make sure to follow me on Instagram where I share my happy creations! Thank you!
I am thrilled to share the 7th Annual Sweet Treats Blog Hop with Newton’s Nook Designs! Every year before Valentine’s Day our Design Team creates a bunch of projects to show some extra love to the people we care for. If you want to see my projects for the last few years, I will link them here: 2020, 2019. Make sure you scroll down to the bottom of this post to see the whole list and hop along and comment for a chance to win!
My father-in-law loves tea and I truly miss spending time with him. We live in different countries and due to Covid I haven’t had the chance to see him for almost 2 years now. Crazily long time. I was thinking of him and our tea-time discussions when the idea of a Tea Treat hit me. It is a small package which has everything for an indulging moment of peace and pleasure: a small box of tea, a little jar of honey, some crackers to go with the tea, a card to hold the loving message and all wrapped up in a pretty mug. Let me show you how I made these. For all pieces I used the Echo park Coffee and Friends paper pad and a couple of stamps and dies from Newton’s Nook Designs.
TEA BOX
We have these big matchboxes here in Hungary and I just deassamled the cover of one and used it as a template to create my own: I traced it on white cardstock, creased according to the template and adhered it together. I adorned it with coloured cardstock and patterned paper. I stamped a few sentiments on the matchbox sides from the Heartfelt Love stamp set.
The cute kitty is from Newton’s Mug, coloured with Copics, die cut out and popped up on the top of the box. I stamped an extra sentiment on a stitched banner from Banner Trio and another one in a small stitched heart from Heart Frames.
This little box can holf 4 tea bags, so perfect for a family tea time even! Isn’t it cute?
CRACKER BAG
When I drink tea I prefer to have something salty with it, but you can easily add little biscuits too instead of the crackers. I simply put some little pretzels in a clear bag and created a topper for it: I die cut a stitched circle with Circle Frames from patterned paper and backed it with a slightly bigger dark green circle (I used a circle die from Pink and Main here, but many companies make nesting circle dies which match).
I added the same sentiment on a stitched banner and also the little heart with the Purr-tea line, I just love it!
CARD
Of course there is no treat bag without a handmade card to hold your message. I kept it simple here: the kitty from Newton’s Mug on a woodgrain circle backed with a slightly bigger green one. For the background I used the same patterned paper to match the other elements. I had the same 2 sentiments as before, it really makes it part of a package. So neat!
TAG
As the mug is also part of the gift I created a little tag too which resembles a tea bag itself: I used the Tag Times 2 die set to cut the base from dark green cardstock and added patterned paper in the middle. I die cut the circle tag from peach cardstock and adhered the stitched heart with the sentiment on it. I used a chunky green twine to hold these together.
GIVEAWAY
Would you like to win a $25 store credit to Newton’s Nook Designs online shop? We are giving them out to TWO lucky winners! Here’s how to win: comment on the NND blog and Design Team blogs (see list below)! The winner will be chosen at random from the collective reveal posts. Make sure to check out each of their blogs and comment for your chance to win. You will not know which blog has been chosen so the more you comment on the better your chances are of winning! You have until Monday, February 8th at 9pm EST to comment — winners will be announced on the NND blog on Tuesday, February 9th.
I am so excited to be part of the Heffy Doodle and Honey Bee Stamps Collaboration Blog Hop! I love both companies, they have amazing designs and so easy to combine them! I have 2 cards for you today in different styles: one elegant and one cute. Let me guide you through the cardmaking process.
CARD 1
For my first card I die cut a Heffy Doodle Stitched Rectangle from Copic friendly cardstock and stamped the Honey Bee Stamps Pretty Postage image on it. I used my Copics to colour it, kept the colours simple: reds and aqua. I added some dots when I was done with the colouring to add some texture to the leaves and flowers. I also used a black glaze pen to go over all the little black dots and a white gel pen for even more texture.
Then I die cut the Heffy Doodle Miss you sentiment: the shadow I cut from vellum, the sentiment itself I cut 2 times from dark red cardstock and layered them on top of each other. Even 2 layers make instant dimension!
I gave the panel a teal mat and chose a pretty patterned paper from the Honey Bee Stamps Love Letters paper pad for the background. As a finishing touch I added glossy accents to the hearts. Isn’t it pretty? If you want to have coordinating envelopes, Honey Bee Stamps has them ready for you! So cool!
CARD 2
For my second card I used a fun mirror stamping and die cutting technique. Jennifer McGuire has a great video on this, you find it here.
The sentiment is from the Honey Bee Stamps Stolen my heart set: I heat embossed it on vellum with black sparkle embossing powder 2 times for a raised look. I used my Misti stamping tool for this, but even one layer of embossing powder givs a beautiful result! I used the coordinating die to cut it out and adhered it to the middle window using tiny drops of liquid glue behing the letters.
The card base is 3,5*8,5 inches. I popped up the racoons with 3D foam suares, added glossy accents to the nose and hearts and embellished the frame with tiny jewels from the Honey Bee Stamps Love letters gem collection. I love how this turned out, I hope it makes you smile too!
GIVEAWAY
Both brands’ Design Teams have created wonderful inspiration for you. Make sure to comment along the way for your chance to win! Honey Bee Stamps will be giving away $30 and Heffy Doodle will be giving away £25 to their respective stores! Be sure to comment before 11:59 PM on Feb 3rd to be entered to win!
Each company will post their random winner on Feb 4th at 10AM EST! Make sure to check the Heffy Doodle Blog and Honey Bee Stamps Blog to see if you’re a winner! Here is the full hop list:
I hope you enjoyed today’s cards and will check back later for more inspiration. If you like my cards, please make sure to follow me also on Instagram where I share my happy creations! Your support means so much to me! Thank you!
we are halfway through the Newton’s Nook Designs January Release reveals but fear not, cuteness is still coming your way! Love Emergency is a wonderful set, not only for love cards. It is definitely perfect for our other halves for Valentine’s Day though. It comes with coordinating dies too.
All products will be available on Friday, 22/01/2021!
I wanted to create a slimline card so I needed all the vehicles: I stamped and coloured them with Copic markers an cut them out with their coordinating dies.
Then I die cut the scalloped rectangle from Slimline Frames and Portholes and used the new square masking stencil to add the background with Blueprint Sketch Distress Oxide ink. Before removing the stencil I sprinkled it with water and diluted Blueprint Sketch ink. I also added black and white splatters for a fun textured look.
When the inked background was all dry, I popped up the cars with 3D foam suares and stamped a matching sentiment above each little scene.
I adhered the panel to a striped patterned paper before mounting it on a slimline card base, and used a clear shimmer pen and glossy accents to emphasize some details.
GIVEAWAY
Would you like to win the “Love Emergency” Stamp Set? We will choose ONE lucky winner for this stamp set! Here’s how to win: Comment on the NND blog and Design Team blogs (see list below)! Thewinner will be chosen at random from the collective reveal posts. Make sure to check out each of their blogs and comment for your chance to win. You will not know which blog has been chosen so the more you comment on the better your chances are of winning! You have until Thursday January 21st at 9pm EST to comment — winners will be announced on the blog post on Friday, January 2nd.
Check out all the awesome Design Team Blogs below to enter: