Pretty Pink Posh March Blog Hop

Hello Everyone,

I am so excited and honored to be part of the Pretty Pink Posh March Blog Hop. It is the last day of the hop so if you have missed the previous days, make sure to check all the fabulous inspiration our team and special guests created! This release is full of Easter and Spring themed stamps, dies, stencils and embellishments!

My project today is a home decor for Easter. I made a framed picture, a small treat in a pot and a matching card. I love to create complex project like his one, it can be a perfect gift too! Lets see them one by one.

PICTURE FRAMED

I cut a piece of teal cardstock which matched the frame I had at home and used the new Easter Words stencil with some pearly texture paste. I did add some colour to the paste with Peacock Feathers and Blueprint Sketch Distress Oxide, to get a tone-on-tone look. As my cardstock was larger than the stencil I needed to continue the pattern by simply shifting the stencil. With this design, it was super easy to line it up again for a seamless result.

While the paste was drying I die cut and assembled a few bunny heads using the Bunny Face Shaker die set. I used liquid glue with a precision tip to add all the tiny details.

I also die cut the Happy Easter sentiment with 2 older die sets: Happy Spring Shadow die set and Easter Wishes die set. I used vellum for the shadow and simple black cardstock for the sentiment itself.

SWEET BUNNY TREAT

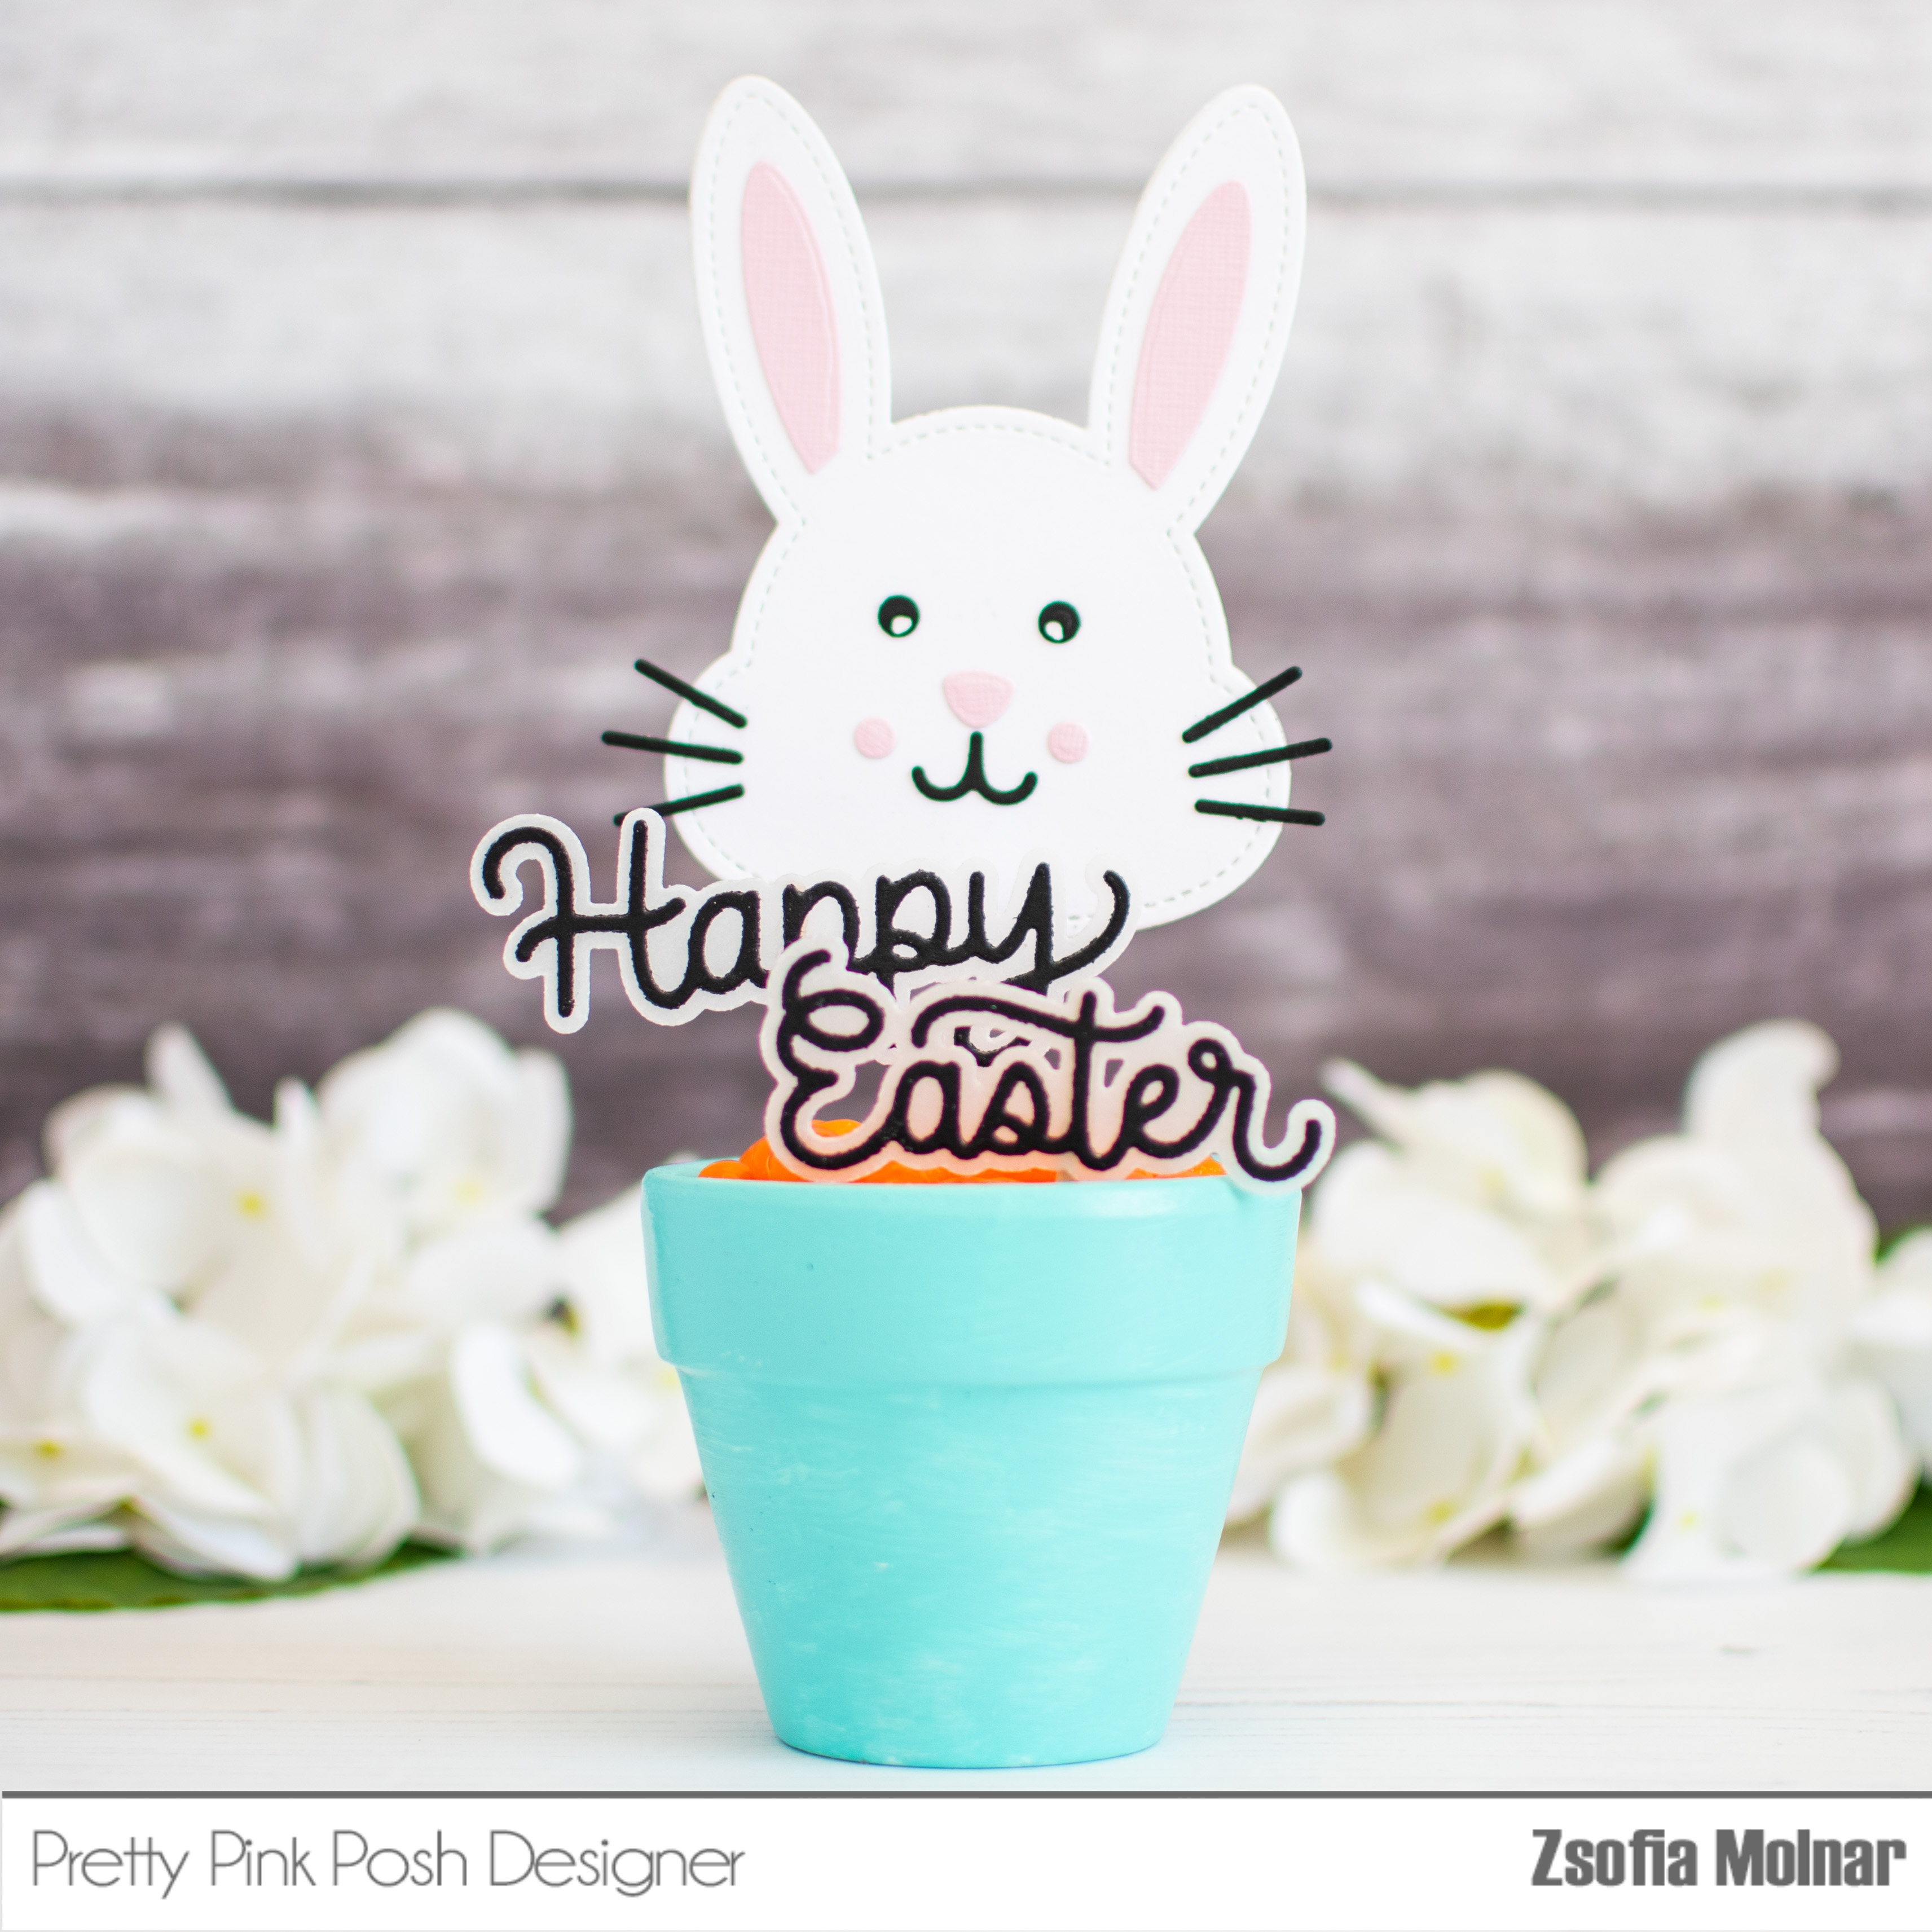
For the small treat I painted a tiny pot with pastel aqua acrylic paint, filled it with orange jelly beans and added the bunny face and sentiments on toothpicks to it. So easy to make, yet so pretty! Perfect for the kids!

BUNNY CARD

I really wanted to make a matching card and I was giddy to figure out how well the Layered Bunny Faces stencil matches the Bunny Face Shaker die set! So I applied white pigment ink on teal cardstock with Layer A of the stencil set and dried it with my heat tool before adding the eyes and mouth with black and nose and ears with pink inks. It is so subtle and cute!

When it was dry, I cut it down with a Stitched Torn Rectangle die, adhered it to a white card base and adorned it with the same sentiment.

GIVEAWAY

Leave a comment on each stop of the blog hop and you may be one of the lucky winners! They are giving away 3 $30 gift certificates to random comments (1 winner each day) left before March 13, 2024 at 11:59 PM PST. The winners will be announced on the PPP blog, so be sure to return and see if you are one of them! The last day blog hop list:

Pretty Pink Posh blog 
Amanda Wilcox
Dana Kirby
Annette Allen
Zsofia Molnar – you are here
Jeanne Jachna
Heather Hoffman
Gemma Campbell

I hope you enjoyed my inspiration and will pop in again soon.

See you,

Zsofi

Pretty Pink Posh Birthday Blog Hop

Hello Everyone,

Pretty Pink Posh is turning 10 this month and we celebrate with a gorgeous new release, a fun Blog Hop, freebies with purchase and more! I am so grateful to be part of this awesome party, I am a fan of all Pretty Pink Posh products ever since Paulina brought out her first sequins. But enough of being sentimental, let’s dive in the fun!

For today I created cute little treat boxes with the new Birthday Treat Box die set. I cut the base 2 times from aqua cardstock for each treat box, folded them at the scorelines and adhered them together with score-tape. It is ready super fast! I knew I wanted to put some candles in one and flowers in the other, so I adhered a piece of cardstock in the middle of each to have something to add my die cuts to. I also added green rice paper which I always save when I get a package. It makes the treat boxes so festive!

I used the candle die from the same set and cut it 3 times from white cardstock. I used Copic markers to colour the flames. I die cut some flowers from white cardstock and leaves from green cardstock using the Spring Foliage die set. I coloured the flower centers with Copics and assembled the bouquet.

I adhered both the candles and the flowers to that middle piece of cardstock with liquid glue. I could easily hide a gift card or small chocolate pieces behind them, isn’t it cool?

For the sentiments I chose the new Happy Birthday Shadow die and the Smile Shadow die from an older release. I cut the text from gold sparkle cardstock and the shadow from white, used liquid glue to adhere them together and secured them on the treat boxes.

As a finishing touch I used a clear shimmer pen on the flames and flower centers.

GIVEAWAY

Pretty Pink Posh has a freebie with purchase and a sale as part of the festivities.

Also if you leave a comment on each stop of the blog hop, you may be one of the lucky winners! They are giving away 5 $30 gift certificates to random comments (1 winner each day) left before February 16, 2024 at 11:59 PM PST. The winners will be announced on the PPP blog, so be sure to return and see if you are one of them! The last day blog hop list:

Blog Hop Day 5

Pretty Pink Posh blog

Tammy Stark

Barbara Tarayao

Jeannie Lieu

Zsofia Molnar – you are here

Melody Rupple

Heather Hoffman

I hope you enjoyed my project and got inspired. Please pop in again soon for more cuteness.

See you,

Zsofi

Pretty Pink Posh January Blog Hop – Day 2

Hello Everyone,

Happy New Year to all of you! I am so excited to be part of the new release blog hop for Pretty Pink Posh this month, what a better start of a crafty 2024 than showcasing a gorgeous new release. The January release is all about love and luck, beautiful new stencils, stamps and dies all related to Valentine’s Day and St. Patrick’s Day. Join us for an incredible amount of inspiration!

For my card I chose the Valentine Cupcakes set, stamped and coloured 3 of the cute cupcakes using Copic markers. I die cut them with their coordinating dies.

While I was die cutting I also cut the new Heart Cover Plate die twice: once from pink and once from aqua cardstock and paper pieced a beautifully stitched background on a white A2 sized notecard. I popped up the coloured cupcakes with 3D foam squares on every second heart.

For the sentiment I white heat embossed two short ones from the Sentiment Strips: Valentine stamp set on black cardstock and cu them to small strips. I adhered them under the middle cupcake using liquid glue.

As embellishment I adhered a few clay hearts from the Colourful Hearts Clay Confetti mix to the background. I also adorned the cupcakes with clear glitter pen and glossy accents for a shiny, dimensional look.

GIVEAWAY

Make sure that you leave comments on each stop of the hop. Pretty Pink Posh is giving away 3 $30 gift certificates to three random comments (1 winner each day) left before January 11, 2024 at 11:59 PM PST. Winners will be announced next week on the PPP Blog. Here is the Blog Hop list for Day 2:

Pretty Pink Posh blog 
Amy Rysavy
Laura Bassen
Kristie Marcotte
Marine Simon
Lisa Mears
Sindhu Prajay
Dana Kirby
Zsofia Molnar
– you are here

I hope you enjoyed today’s inspiration and will pop in again soon for more cuteness.

See you,

Zsofi

PPP August Release Blog Hop

Hello Everyone,

Long time no post, but I am thrilled to be part of the new release blog hop for Pretty Pink Posh. The August release is all about Halloween, cute and adorable designs, fabulous die sets, great stencils and fun new embellishments. Join us for an incredible amount of Halloween inspiration!

My card features the new Halloween Signs stamp and die set. I stamped and coloured the images with Spectrum Noir Illustrator markers and cut everything out with their coordinating dies.

As I could not decide which image to us as focal point, I came up with a simple design idea which uses all of them on one card. For the background I simply took a piece of black cardstock and added a bit of shading to the edges with white pigment ink and a sponge dauber. It gives it a mysterious feeling, I love it. Then I used copper ad white metallic paints to add splatters to the whole panel. I also added white acrylic paint splatters and dried it with my heat tool. Then I spritzed the whole panel with shimmer mist for a subtle sparkle. So easy yet special background!

I used thick 3D foam tape to mount the images. Then I used a white gel pen to add highlights and a black glaze pen to make the eyes of the critters shiny.

I also emphasized some details with glossy accents.

Look at that spider, isn’t it adorable?

GIVEAWAY

Be sure to leave comments on each stop of the hop. Pretty Pink Posh is giving away 3 $30 gift certificates to three random comments (1 winner each day) left before August 15, 2023 at 11:59 PM PST. Winners will be announced next week on the PPP Blog, so be sure to return and see if you are one of the winners.

BLOG HOP DAY 3

Pretty Pink Posh blog

Rachel Alvarado

Dana Kirby

Kristie Marcotte

Rebecca Keppel

Zsofia Molnar – you are here

Stefanie Loh

Tammy Stark

I hope you enjoyed all 3 days of the blog hop and ready to start Halloween crafting full of new ideas. If you like my card, please follow me on Instagram where I share more of my happy cards.

See you,

Zsofi

Pretty Pink Posh June Release Blog Hop!

Hello Everyone,

Welcome to the Pretty Pink Posh June Release Blog Hop Day 3! I am so happy to be part of such a lovely event with a fresh. summer card. I mixed and matched a few sets from the new release, let me guide you through the process.

First I stamped and coloured the images from the Citrus stamp set using Copic markers, and cut them all out with their coordinating dies.

While I was die cutting, I created the background panel from patterned paper (Doodlebug Design Bar-b-cute paper pad) and a Wonky Stitched rectangle die. I used a smaller die to cut a piece of vellum to mute the pattern a little.

For the sentiment I chose the Large Smile Shadow die set and cut it from orange cardstock 2 times and once from metallic orange foil cardstock. The shadow I cut from white and layered all the pieces on top of each other. It looks so shiny and dimensional! I assembled the card as on the picture, using the fruits and sentiment to hide the adhesive and keep the vellum piece in place. I also added a heat embossed sentiment on a black strip of cardstock using 3D foam squares.

As a finishing touch I added clear shimmer to the fruit slices and glossy accent to their skin. I used a few of the tiny flowers from the Citrus stamp set as embellishment also on the sentiment. A tiny Marshmallow Pearl in the middle of the flowers made them even cuter, don’t you think?

GIVEAWAY

Make sure to leave comments on each stop of the hop for a chance to win one of the three $30 gift certificates. Winners will be selected randomly from each day’s comments left before June 14, 2023 at 11:59 PM PST. Winners will be announced next week on the Pretty Pink Posh Blog.

Pretty Pink Posh blog

Raquel Arribas

Wanda Guess

Lindsey Larsen

Marine Simon

Jeanne Jachna

Lauren Taylor

Zsofia Molnar -> you are here

I hope you enjoyed the hop today and got inspired by all the talented designers. If you like my cards, please follow me on Instagram, where I share even more of my creations.

Thank you for stopping by and see you soon,

Zsofi

Pretty Pink Posh Birthday Release Blog Hop

Hello Everyone,

I am so excited to be part of the new release blog hop with Pretty Pink Posh! They are turning 9 this month and the we celebrate in style with a 4 days long blog hop. The new release is full of birthday themed stamps, dies and stencils, check them out!

For my card I used the Birthday Signs stamp set and stamped the cute crocodile and cupcakes on Neenah Solar White cardstock. I coloured the images with Copic markers and cut them out with their coordinating dies.

While I was die cutting I die cut also 2 tags using the Birthday Sentiments coordinating die set: one white and one aqua as I wanted to make them a see-through shaker tag. I covered the open areas with acetate and used thin foam strips to create a funnel which I filled with Citrus Mix jewels. I also added a decorative eyelet to the top and finished it off with twine. I adhered the croc and the cupcakes and my focal panel was ready!

For the background I used the new Layered Party Hats stencils on lime cardstock. For the first layer I used Twisted Citron Distress Oxide ink, then for the second and third layers I used Mowed Lawn Distress Oxide ink. I love the tone-on-tone look I got this way! To match the party hat of the crocodile, I used Blueprint Sketch Distress Oxide for the little star layer, I think it really pops!

I wanted to add another sentiment, so I used the Large Celebrate Shadow die ad cut it from blue metallic cardstock. I wanted it to look as it is foiled, so I did not use the shadow die for it.

As a finishing touch I added a bit of clear shimmer to the party hat and cupcake holders, and added glossy accents tot he candle and the teeth of the croc.

FREE GIFT AND SALE

Pretty Pink Posh has a special gift offer and discount code to celebrate their birthday!

GIVEAWAY

Pretty Pink Posh blog 
Cathy Zielske
Lauren Taylor
Lindsey Larsen
Stefanie Loh
Tina Smith
Zsofia Molnar
– you are here

Be sure to leave comments on each stop every day. 8 $25 gift certificates will be given away to eight random comments (2 winners each day) left before February 15, 2023 at 11:59 PM PST. Winners will be announced next week on the Pretty Pink Posh blog.

I wish you enjoyed my card and will pop in again soon. If you like my style, please follow me on Instagram where I share my creations, sometimes with extra tips.

See you,

Zsofi

Pretty Pink Posh January Release Blog Hop – Day 1

Hello Everyone,

I am thrilled to be part of the Pretty Pink Posh January Release Blog Hop! The new supplies are all available in the shop and we just started the 3 days celebration today! Hop along with us for a fun prize!

For my card I stamped and coloured the images from Potted Roses stamp set using Copic markers. The colours I used are: R89, R37, R35, E57, E99. E15, E13, YG67, YG17, YG03. I used the coordinating dies to cut them all out.

Then I created an elegant tone-on-tone background: I die cut the Pretty Petals background die from white cardstock and adhered it to an A2 sized notecard. I love the texture it gives!

I also die cut the Large Hugs Shadow die from gold glitter cardstock and the shadow piece from black cardstock. It really gives a nice contrast and helps the sentiment to pop out. I also white heat embossed the second part of the sentiment from the Potted Roses stamp set on red cardstock and cut it down to be a tiny strip.

I popped up the roses with 3D foam squares and adhered the sentiments. As a finishing touch I used a clear shimmer pen and added a couple of Sparkling clear gems.

GIVEAWAY

Hop along with us and leave comments on each stop to be eligible to win one of the three $30 gift certificates. Winners will be chosen randomly (one winner each day) from the comments left before January 12, 2023 at 11:59 PM PST. Winners will be announced next week, so be sure to check the Pretty Pink Posh blog to see if you are one of the winners.

Participants on Day 1:

Pretty Pink Posh blog
Caly Person
Raquel Arribas
Melissa Phillips
Davina Cantrell
Kristie Marcotte
Zsofia Molnar
– you are here

Thank you so much for stopping by today and I hope I inspired you! I would love to know which is your favourite product from this release, if you don’t mind sharing it with me.

See you soon,

Zsofi